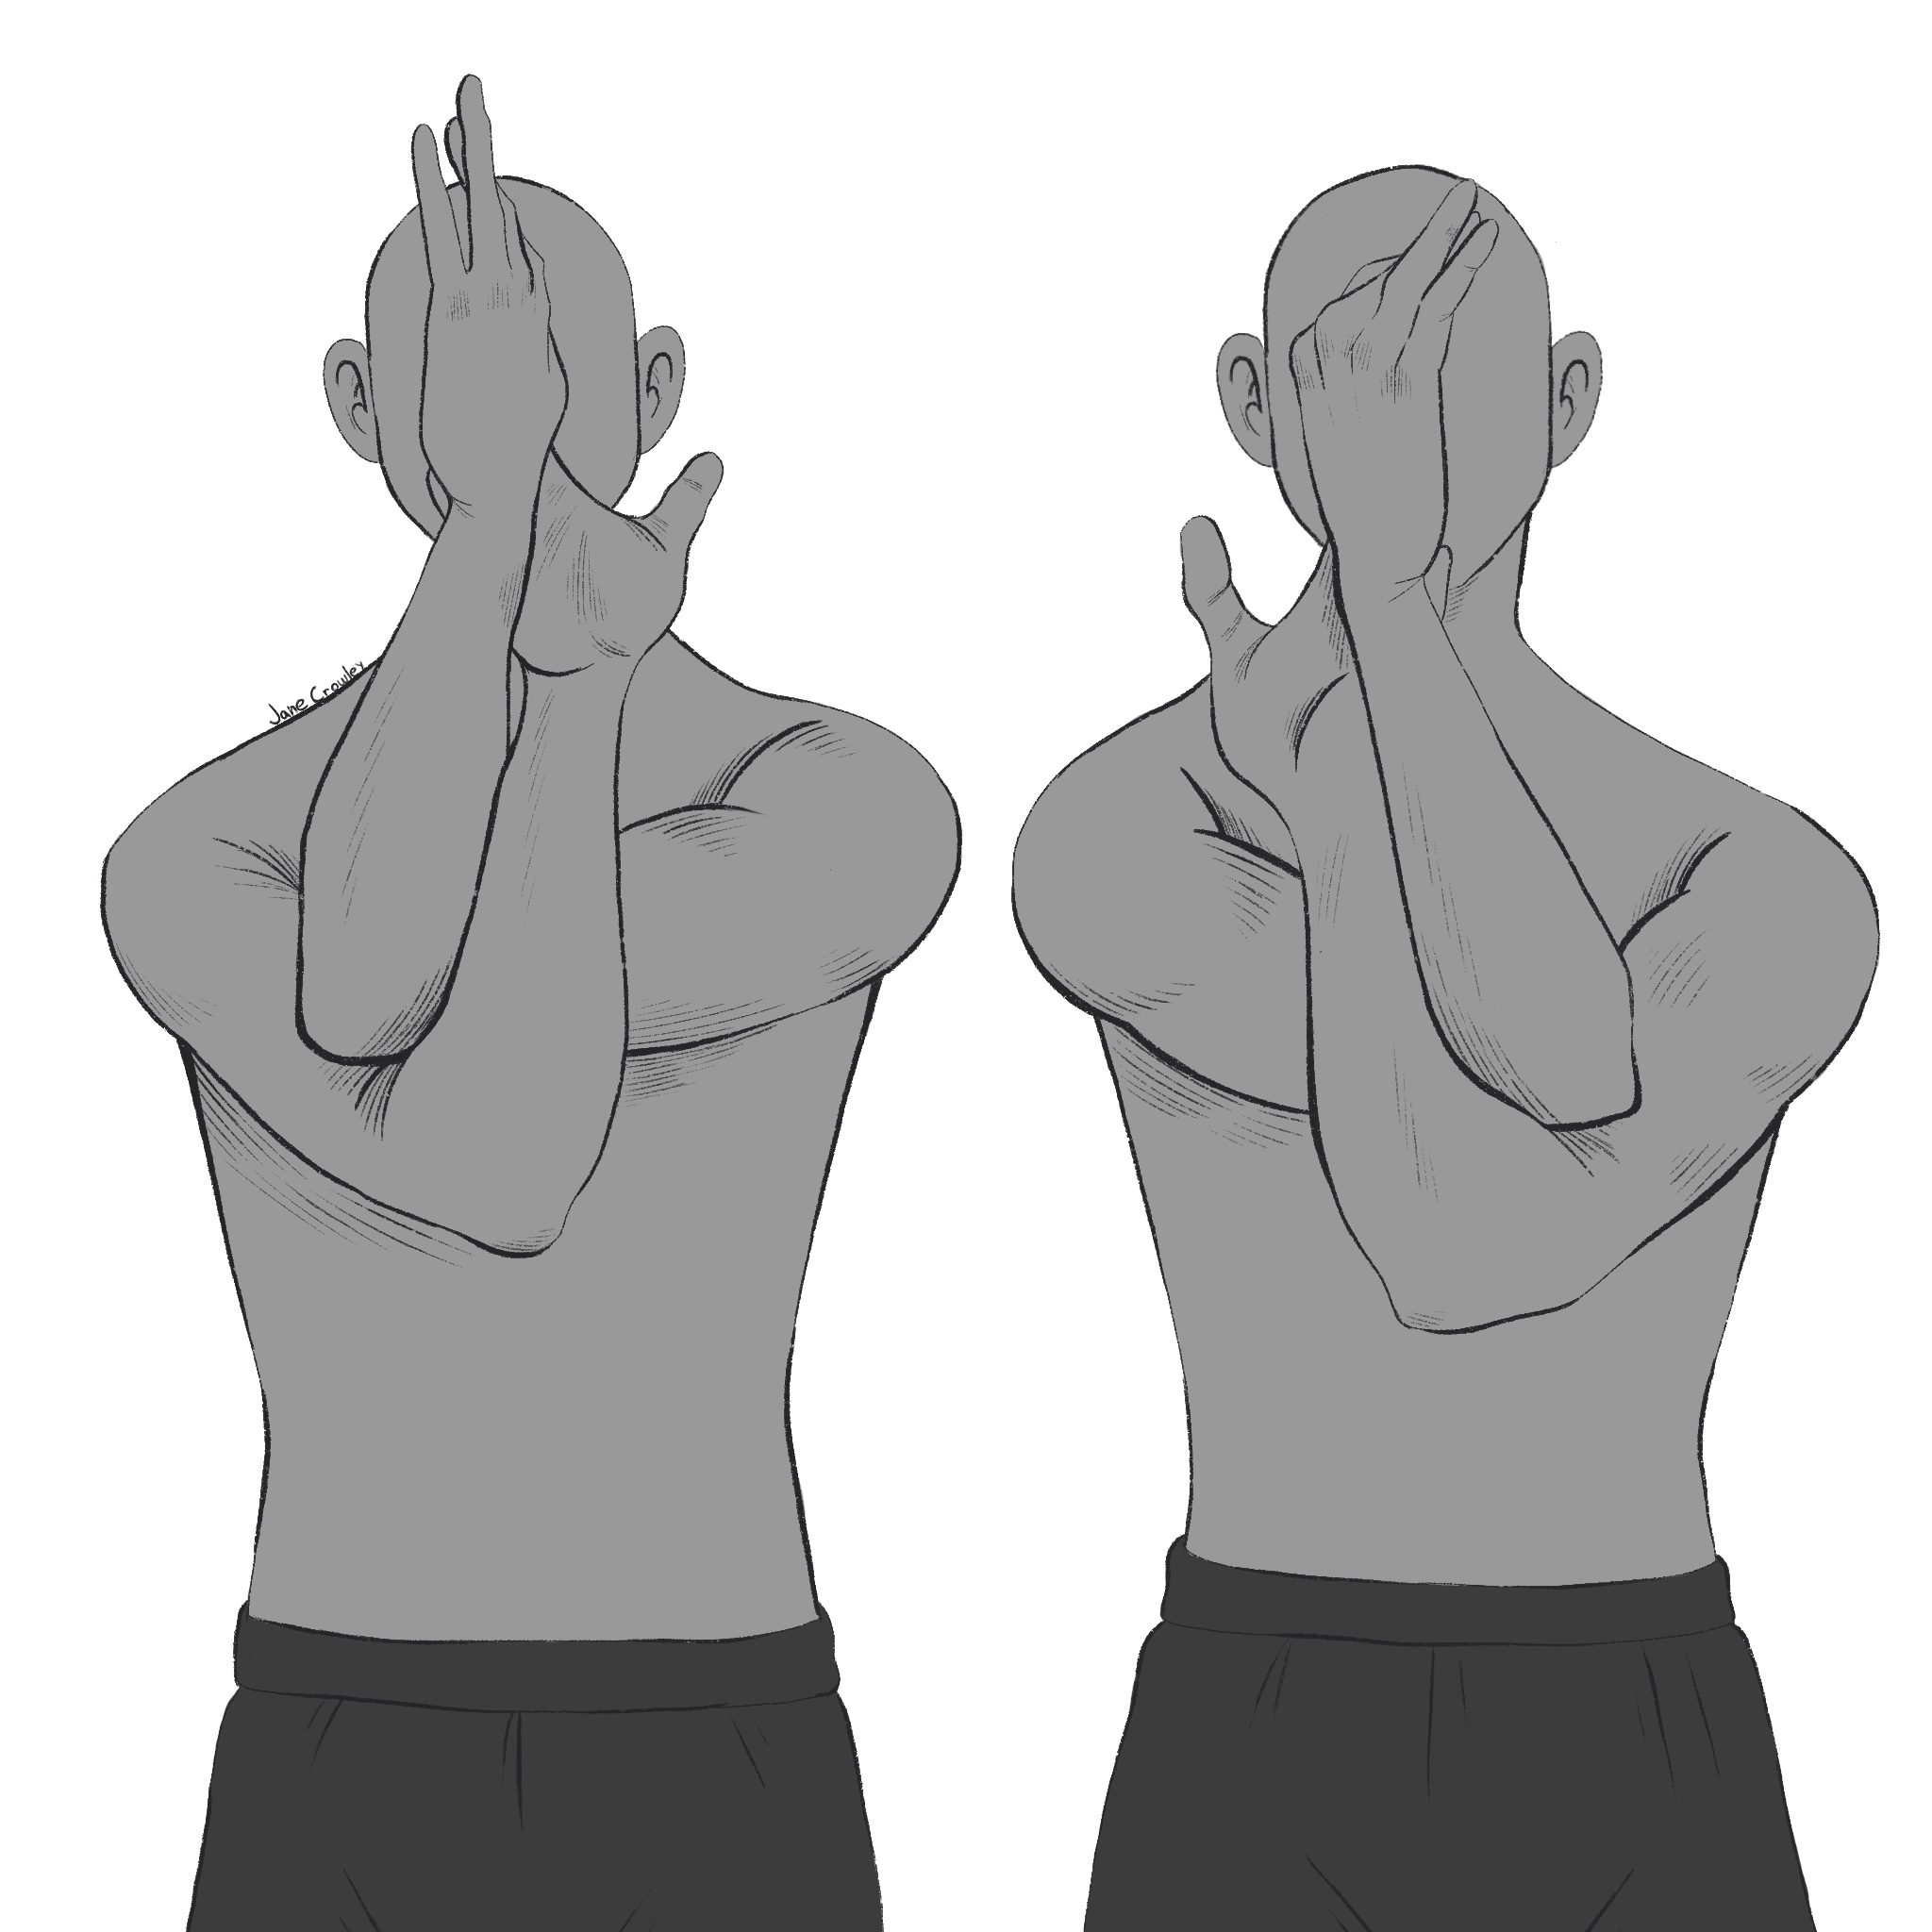
In a standing position gently swing the arms to bring them across each other, crossing above the elbows.Bend both elbows bringing the thumbs toward ones nose.Allow the underneath arm to grasp the thenar eminence (base of the thumb) of the tophand.
While holding the chin on the horizontal and stretching up through the back of the neck, lift the top of sternum (breast bone) and reach the elbows downward.
Shoulder Blade Squeeze
Standing solid on feet, pelvis in neutral position and supported from the low abdomen, roll the shoulders back and downward approximating the shoulder blades as though you were trying to hold a small object (like an olive) between the lower angle of the shoulder blades.Allow the arms to hand from the shoulders at your side and focus all the effort to the musculature between and under the shoulder blades.This is referred to as a “scapular stabilization” exercise.For most, this will also present a stretch across the front of the chest and shoulders.
Hold this posture for 5-10 long slow breaths.
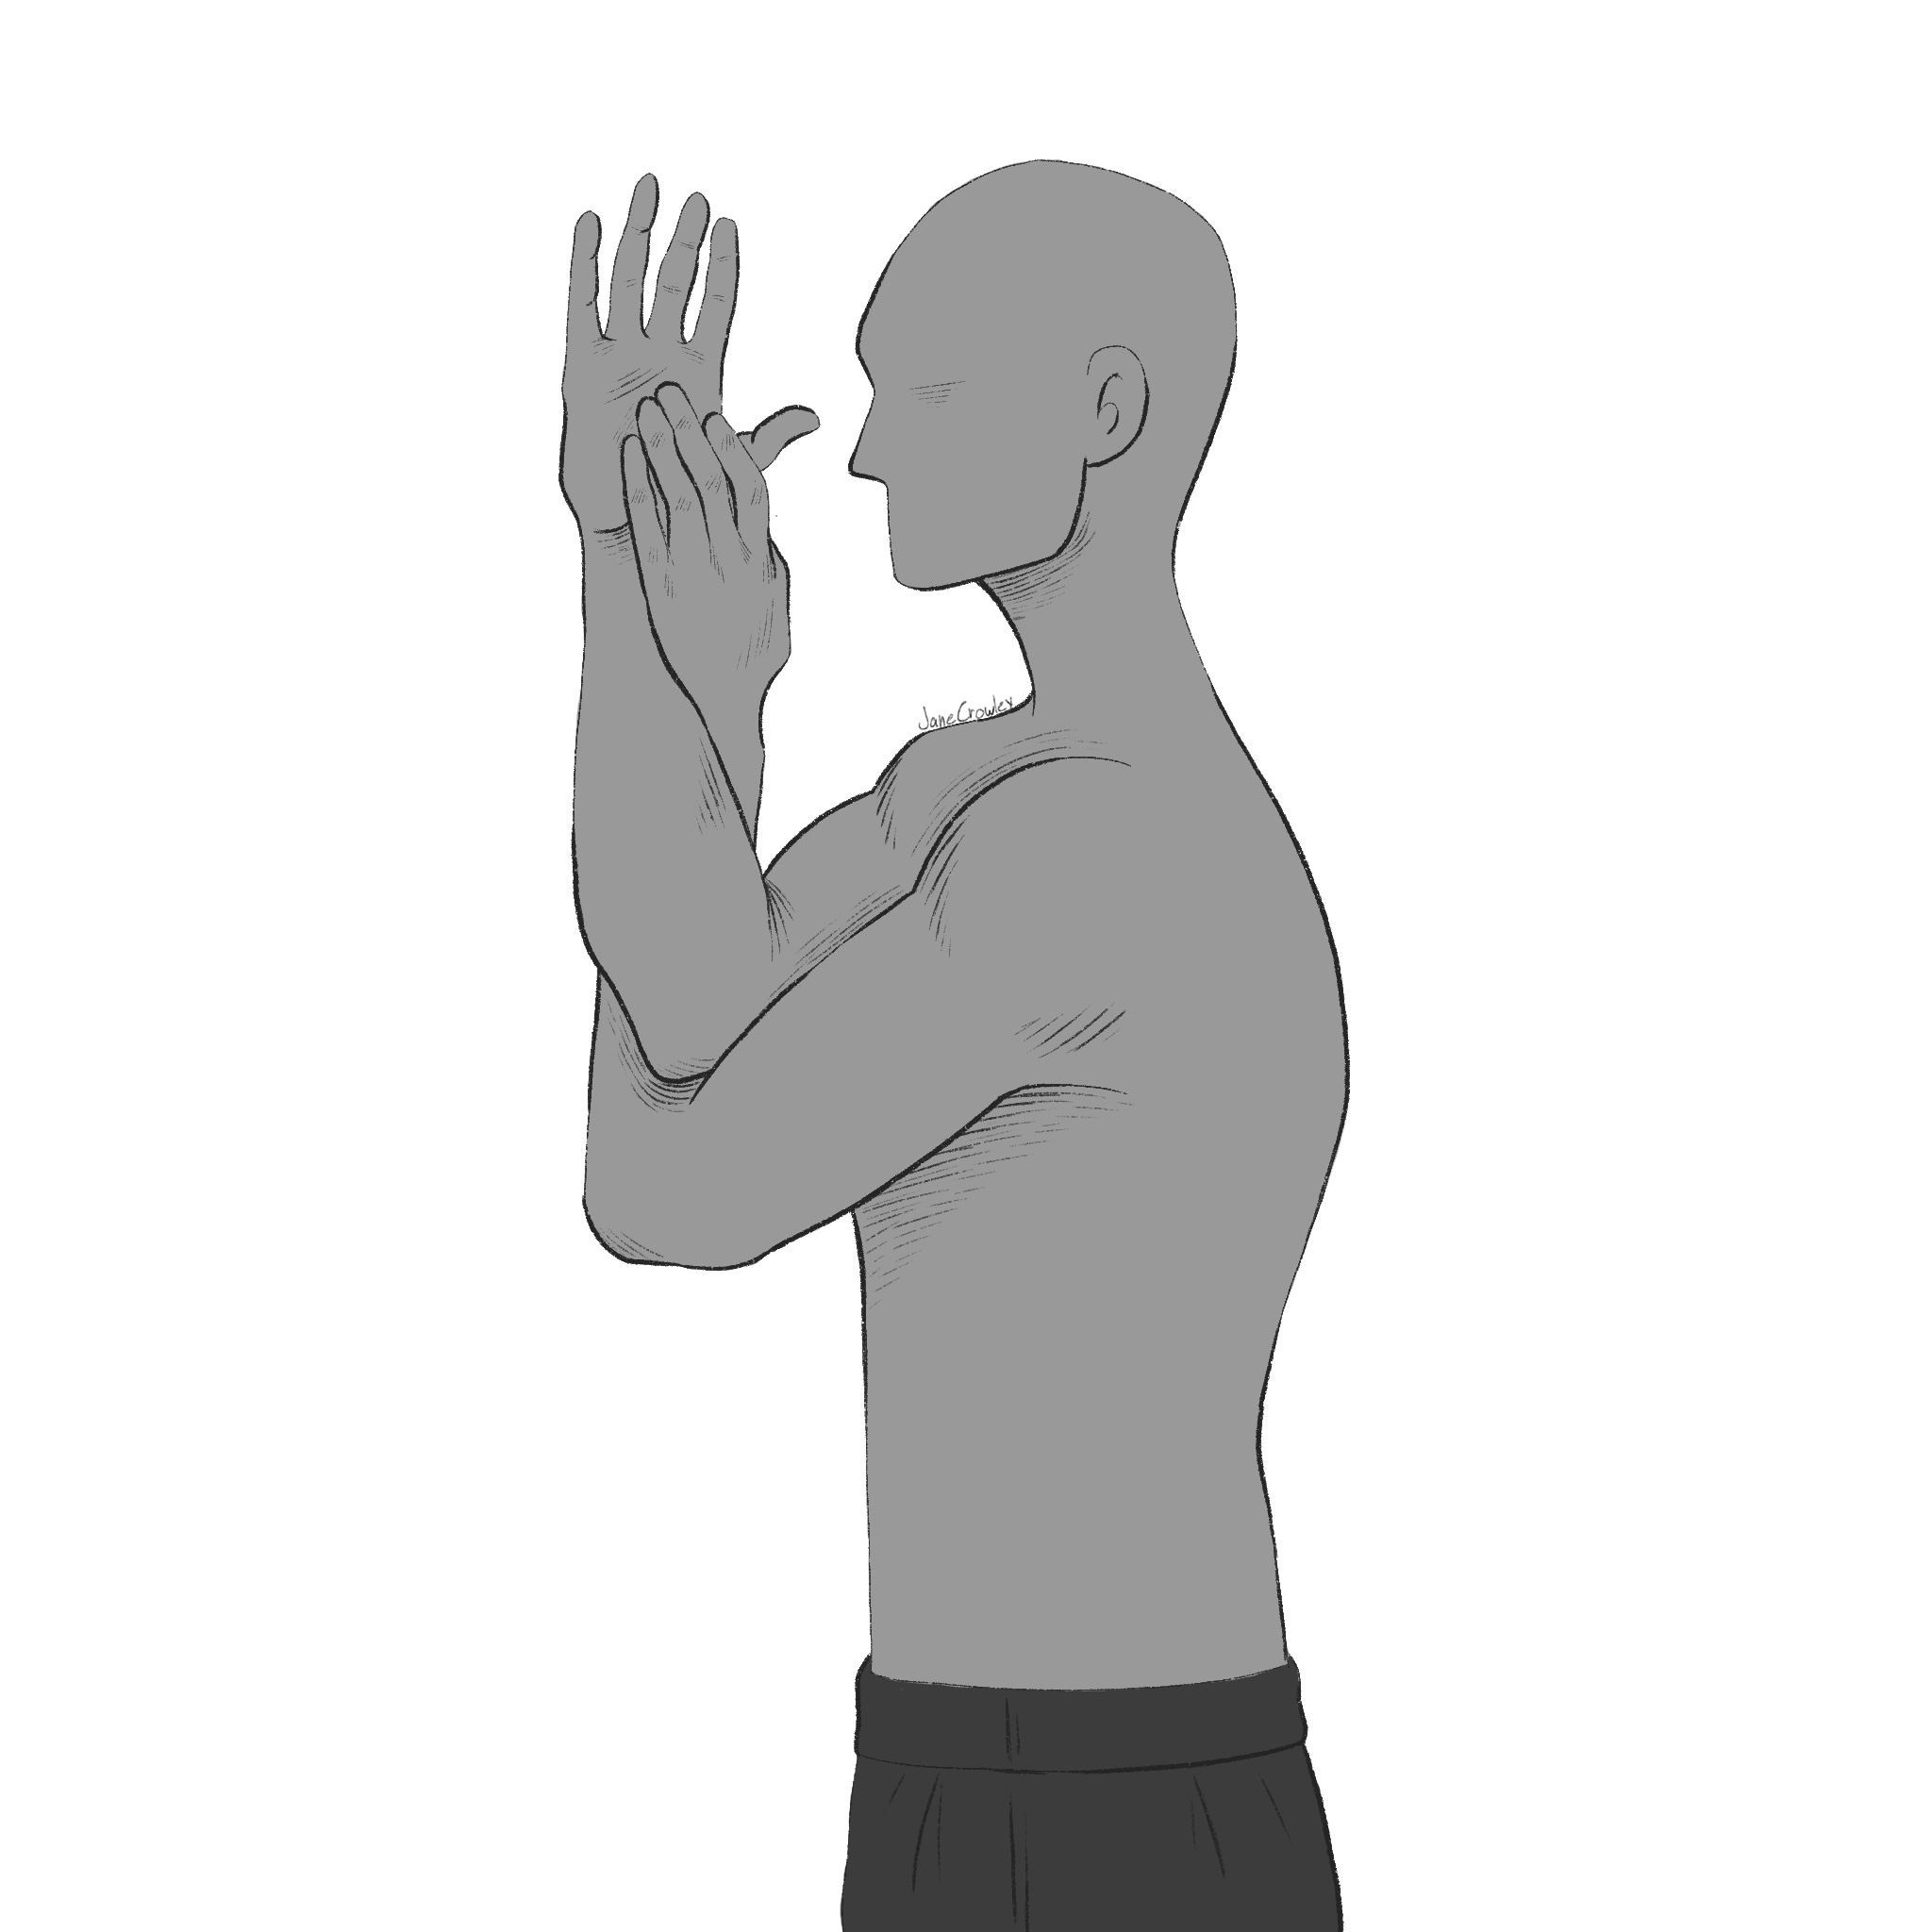
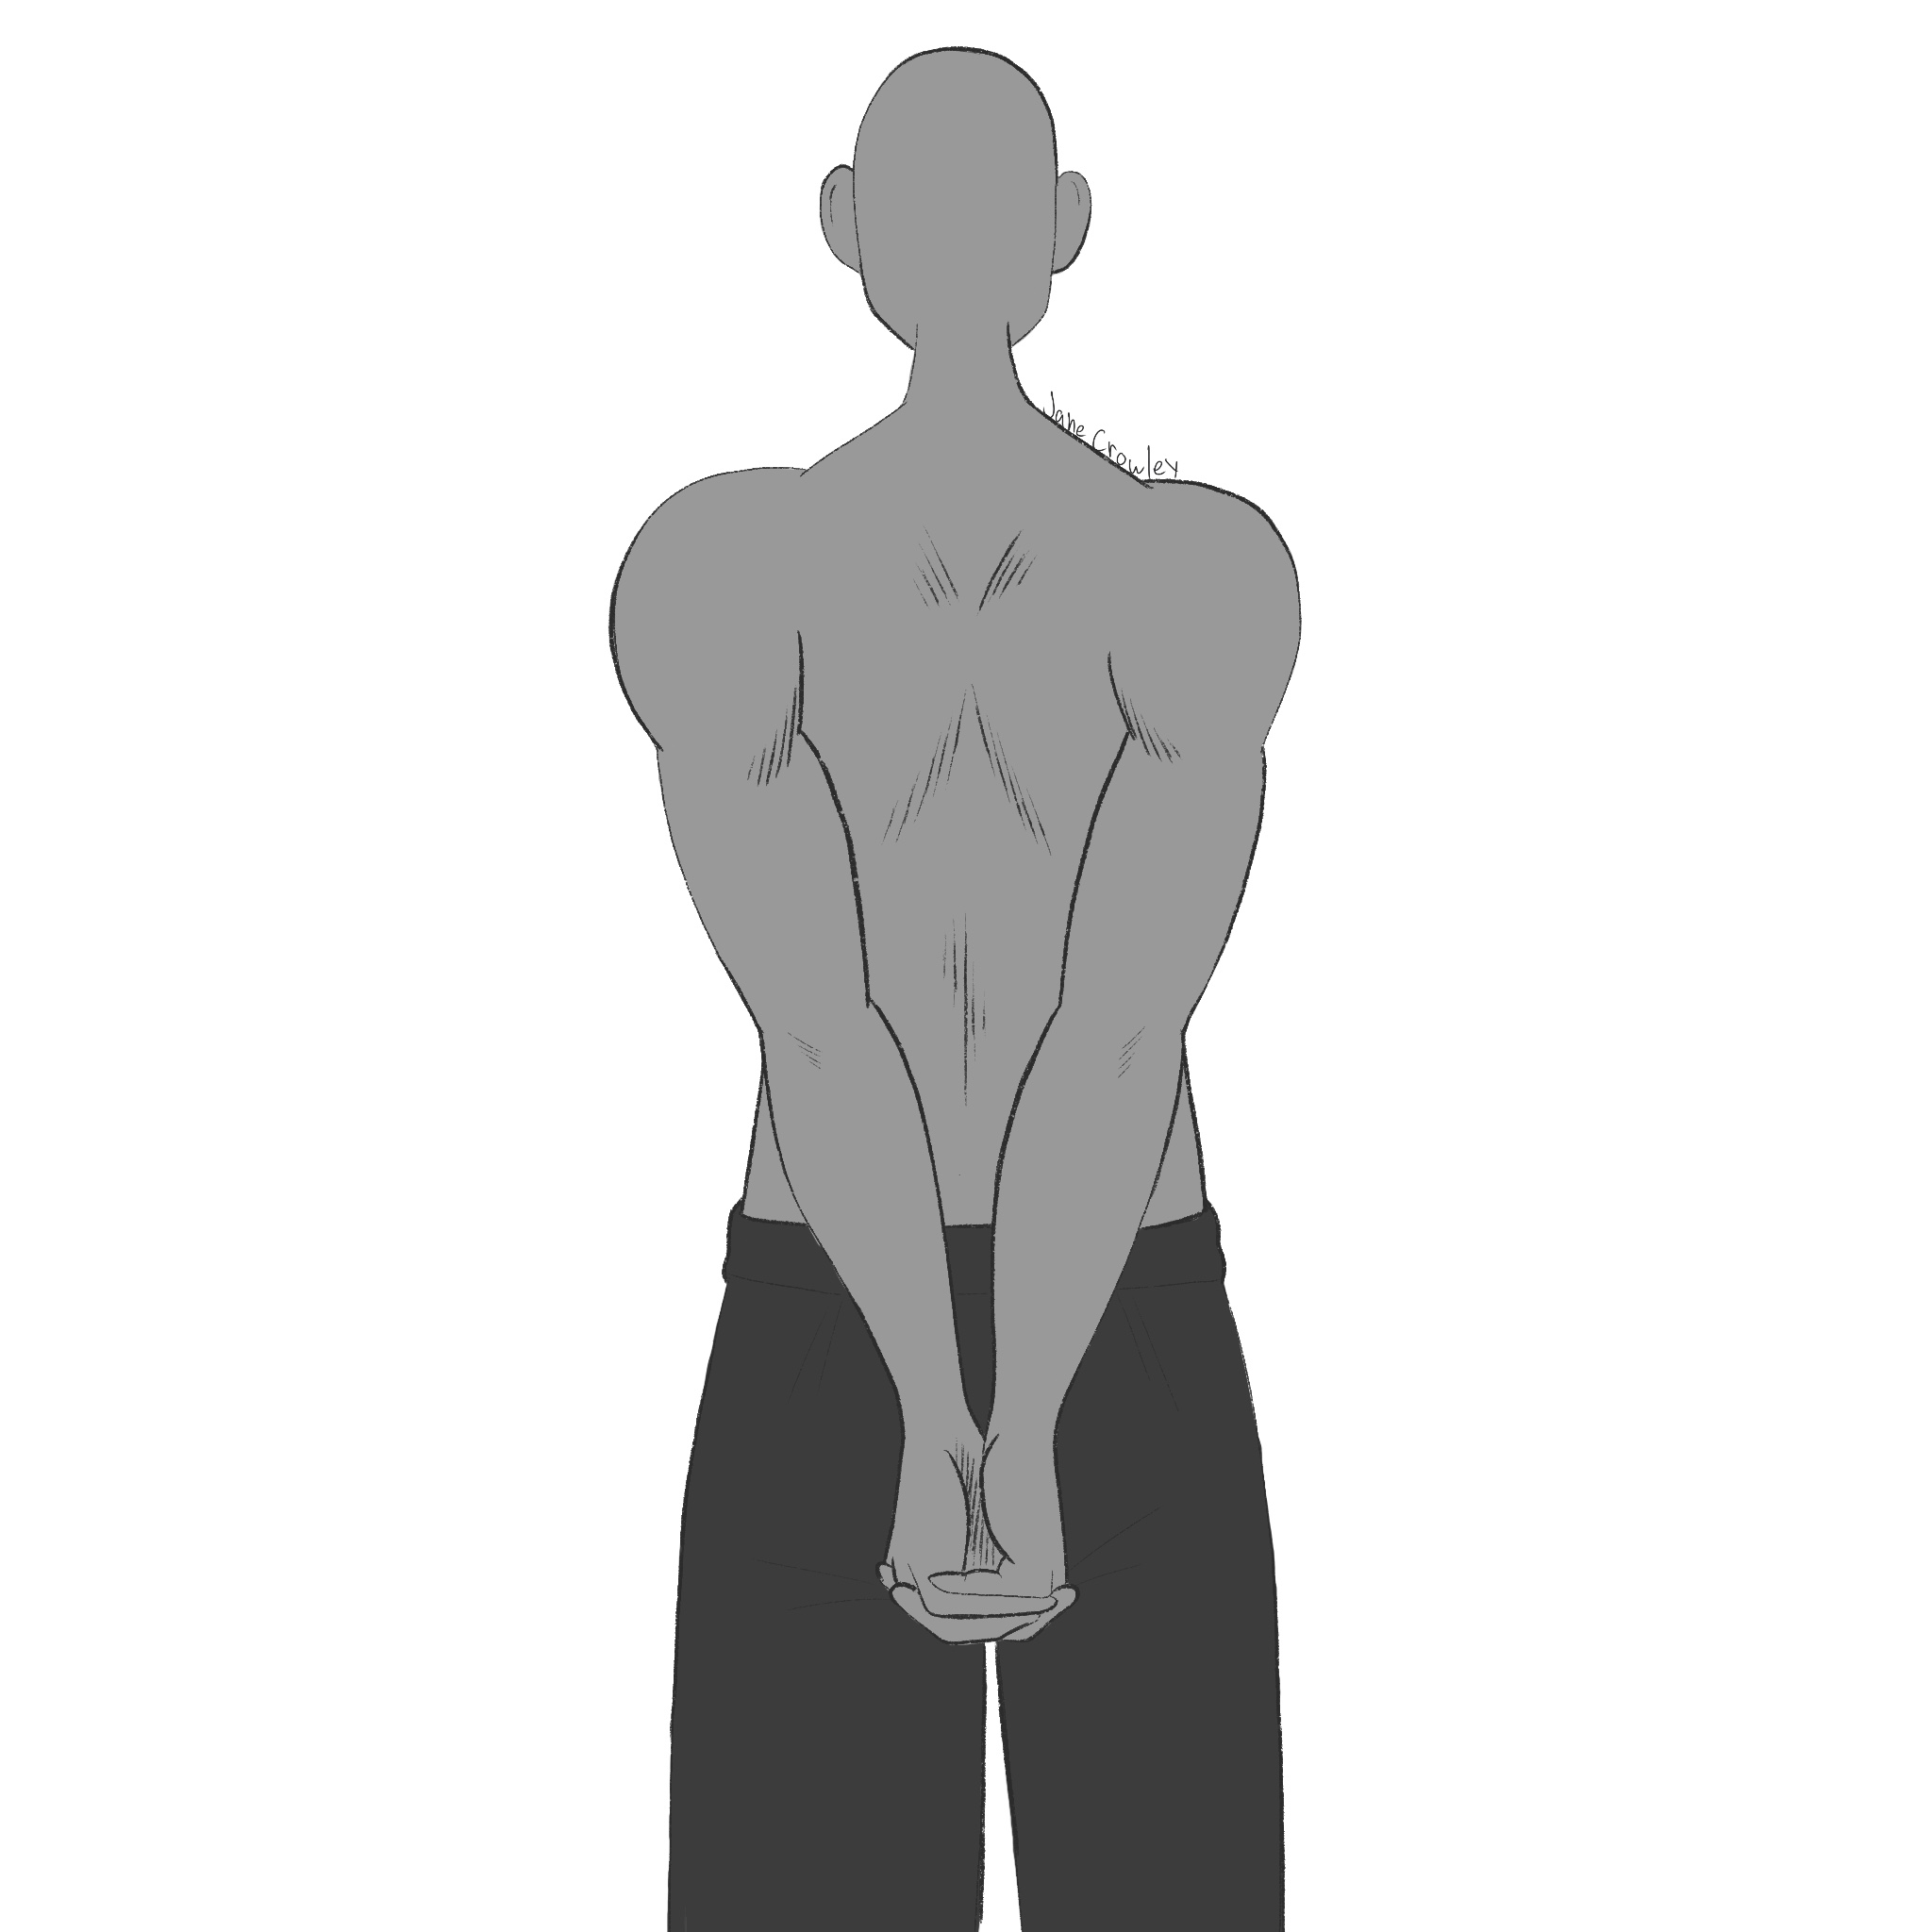
Hands Clasped Behind Back
Standing solid on feet, pelvis in neutral position and supported from the low abdomen, clasp the hands behind the back.Close the palms together and reach the hands downward.Roll the shoulders back approximating the shoulder blades and straighten the elbows.
Hold this posture for 5-10 long slow breaths.
Diaphragmatic Breathing
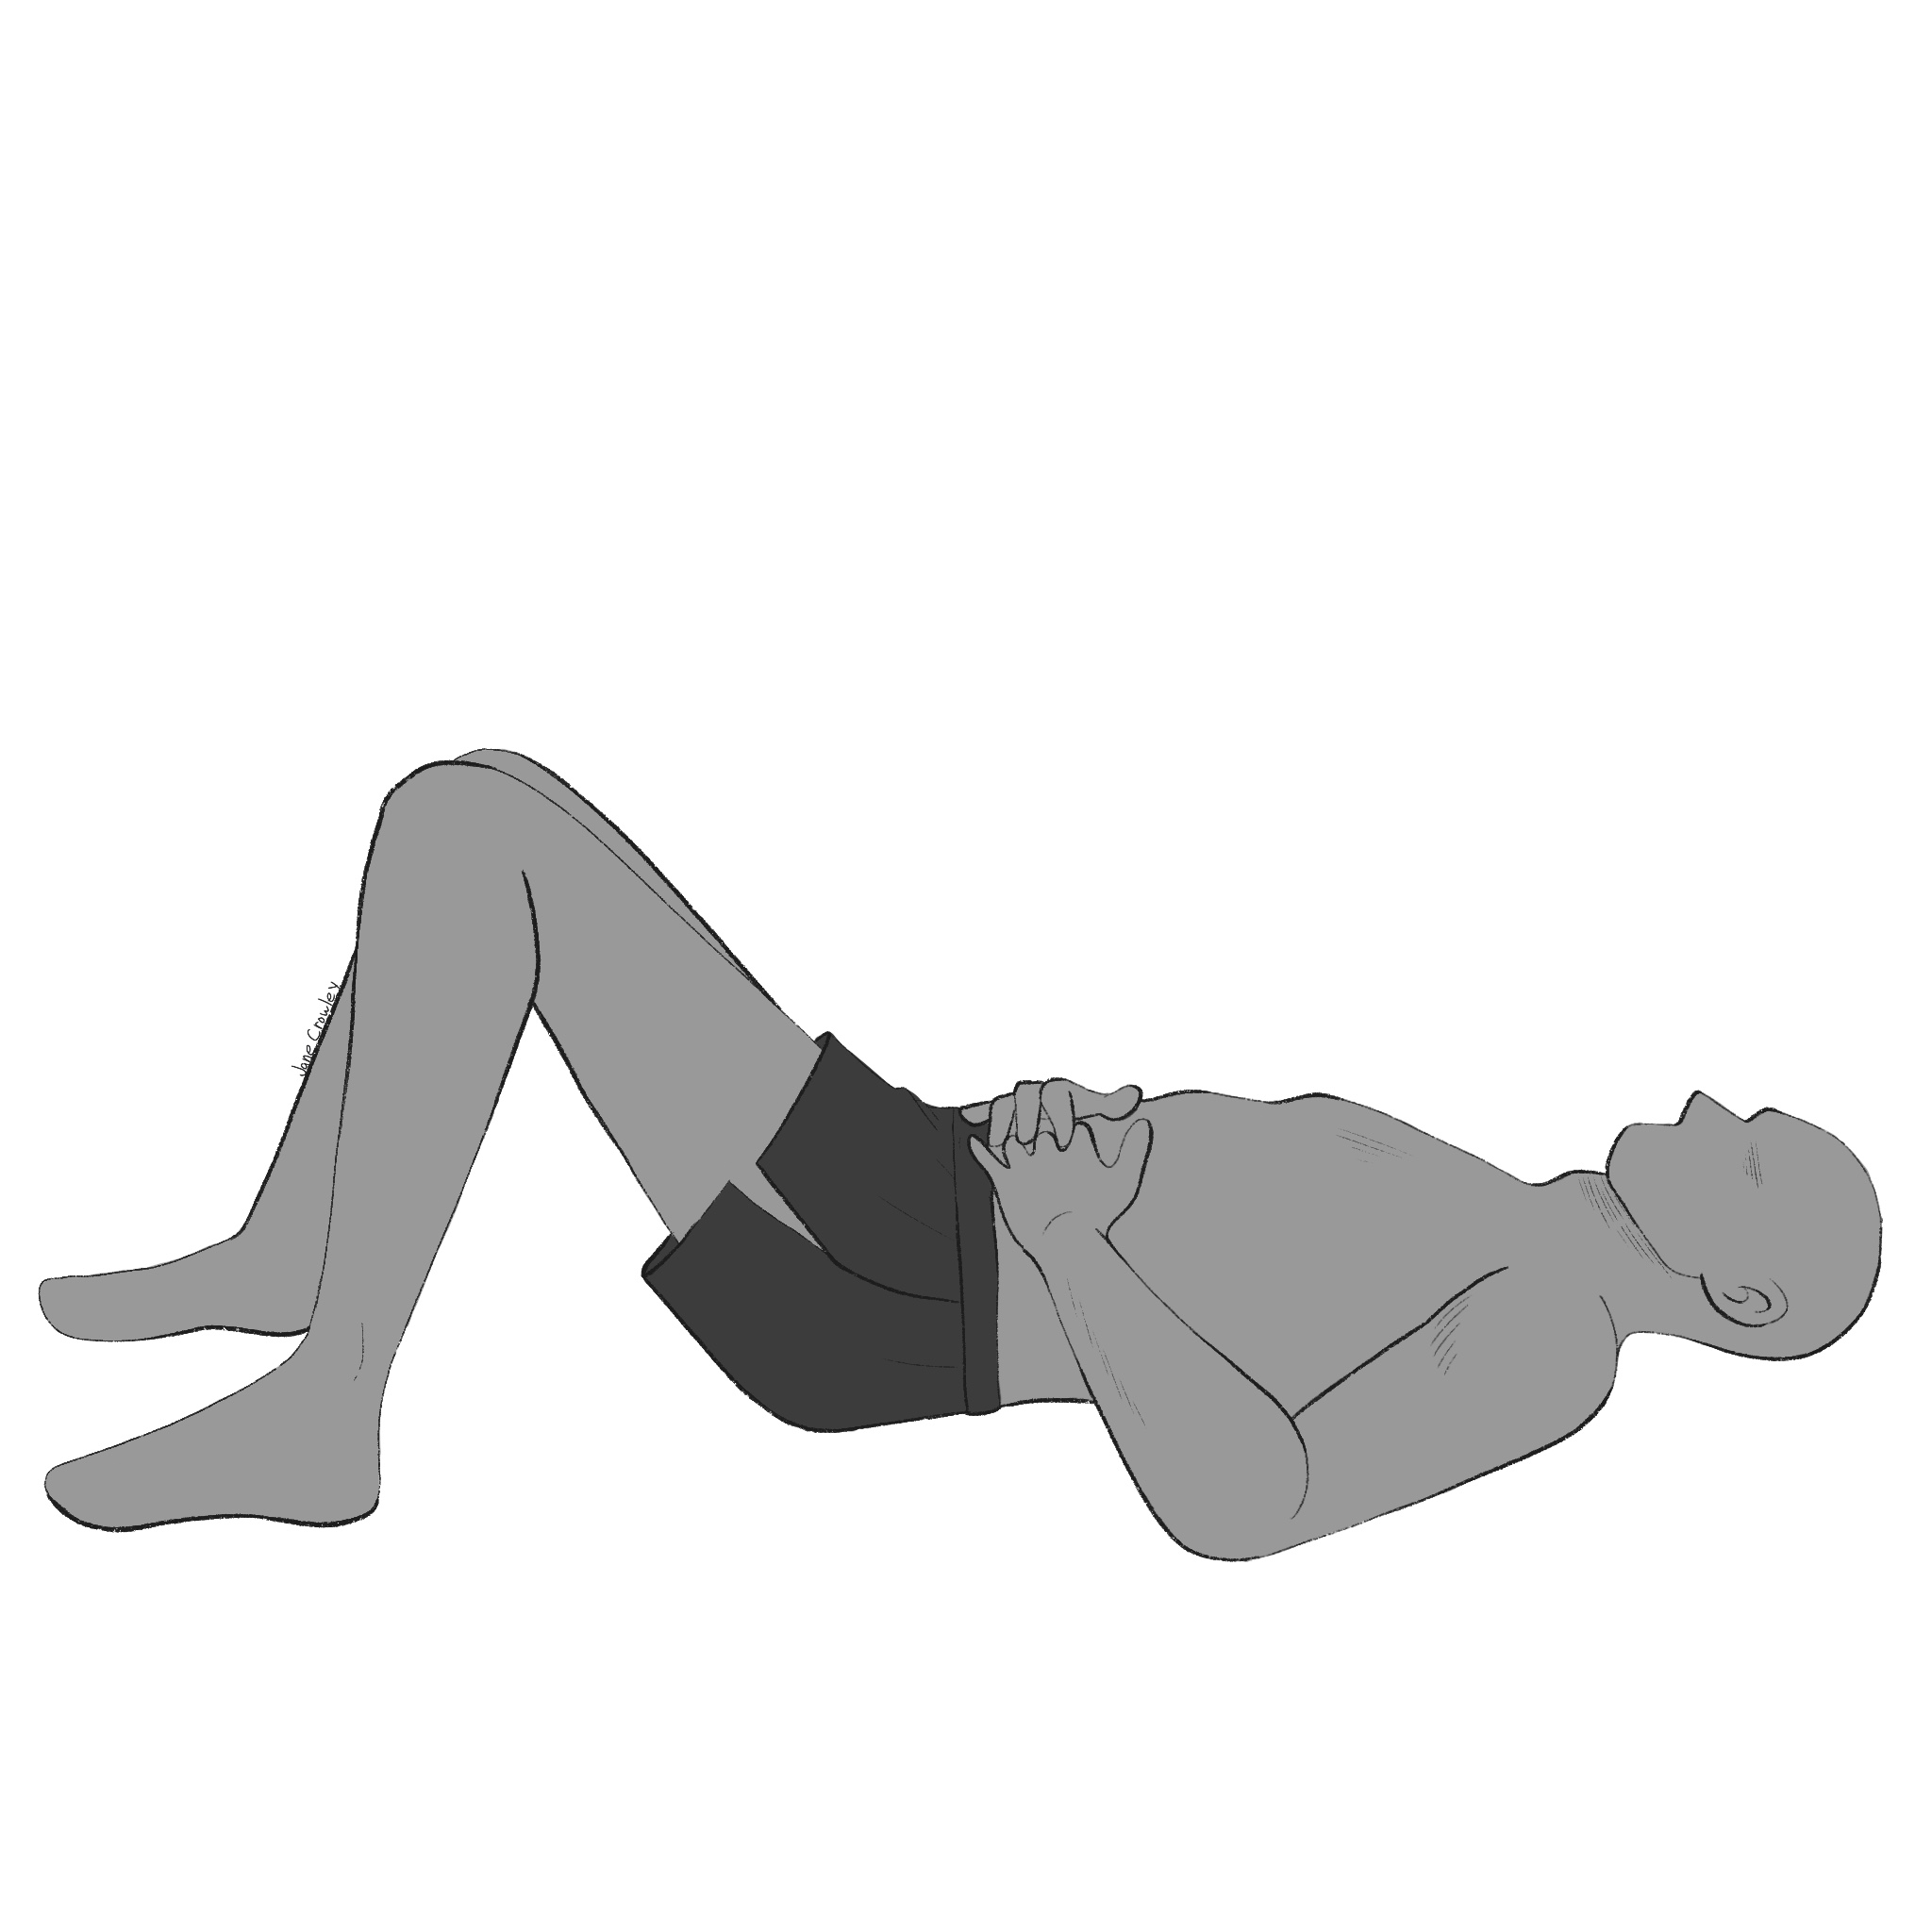
Lying on the floor (on yoga mat or rug) bend knees with feet on floor so that low back settles into the floor.Rest hands on the abdomen.Turn the heels out/toes toward midline so that knees rest against eachother.Allow the body to relax, including the tongue and eyeballs (eyes closed).
10 Passive Breaths — Allow your breath to move in and out without exerting intentional control over it.Simply observe the movement of your breath, wherever you sense the motion in your body.
10 Active Breaths — Staying as relaxed as possible, actively breath into your belly.Keep your low back supported on the floor.With the inhales allow your belly to lift your hands away from your spine.With the exhales allow the hands and belly to sink toward your spine.Keep your upper chest and shoulders and neck relaxed.Try to take the breath in and out through your nose.
10 Passive Breaths — Return to step (2) and observe any differences in the sensations
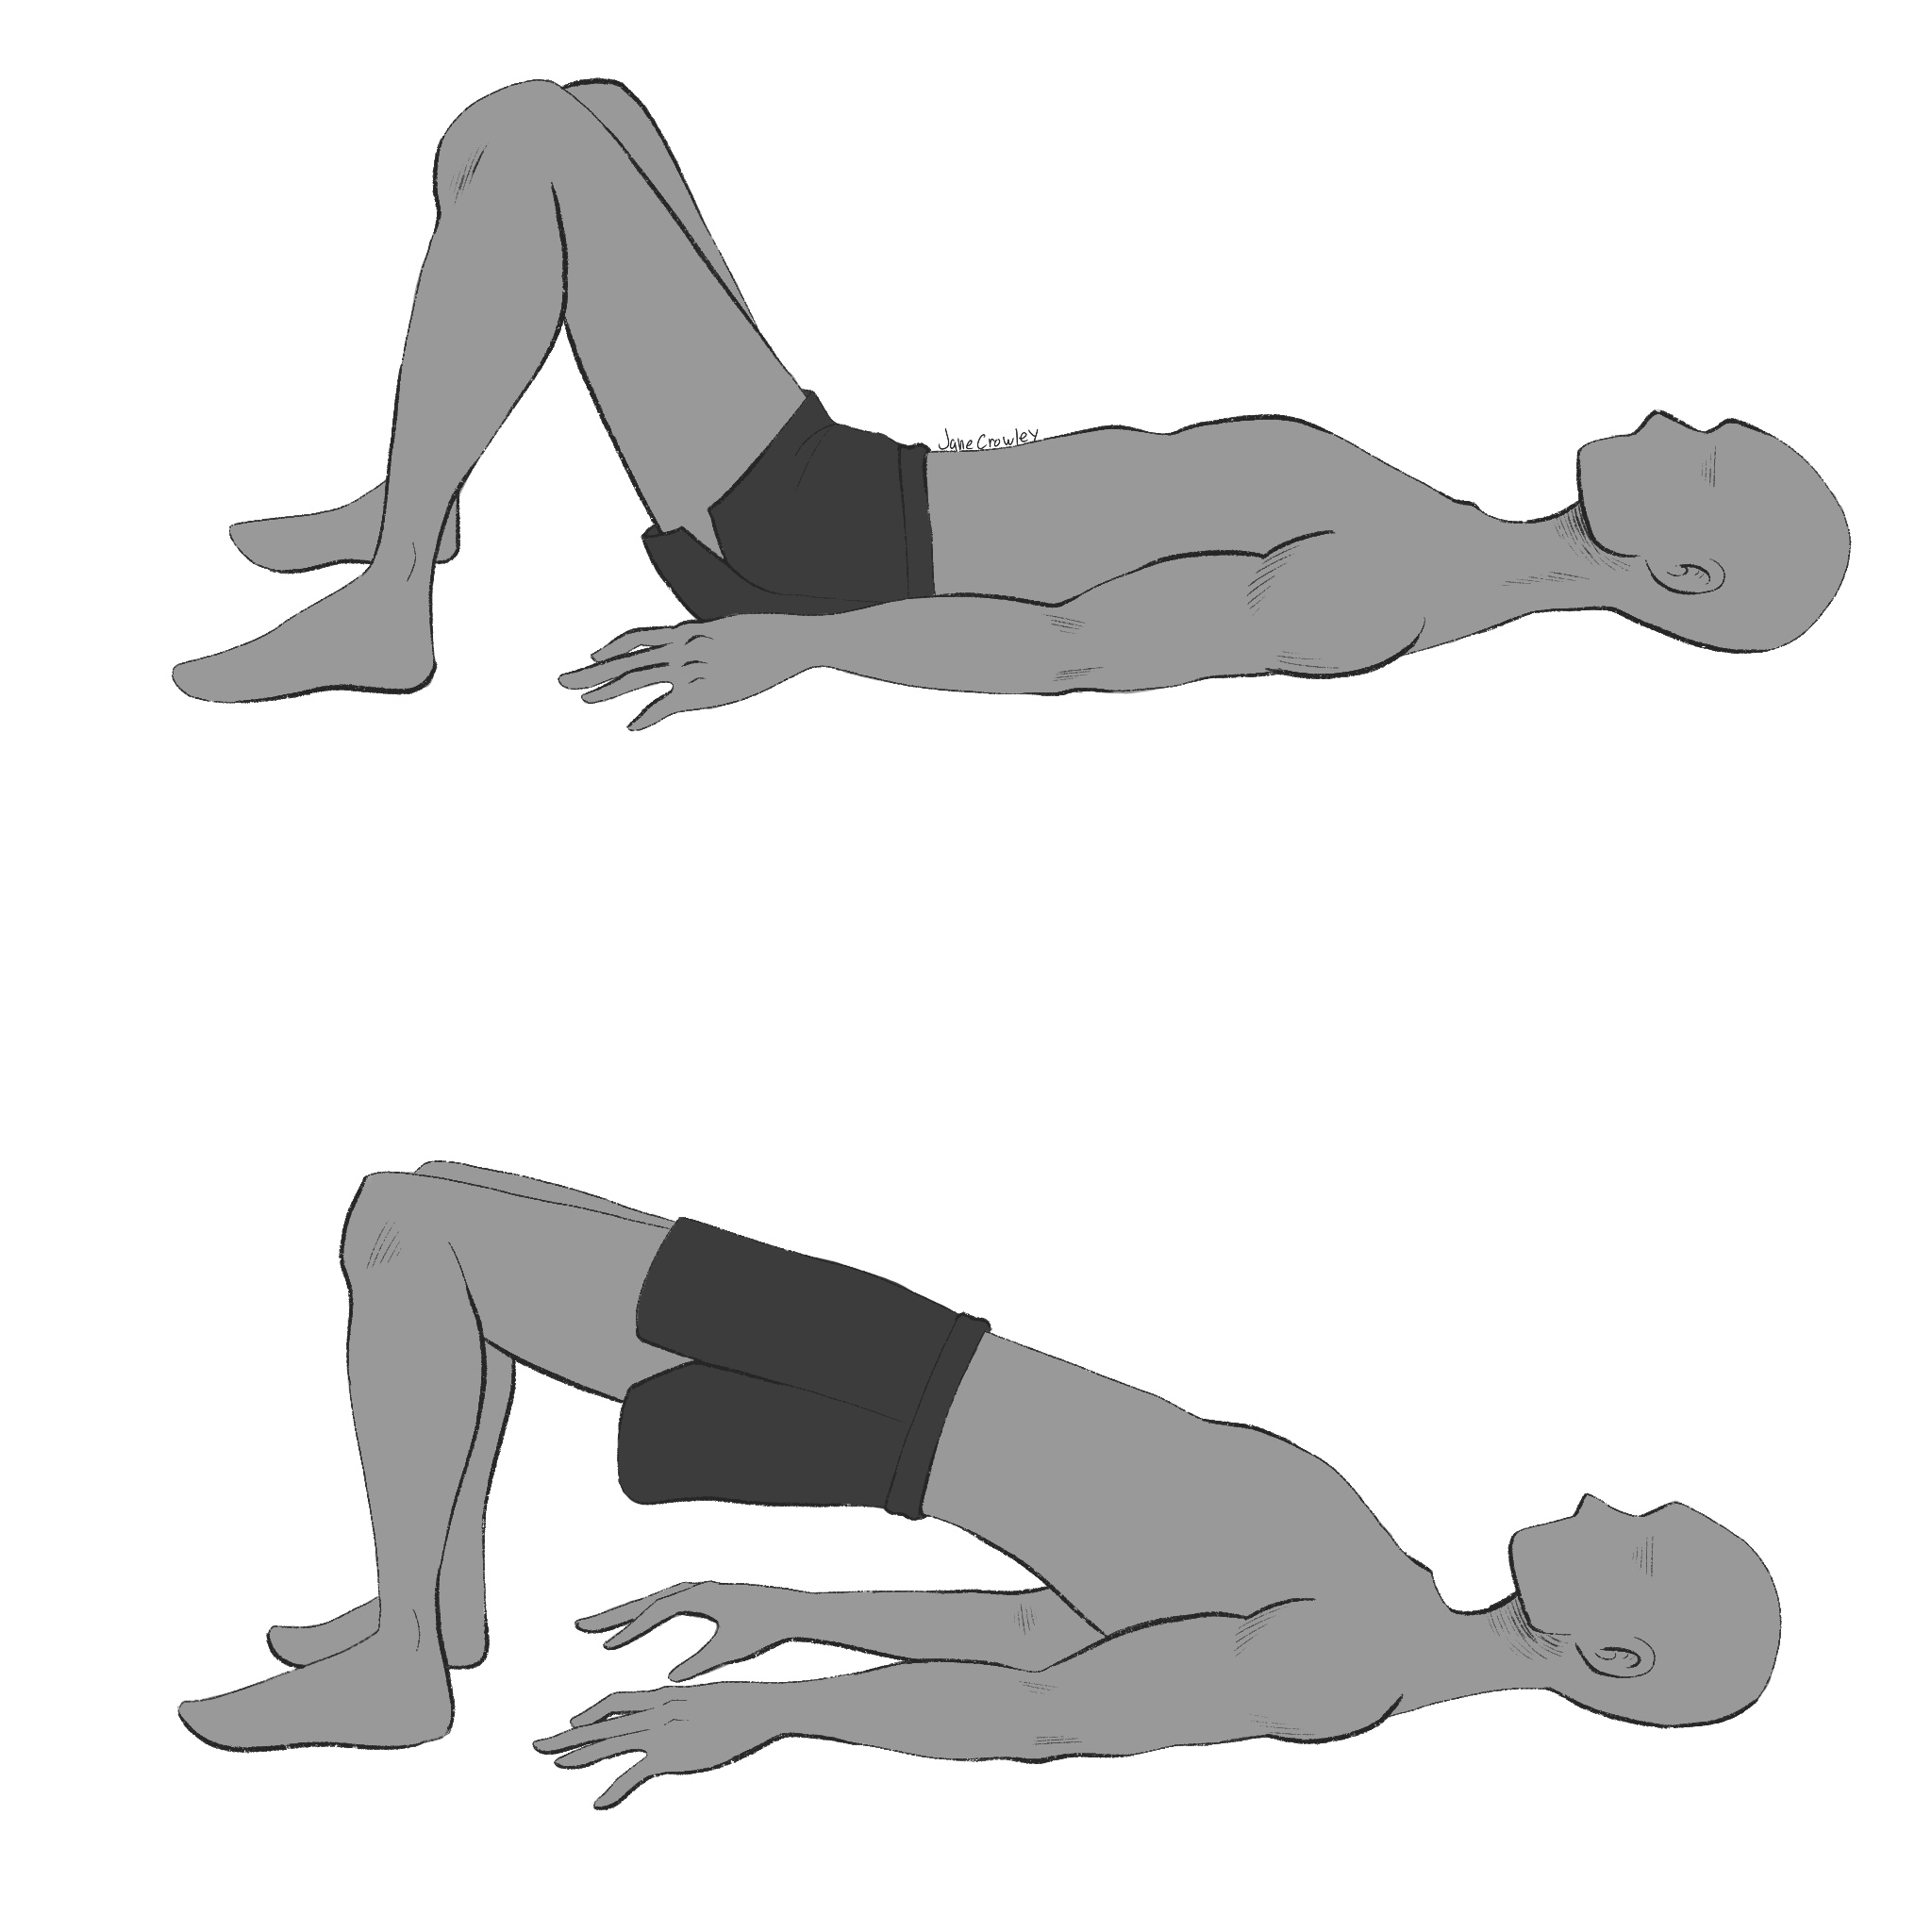
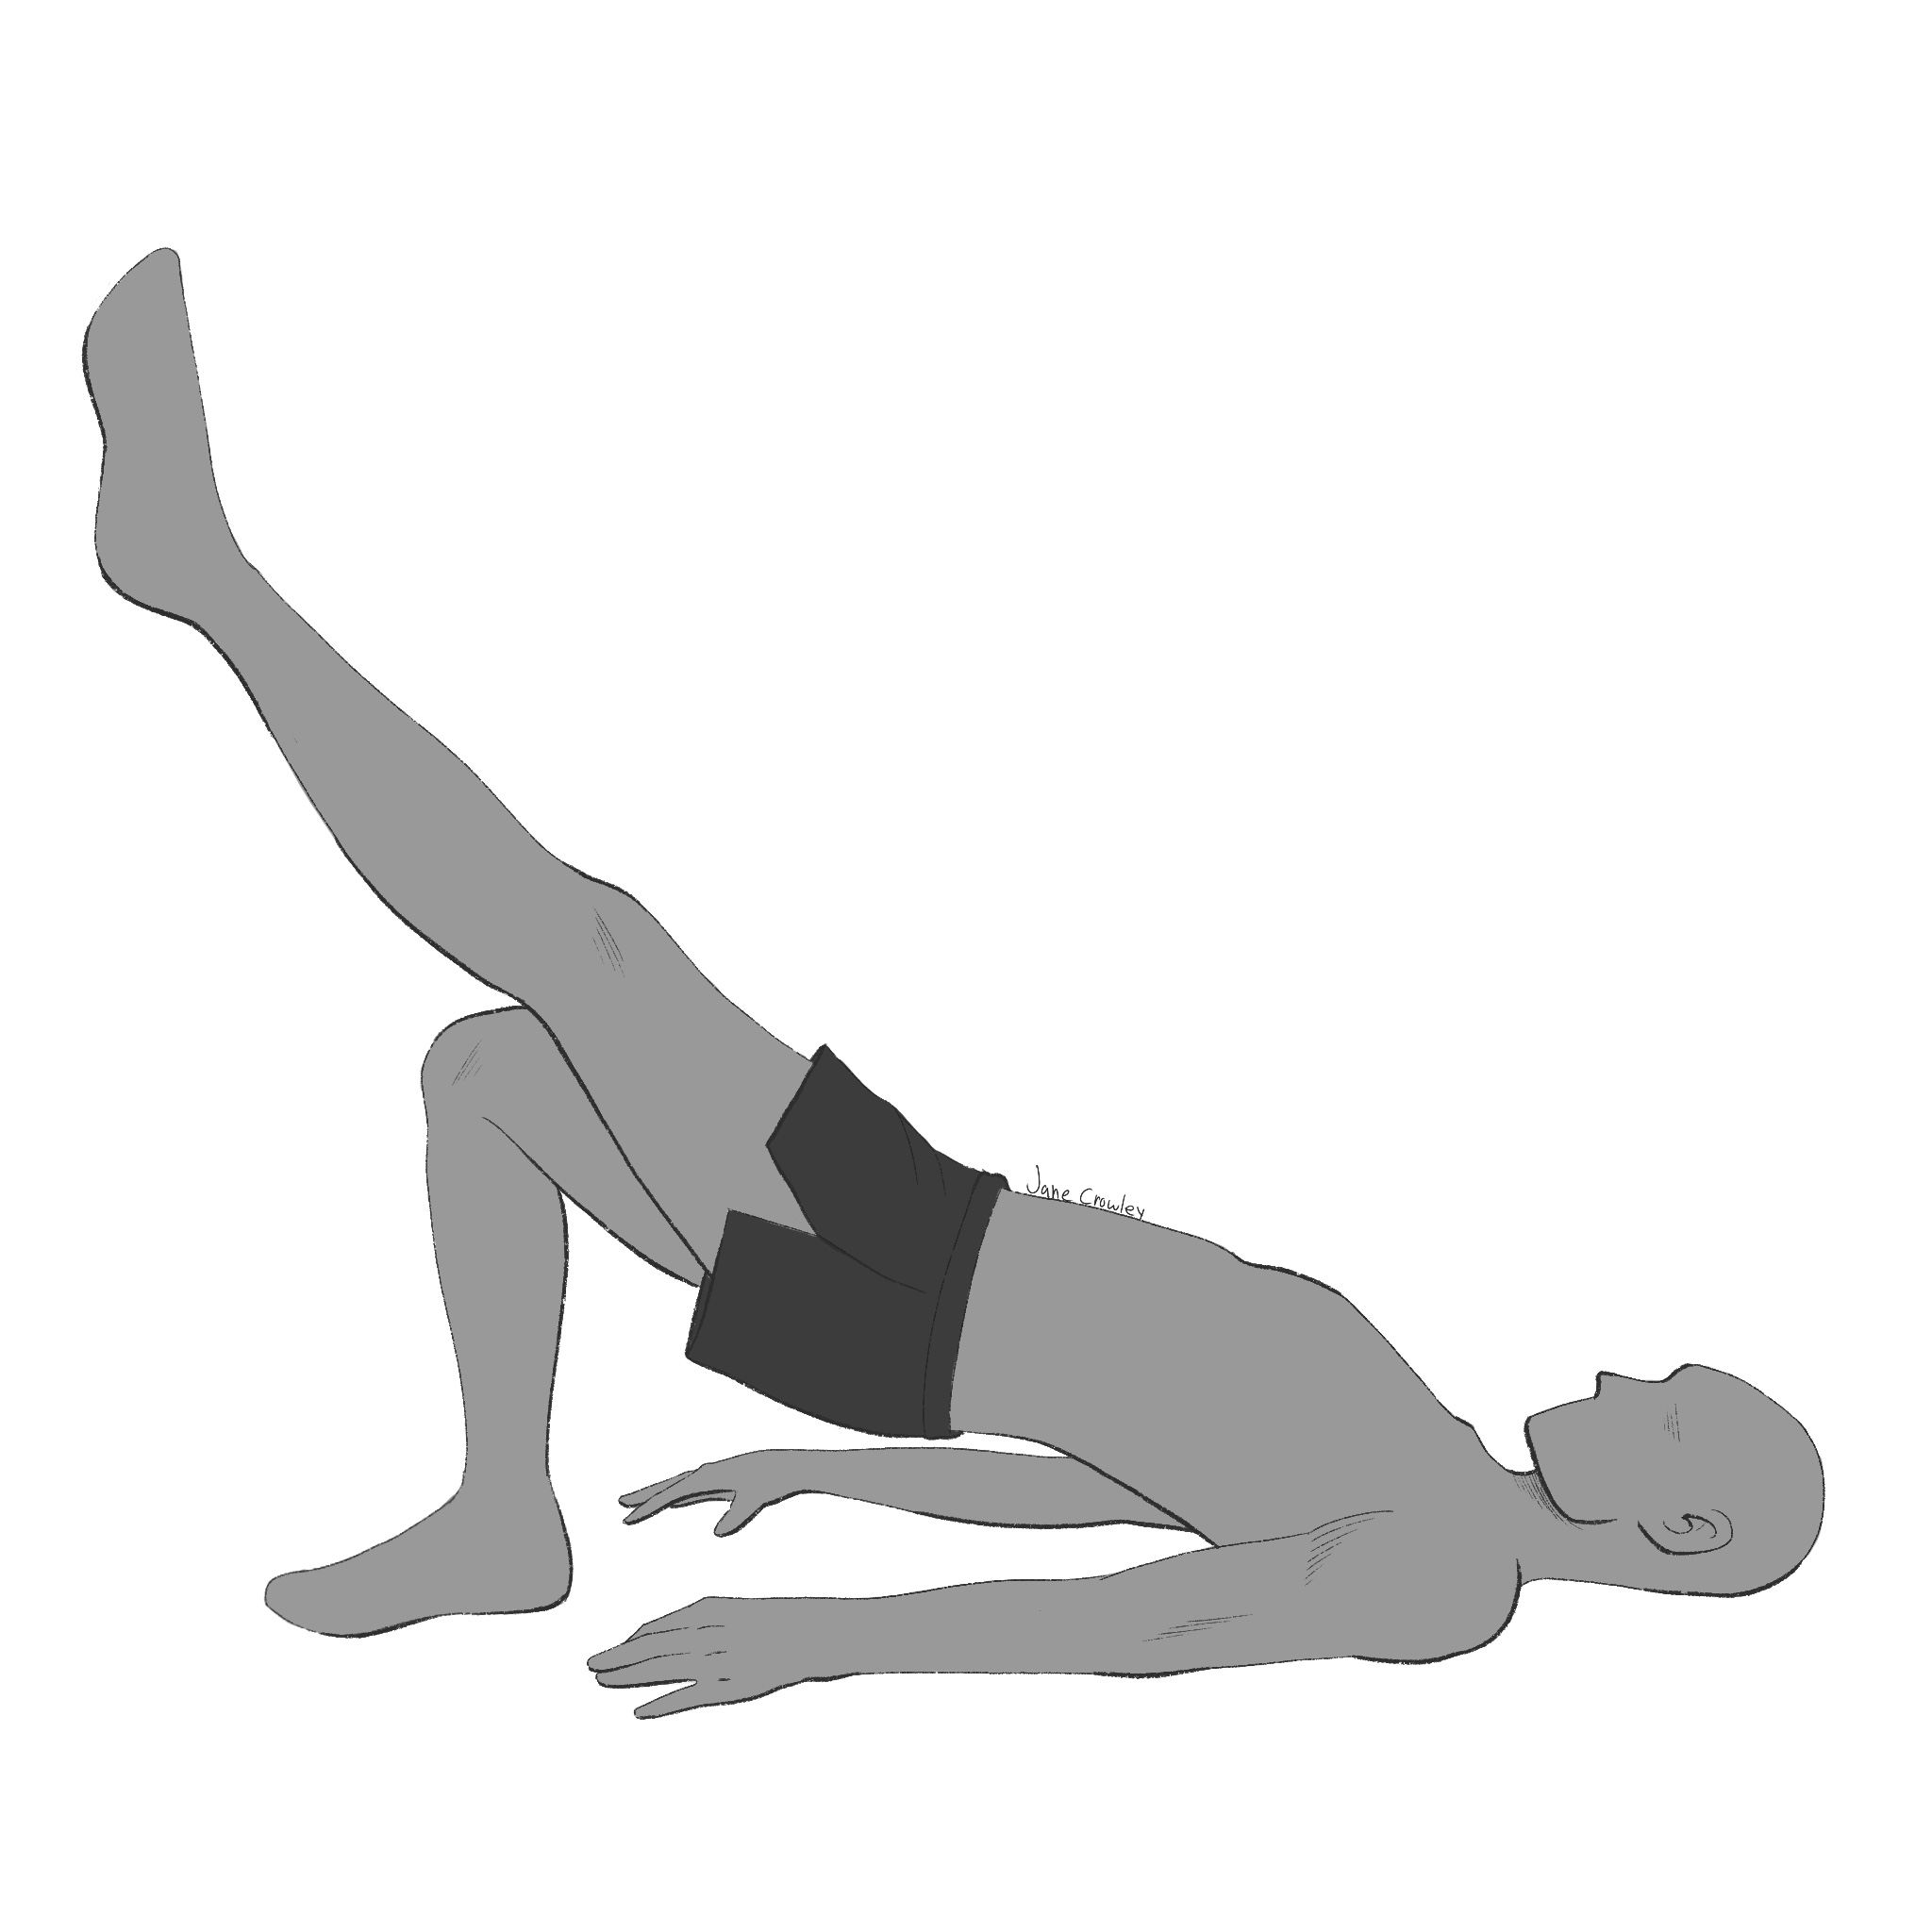
Bridge
Lie on mat or rug with knees bent, feet on the floor with knees and feet approximately lined up with hip joints.Low back supported on the floor.Arms to your side, palms down.
Leading with your tailbone, press your feet into the floor, peel your spine up off the floor (starting from the tailbone toward the head) and gently press the front of your pelvis skyward as far as you can with triggering pain.Once at maximal height hold this position for multiple long breaths (3, 5, 10, etc).Slowly roll down with an exhale by reversing the motion used to lift, setting the sacrum down last.Rest and repeat.
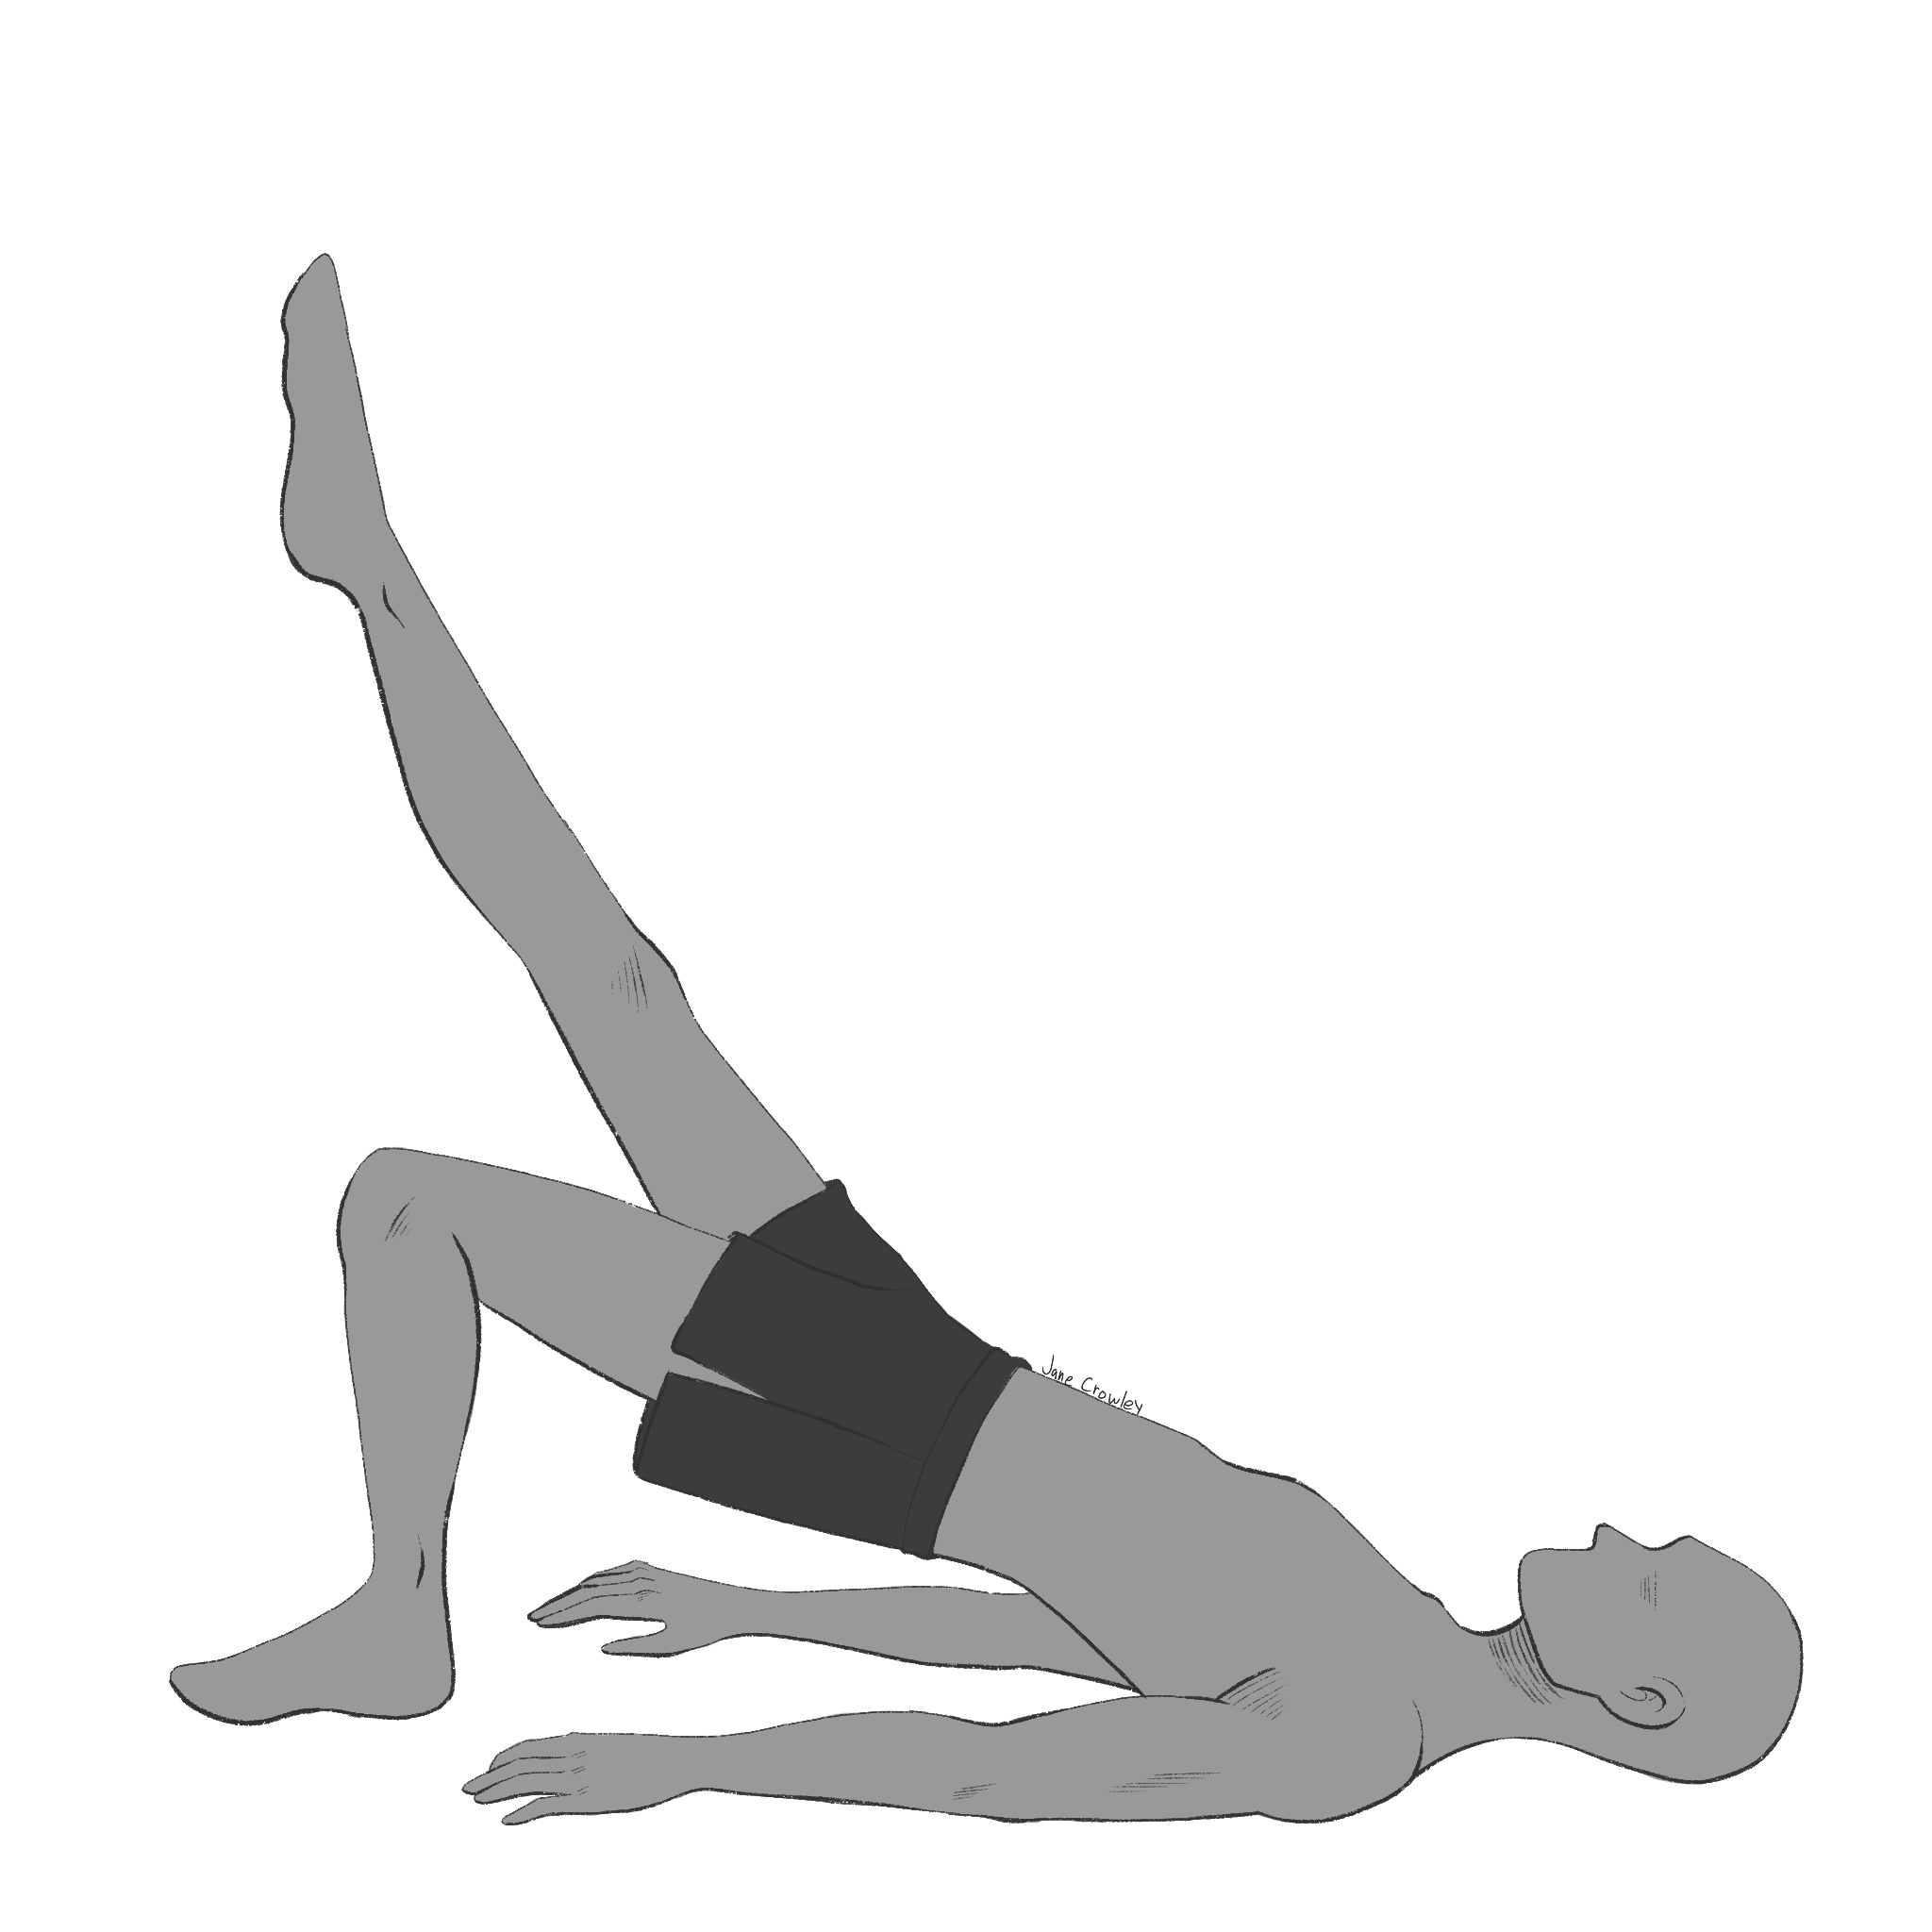
Bridge Single Leg Hold (right and left)
Start with the basic bridge exercise.Then holding the two sides of the pelvis level, lift one leg and hold multiple breaths (3, 5, 10, etc).
Repeat with extending the other leg.Slowly roll the spine down to the floor as with bridge.
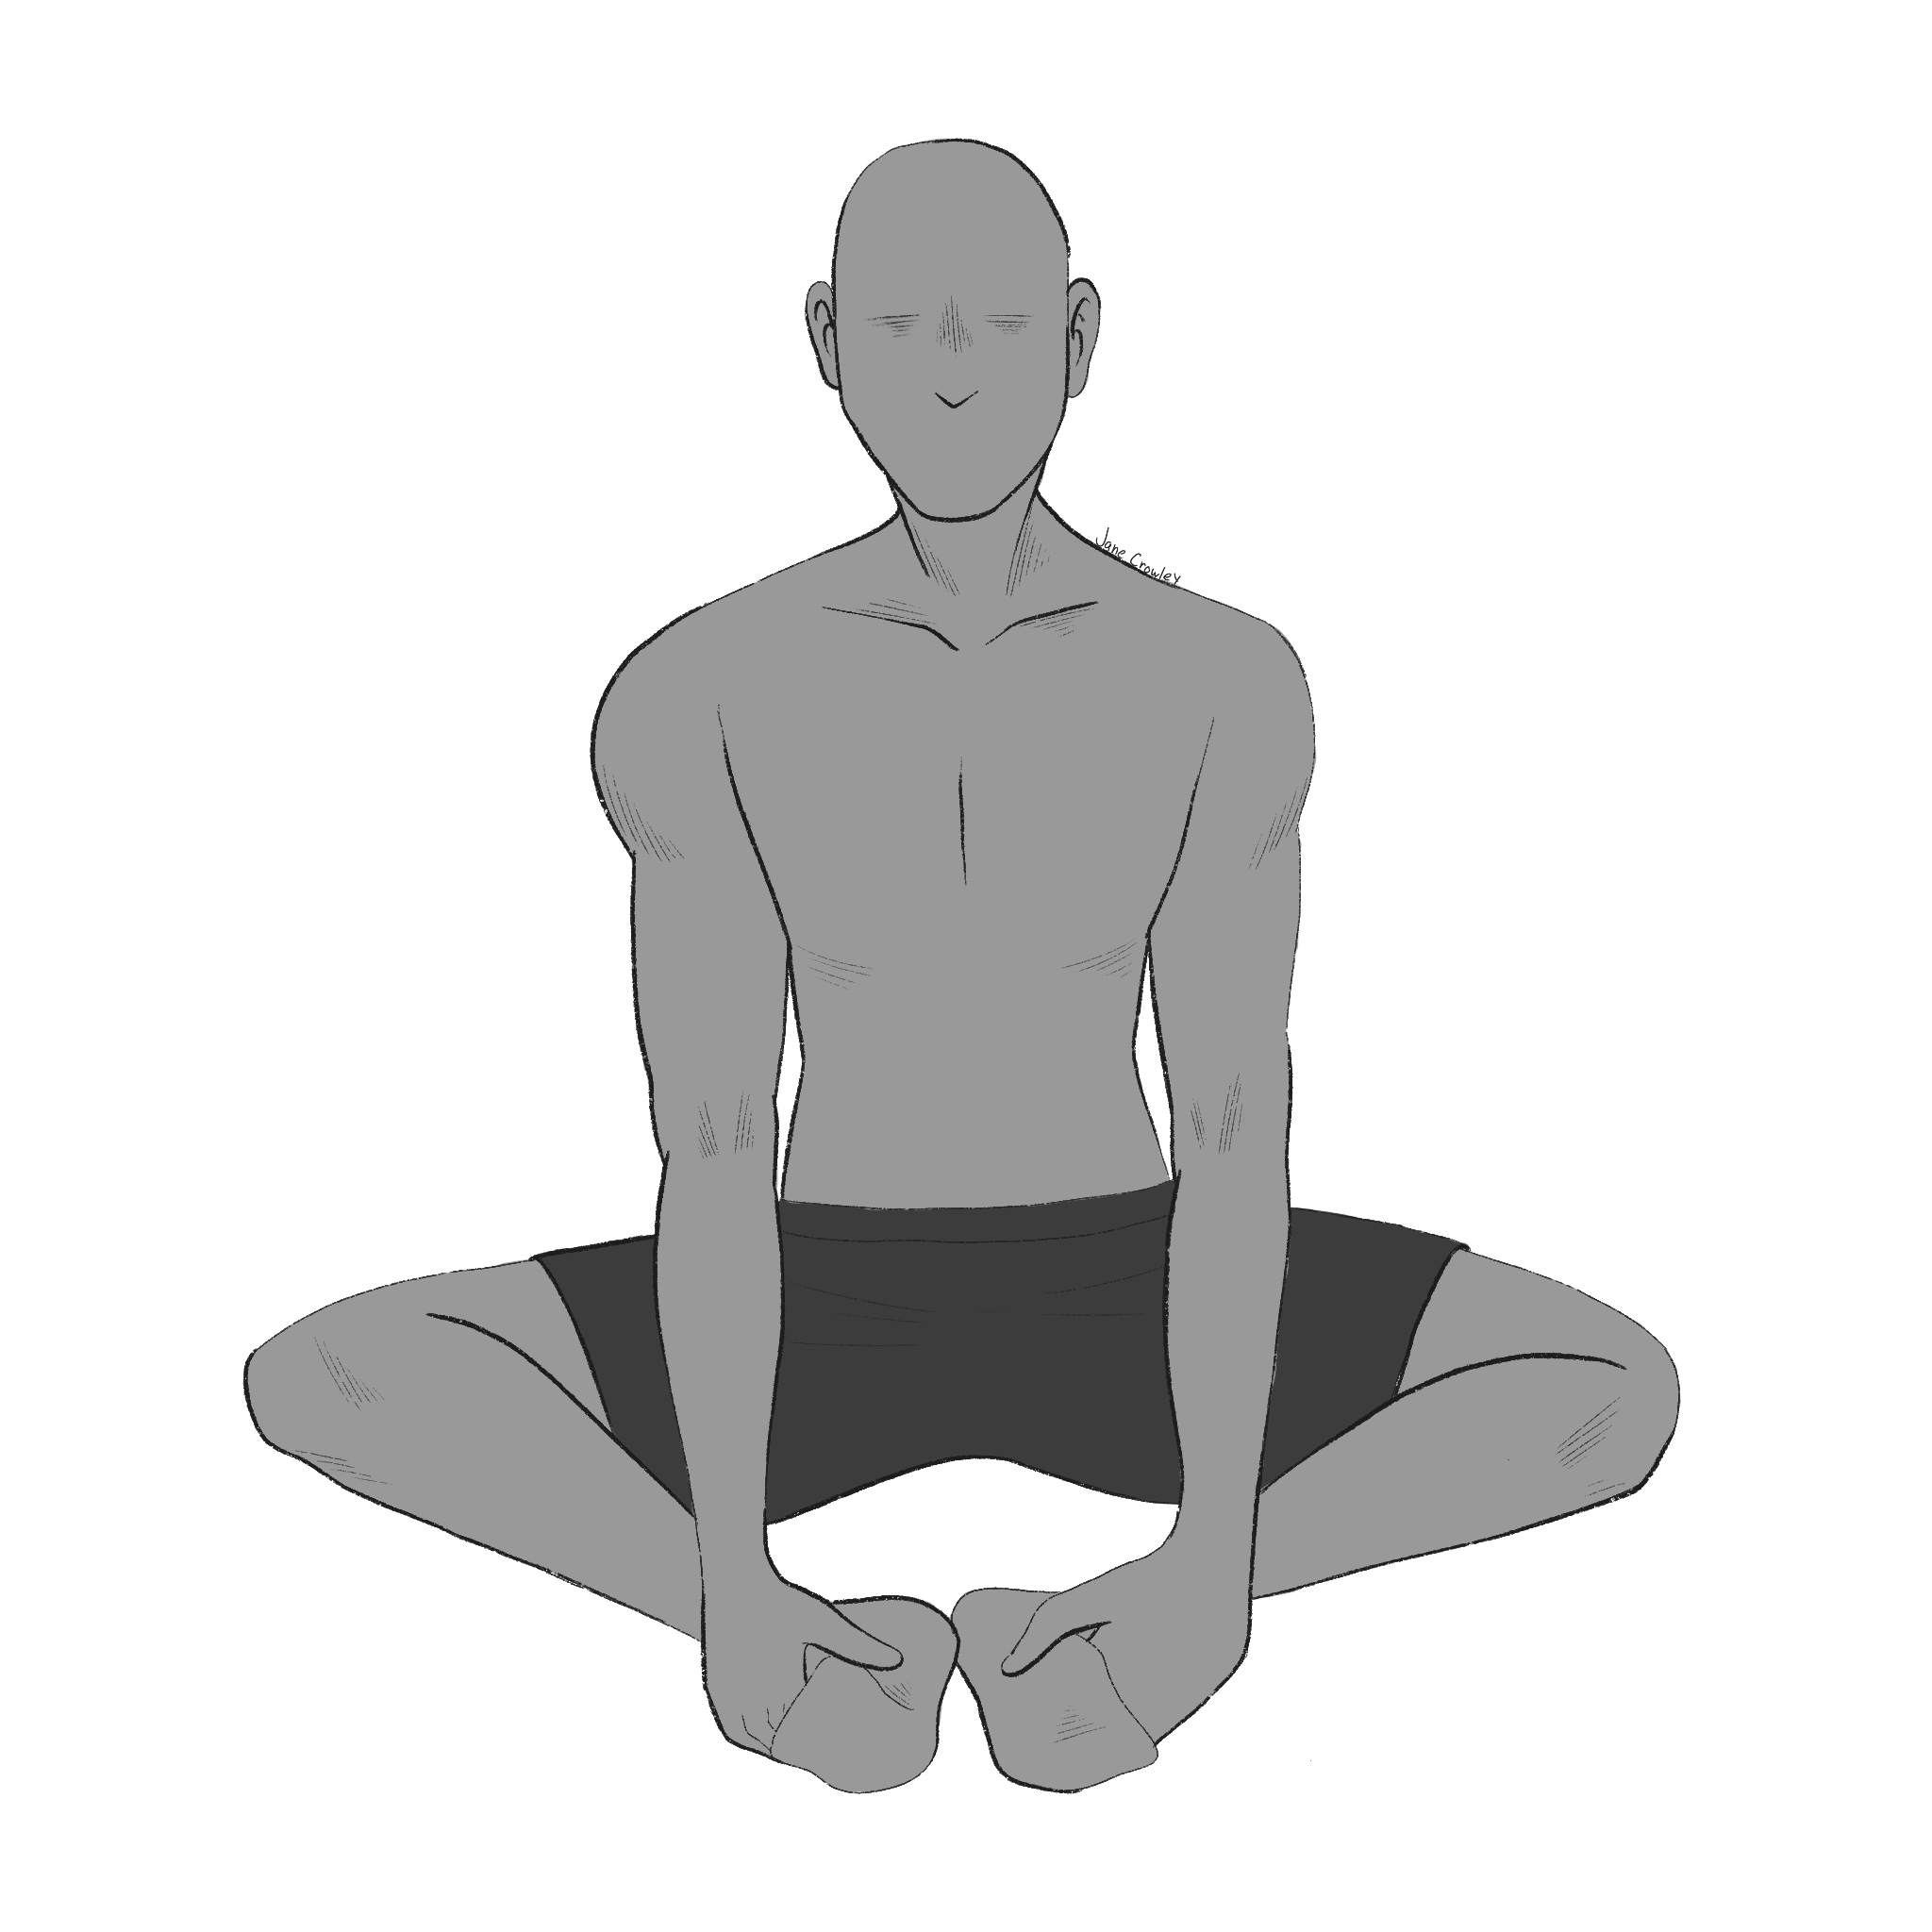
Butterfly Sit
Sit on mat or rug with knees bent, the soles of the feet together and as close to pubis as comfortable.
Place the thumbs to the arches of the feet and drape the fingers over the tops of the feet.Pressing the outer edges of the feet together, use your hands to guide the soles of the feet to face upward.At the same time allow your knees to drop as close to the floor as possible.
Lengthen your spine upward, take 5-10 long deep breaths while maintaining this posture.If able to take this further you might fold forward with long spine, reaching the chest forward and down toward your feet.Remain another 5-10 breaths.
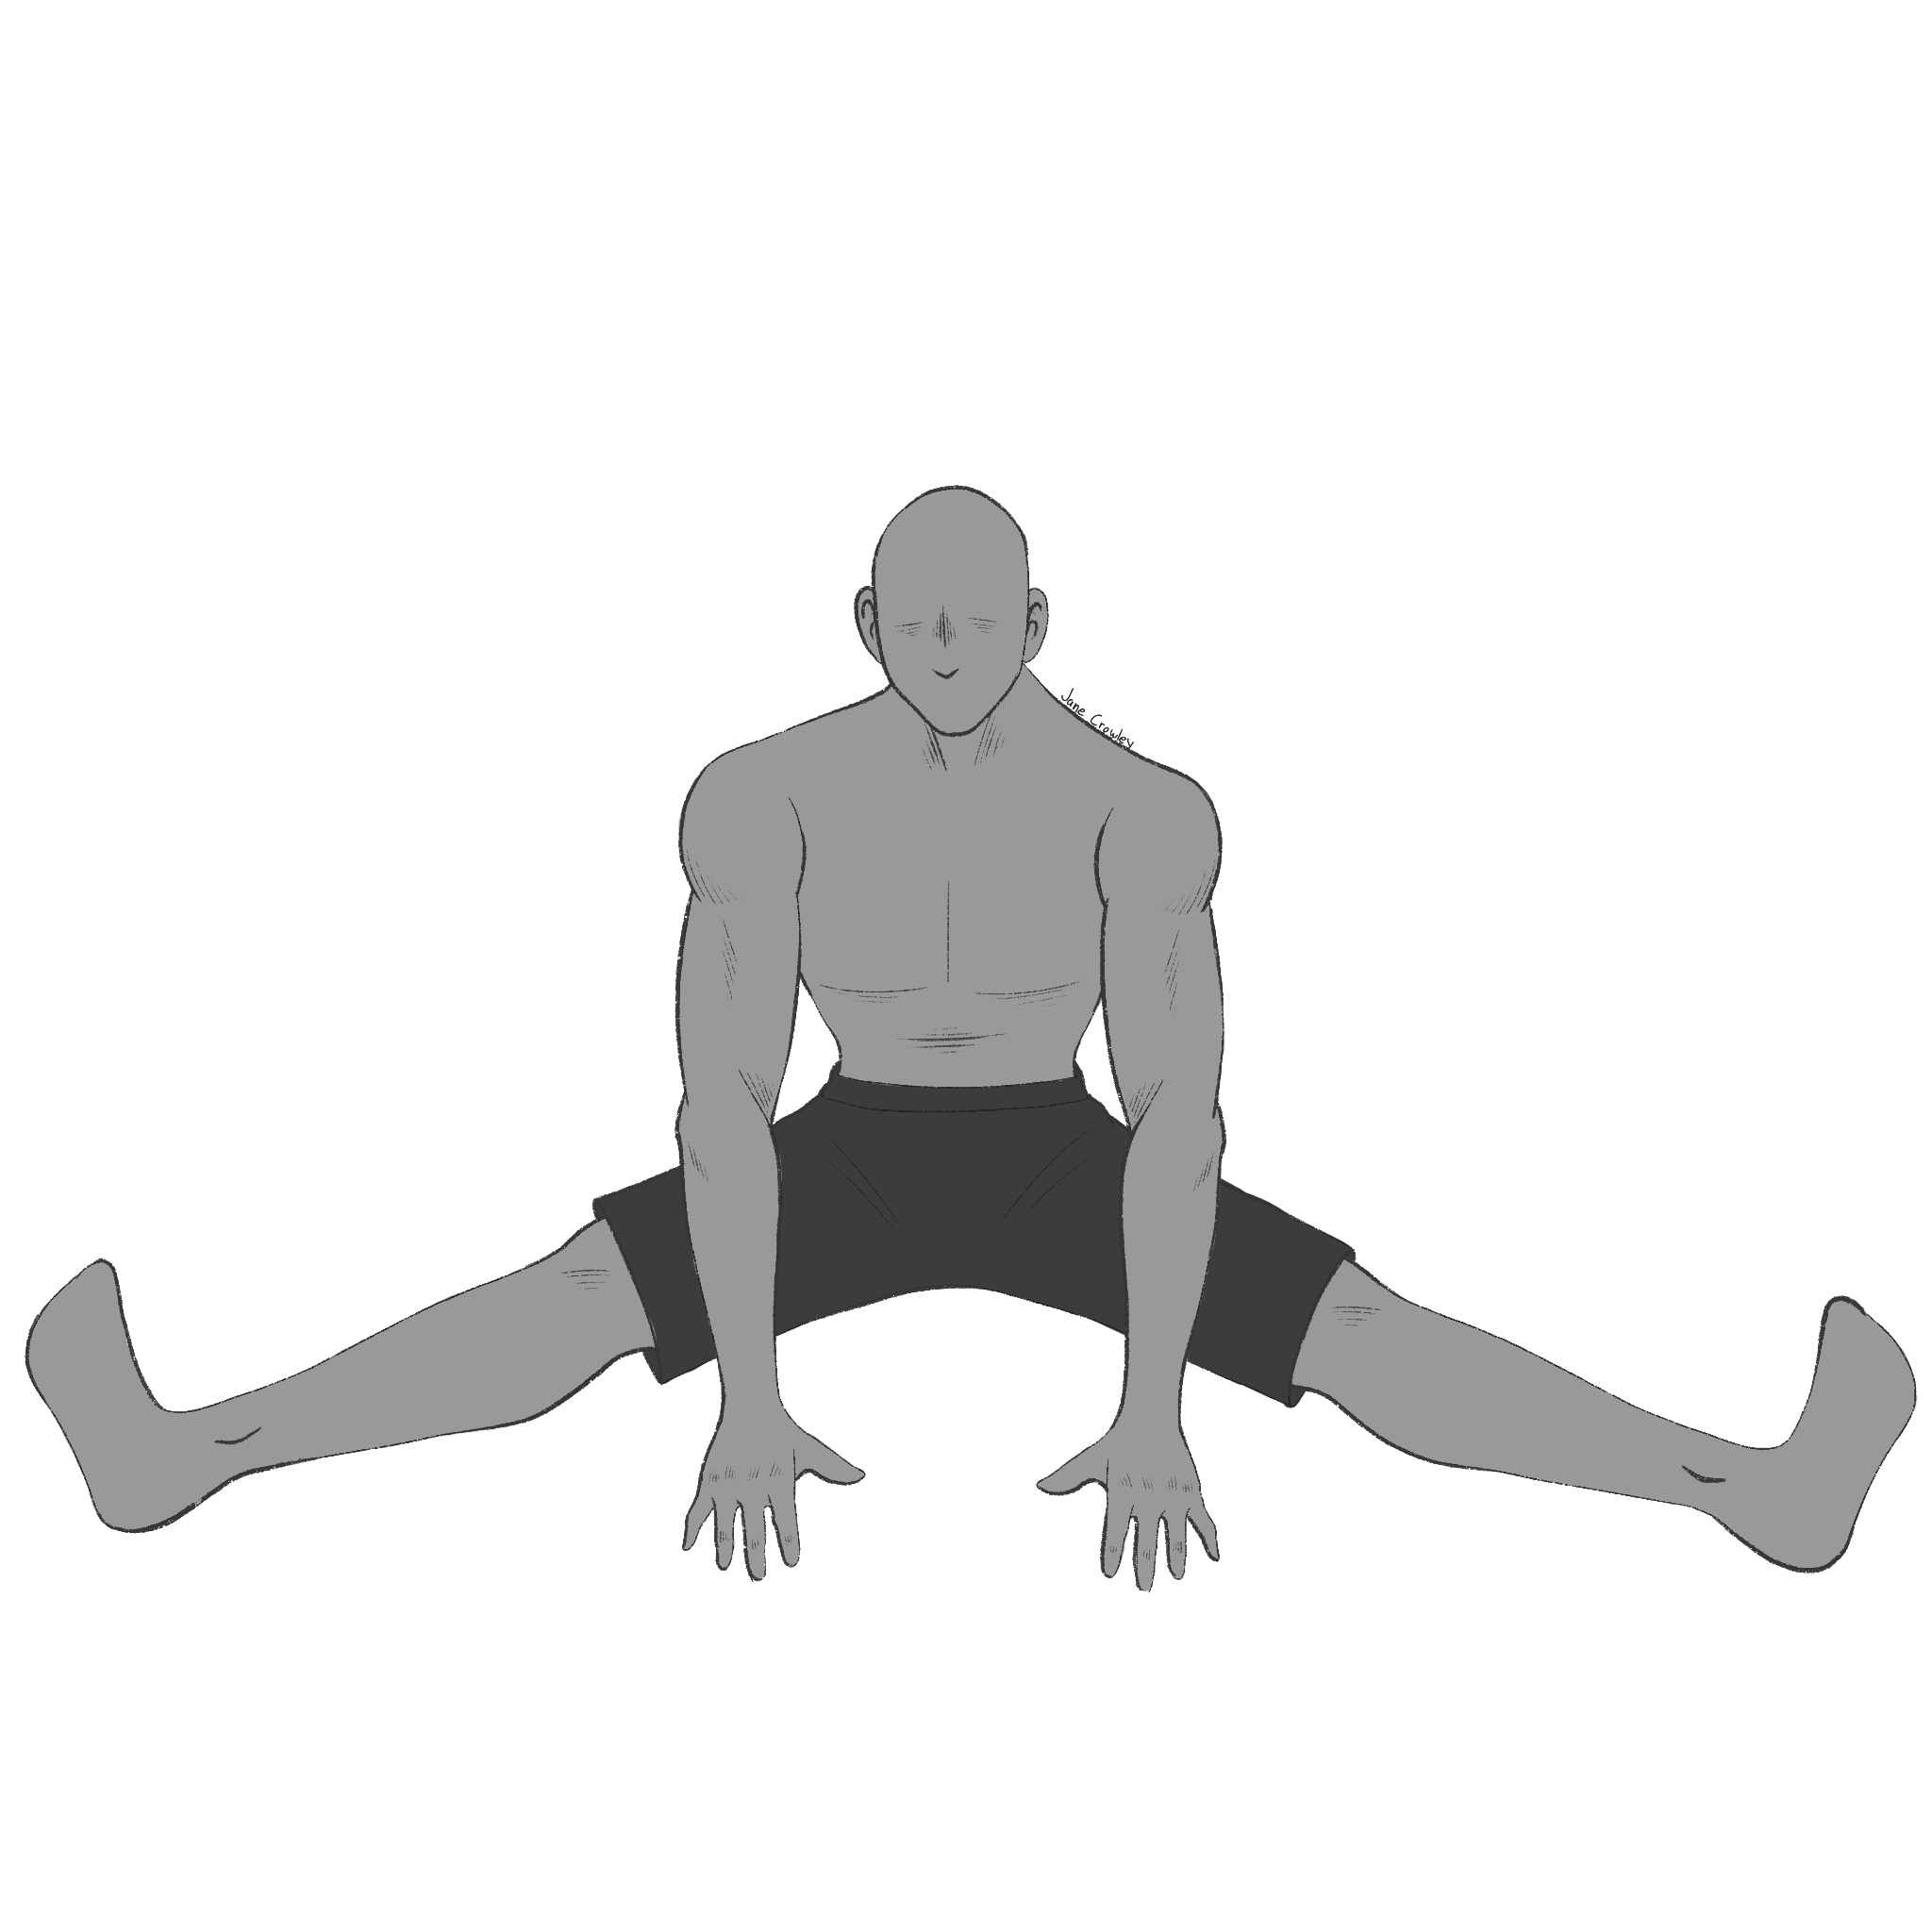
V Sit
Sit on mat or rug, legs spread wide apart. Lift the chest, lengthening the spine upward.Straighten the knees toward the floor with the toes facing skyward (ankles dorsiflexed).
Hold this posture for 5-10 breaths.If unable to straighten the spine and the knees simultaneously then you might try variations (first long spine then straighten the knees).This may also be practiced with one’s back against a wall for support and with a gradual straightening of the knees over time and daily repetition.
Supine “T” Over Lengthwise Bolster
Lie with a foam roller or long bolster positioned lengthwise under your spine with the top of the bolster level with the top of your shoulders.Your head should not rest on the bolster but instead on a folded towel or pillow (thinner than the bolster) so that the head drops back slightly but without straining the neck.Open the arms perpendicular to the spine, palms up.Bend the knees with the feet on the floor.Depending on the length of the roller/bolster the sacrum will either rest on the floor or bolster.
Breathe and relax over the bolster for 5-10 minutes, allowing gravity to open your chest and thoracic spine.
When ready to stop, ease your way off to one side, lay on your side briefly then ease your way to sitting from your side.
Supine “T” Over Transverse Bolster
Lie with a foam roller or bolster positioned transverse/perpendicular to your spine, behind your chest as shown in drawing.Support your head with a folded towel or pillow thick enough to prevent strain of the neck.Let your arms rest perpendicular to your spine with the palms up.Bend your knees with soles of feet on the floor and knees upward, or alternatively with the knees dropped open and soles of the feet together.
Breathe and relax over the bolster for 5-10 minutes, allowing gravity to open your chest and thoracic spine.
When ready to stop, ease your way off to one side, lay on your side briefly then ease your way to sitting from your side.
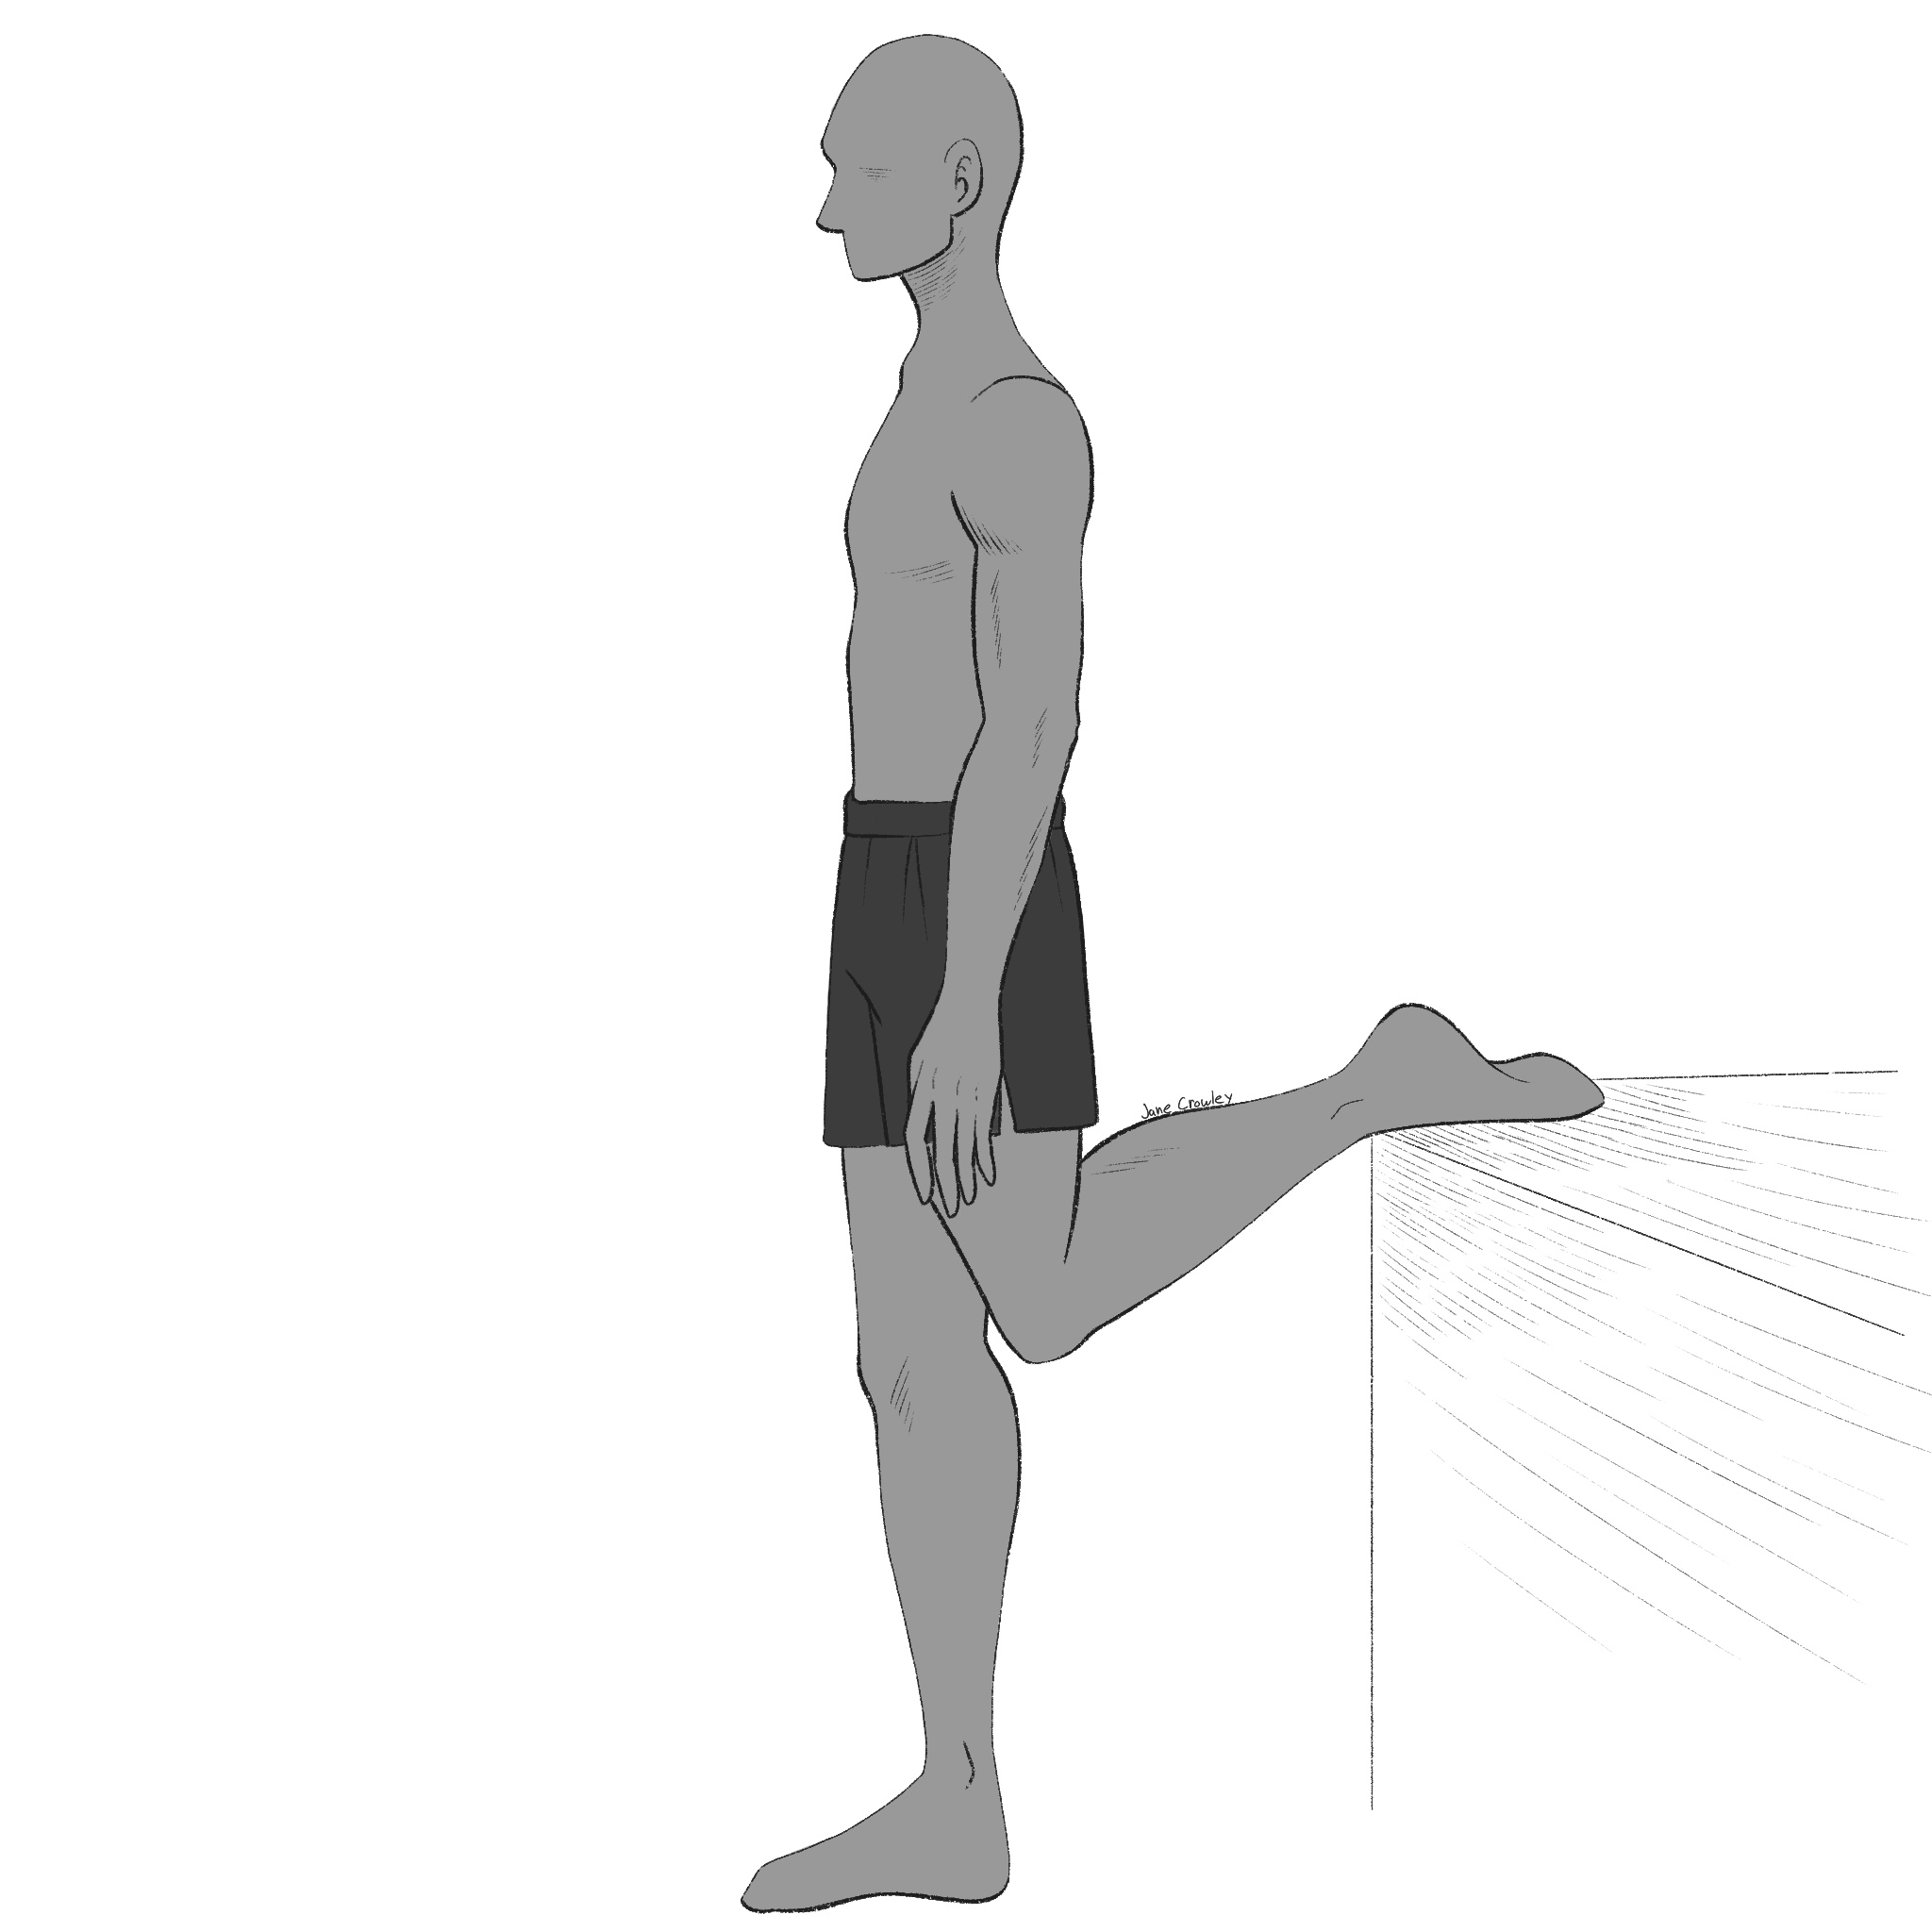
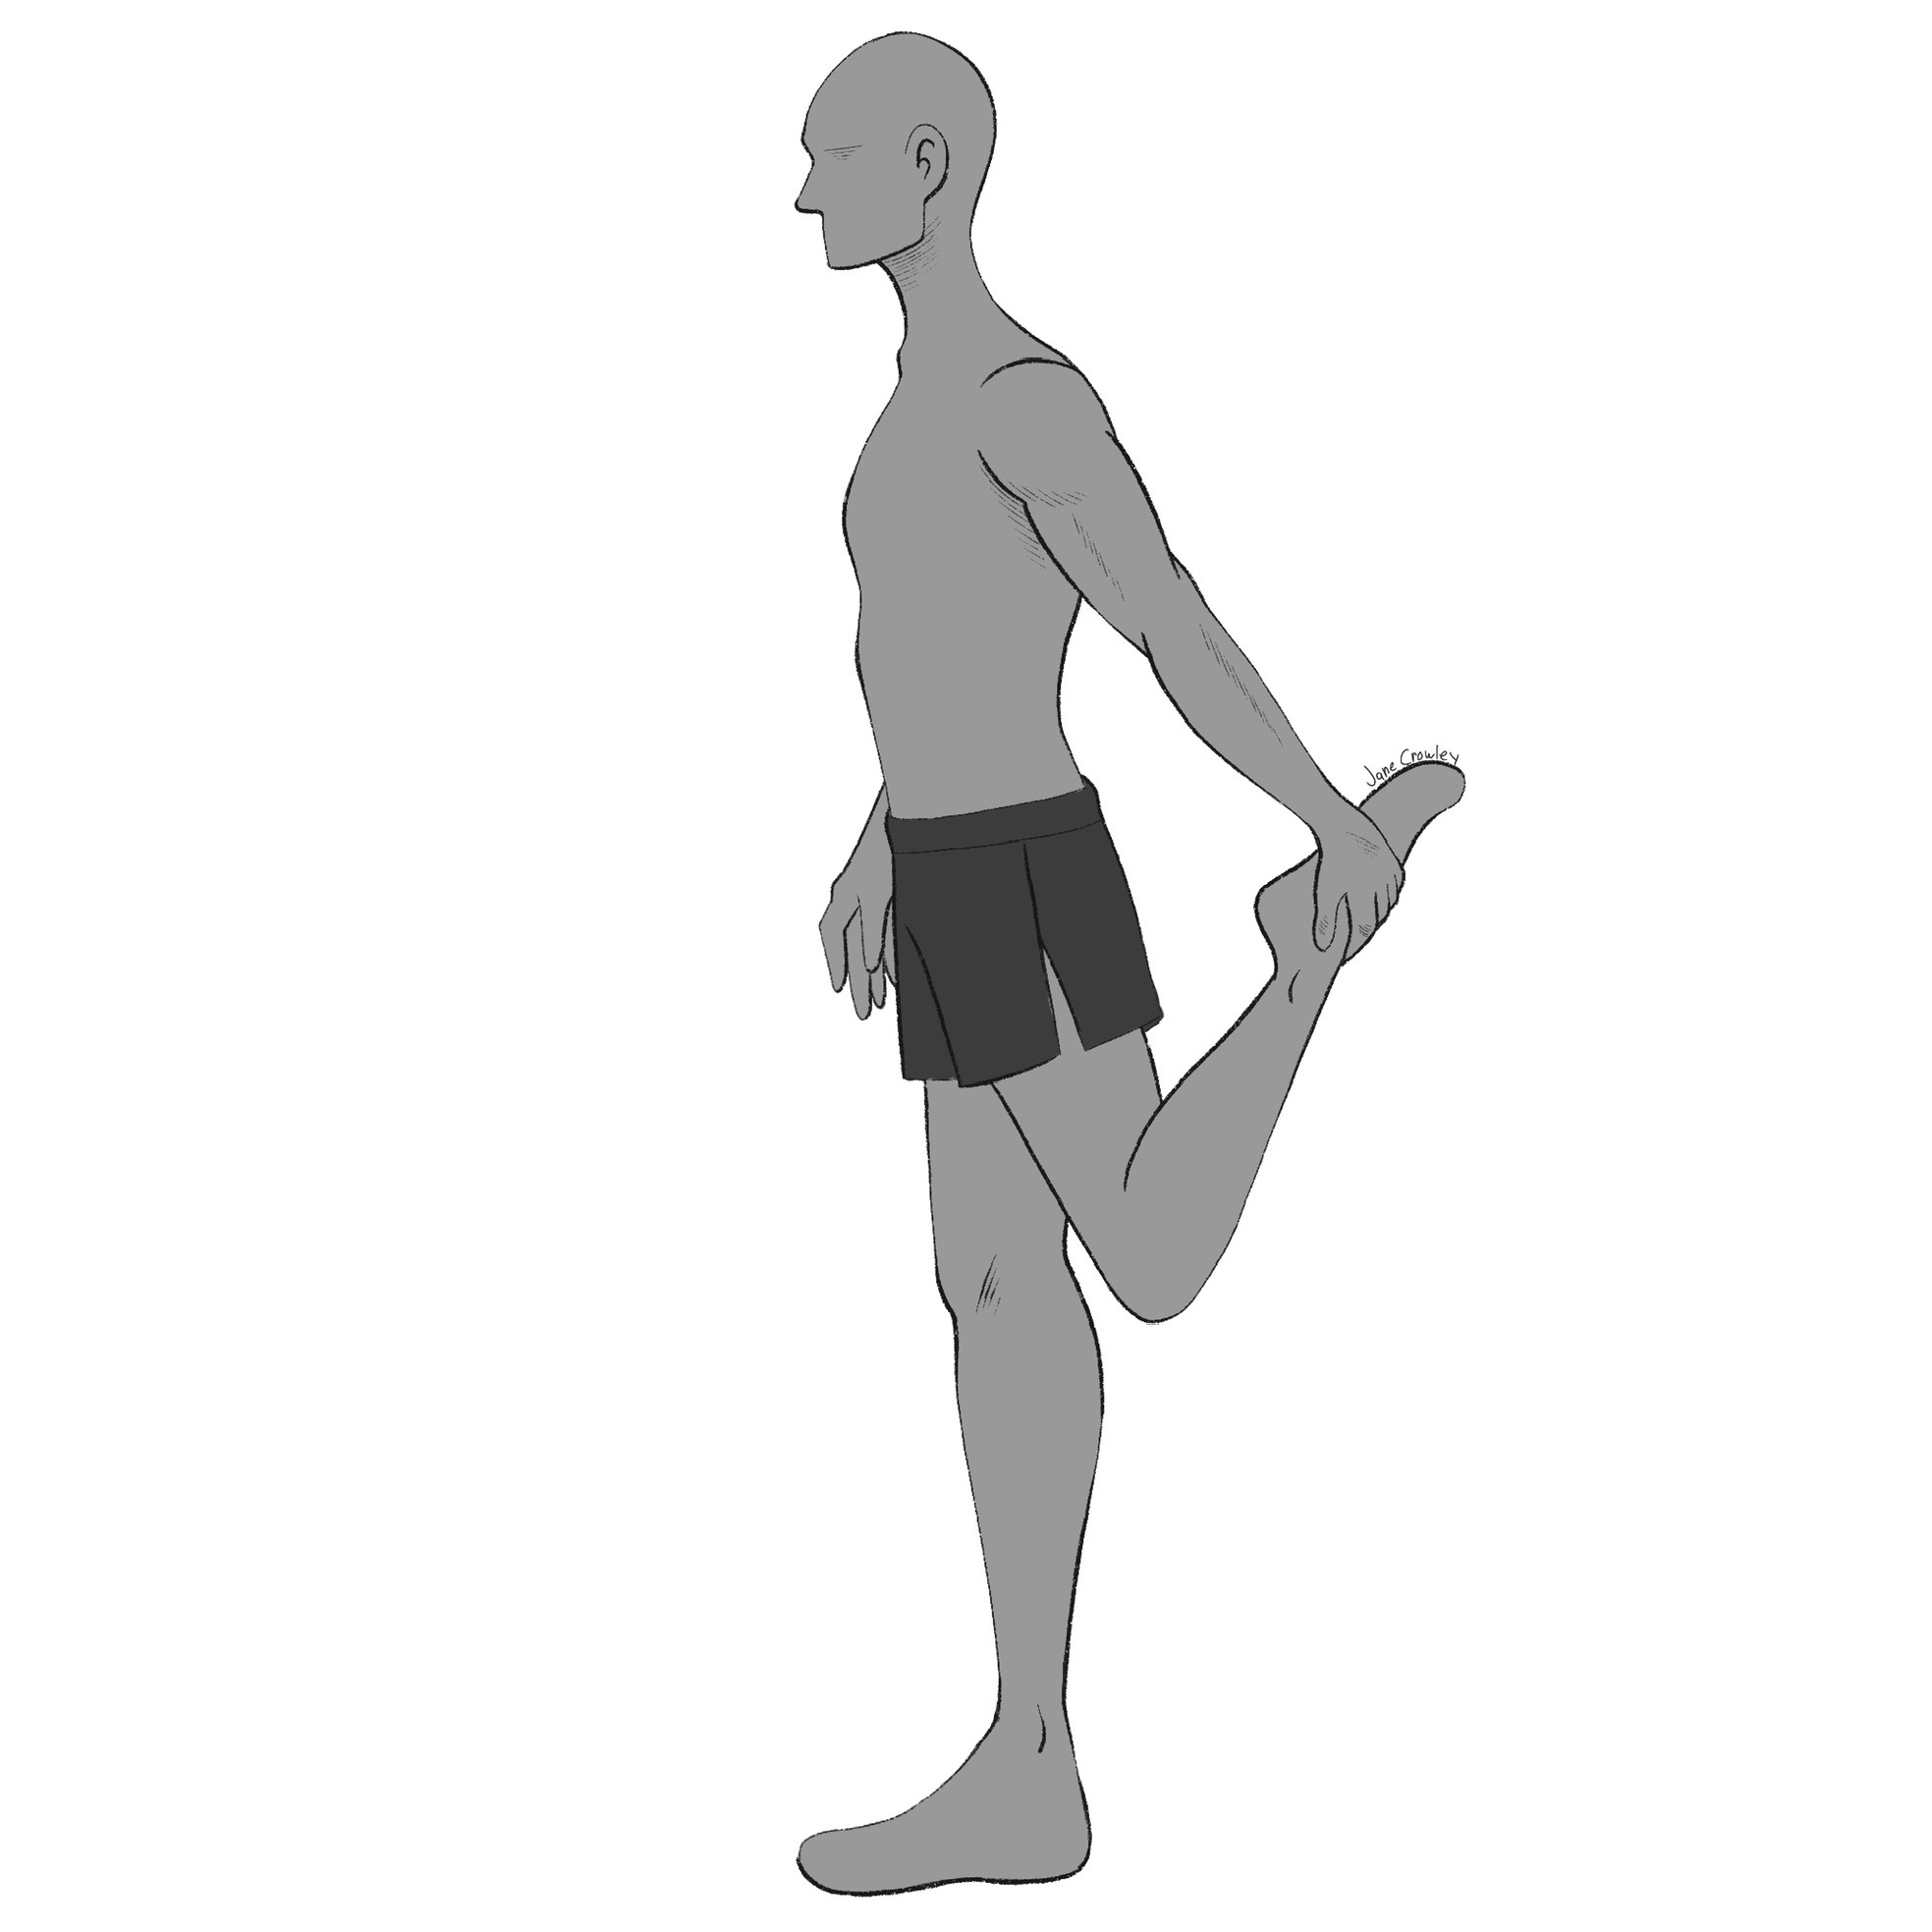
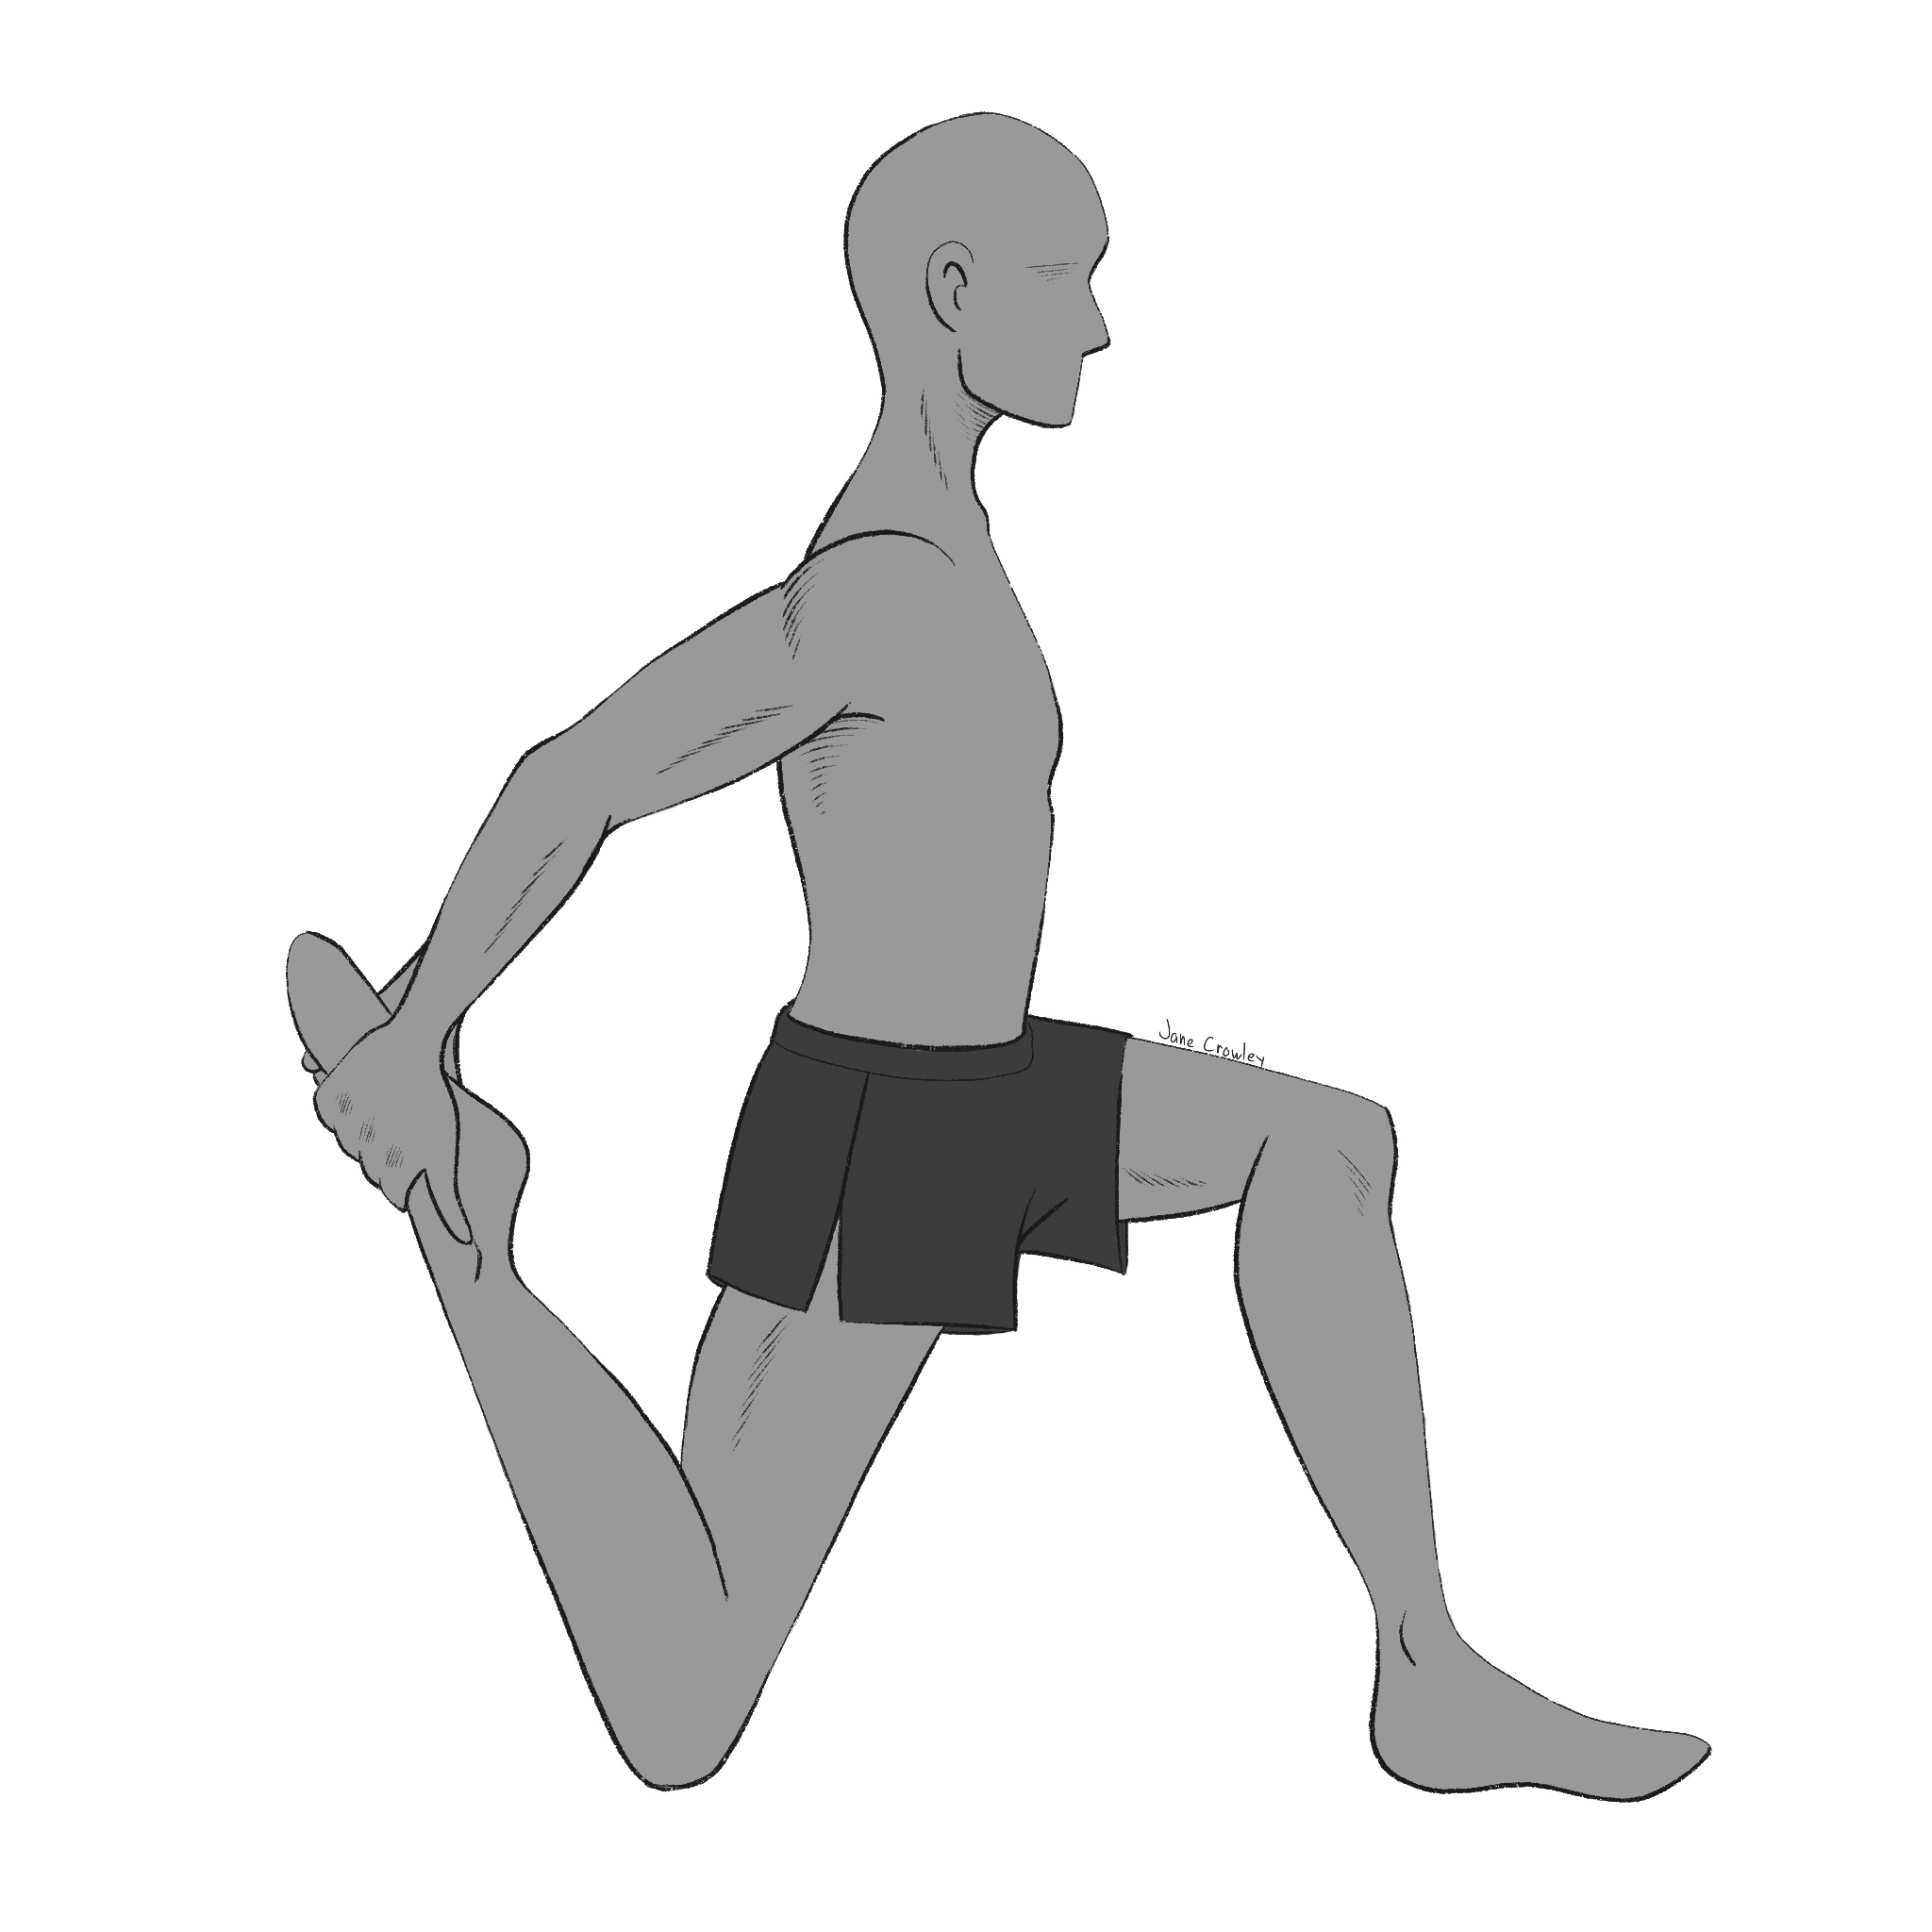
Standing Quad Stretch
Place one foot with the dorsum/top of the foot supported on a bench, table, chair-back at approximately the height of your mid or upper thigh.Keep this thigh parallel to the thigh of the standing leg.Tuck your tailbone under and forward to open the front of the hip region.
Bend the standing knee(figure 2) and adjust the tucking of the pelvis to increase the stretch of the thigh, keeping the stretch sensation in the belly of the thigh and avoid undue pressure on either knee.
Alternatively, one can hold the the foot in one’s hand (figures 3 and 4), being careful not to strain the bent knee and keep the thighs parallel.
Maintain for 5-10 long slow breaths.
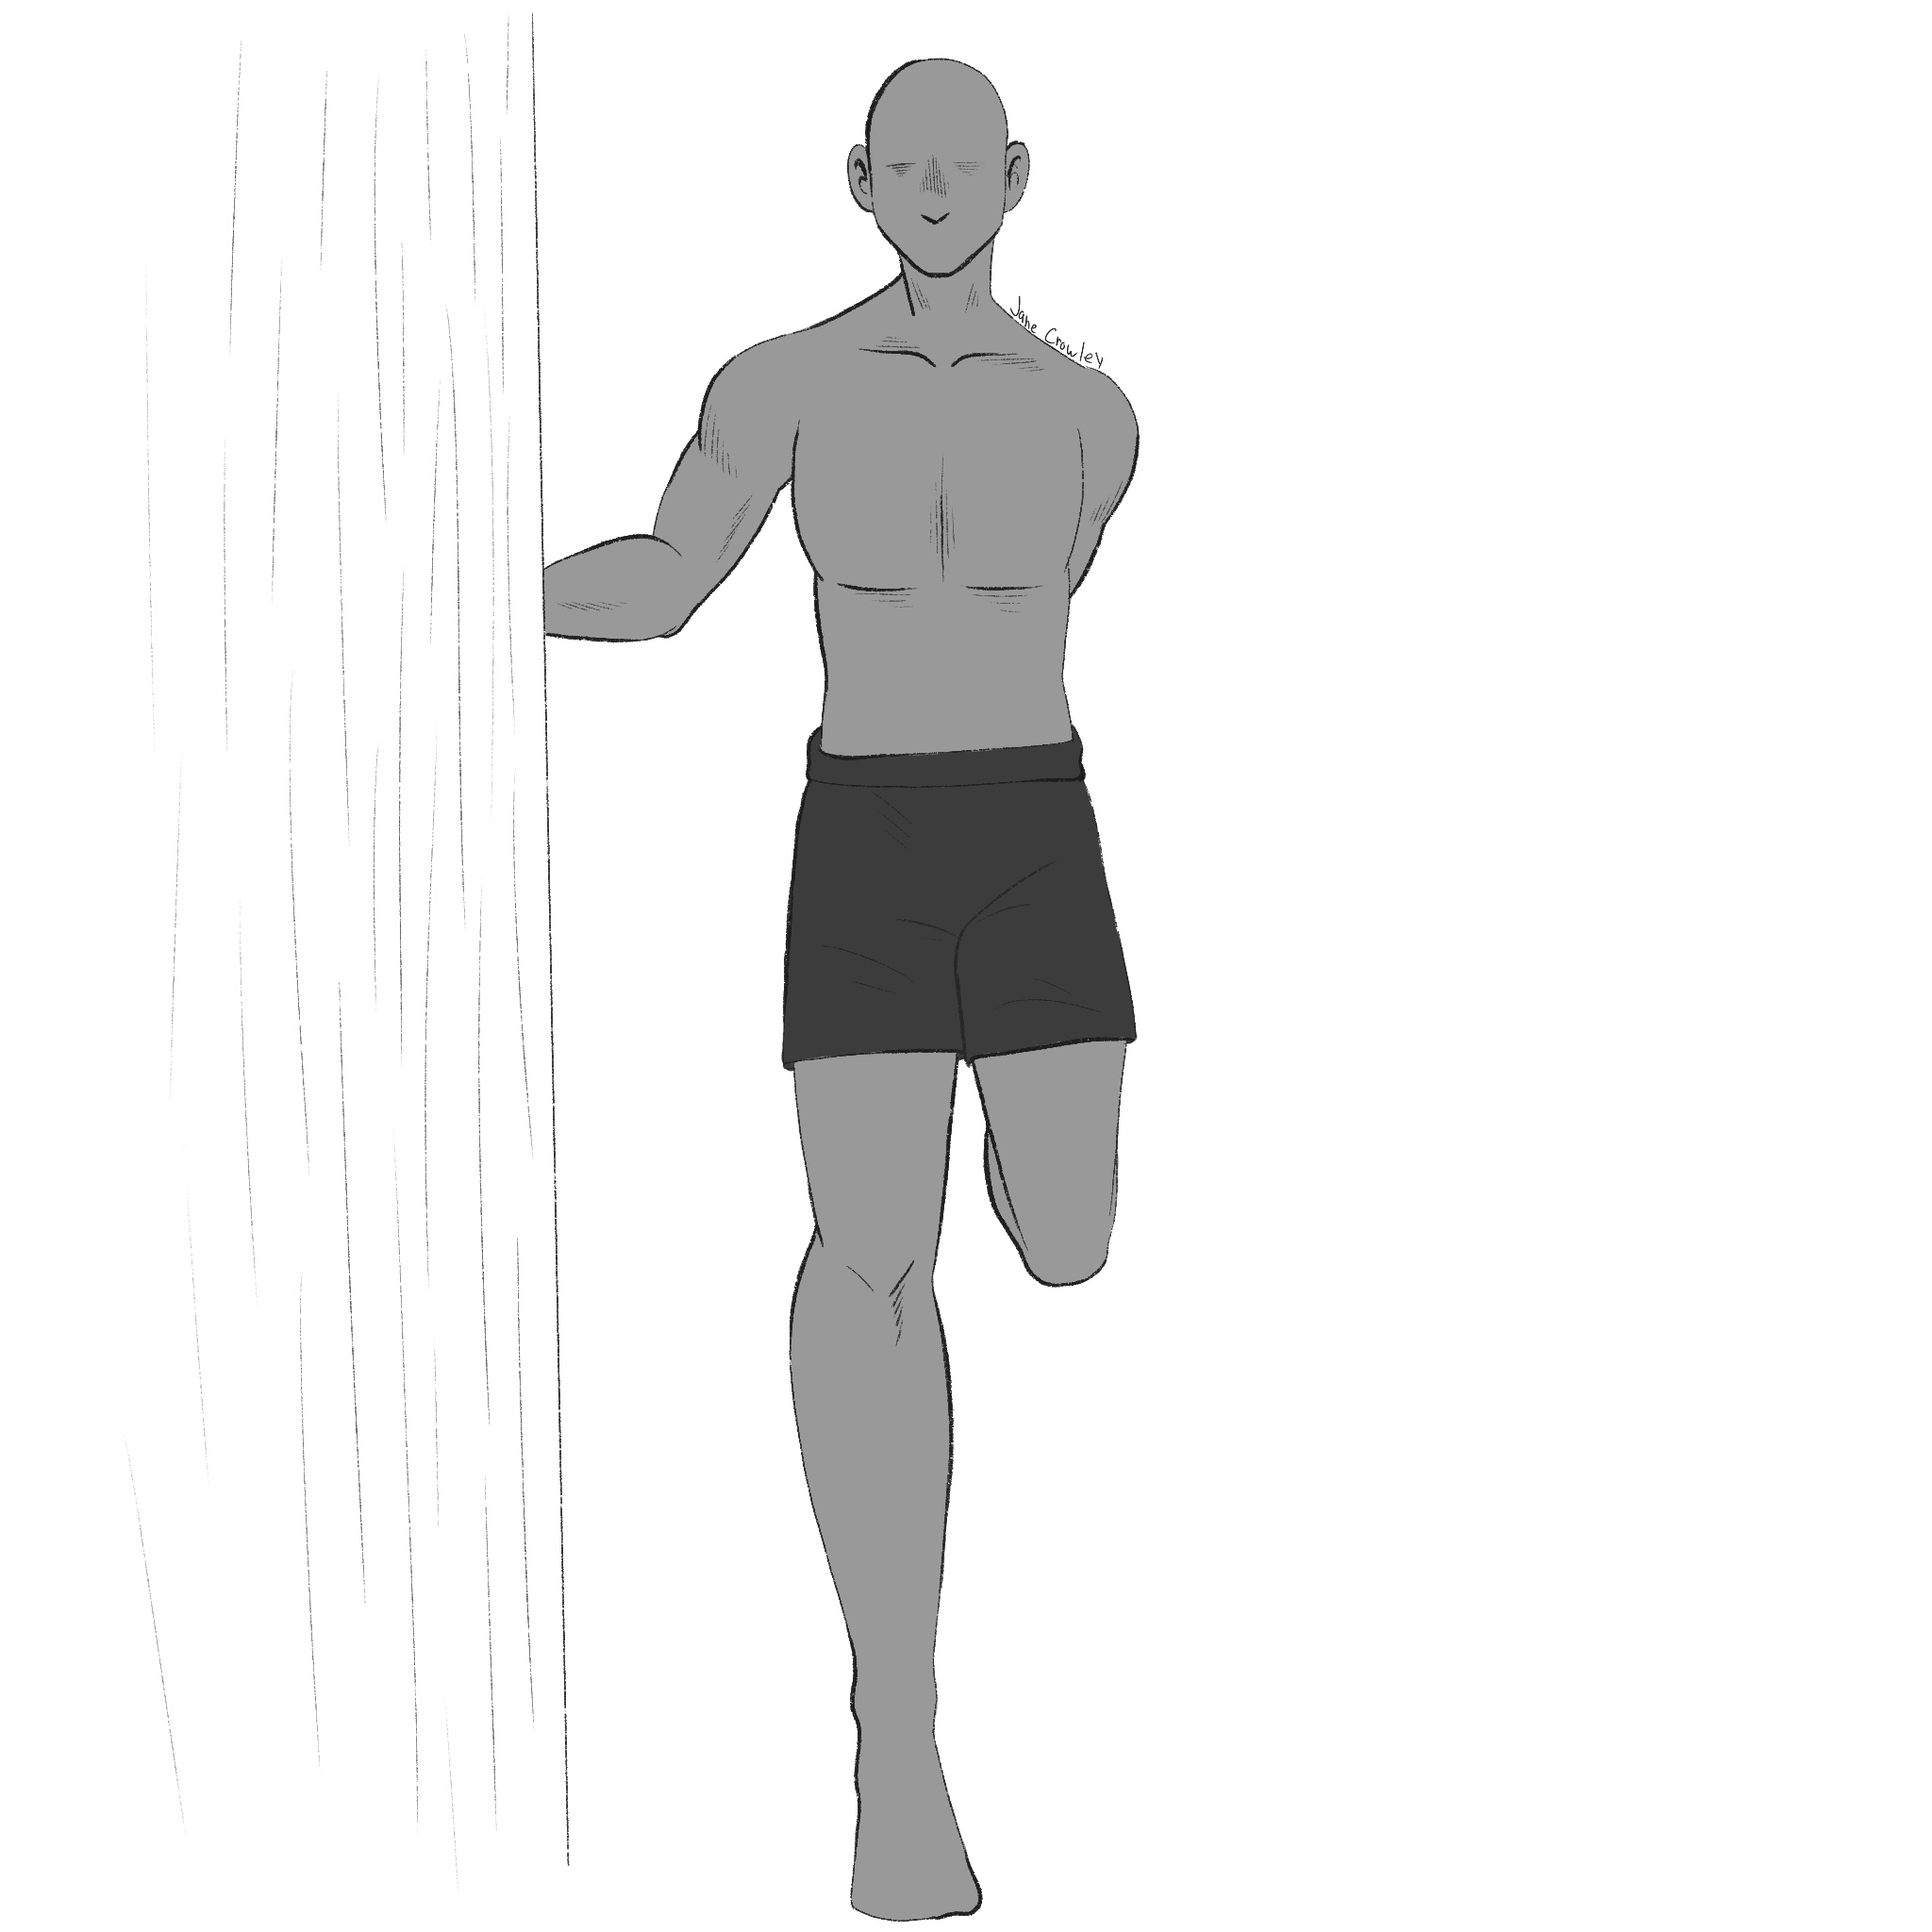
Calf Stretch on Stair
Stand with both feet on a stair supporting ones balance on a wall or rail.Slide one foot back until the hind 3/4 of the foot is off the stair and the ballmount of the foot remains on the stair with the other foot.
Keeping the knee (of the leg being stretched) strainght gently reach that heel down below the level of the stair to the desired degree of stretch in the calf.
Hold this stretch for 5-10 breaths then repeat on the other side.
Note:to shift the stretch down into the lower calf/achilles region bend the knee of the stretched leg — be CAREFUL not to overload/over stretch the achilles tendon
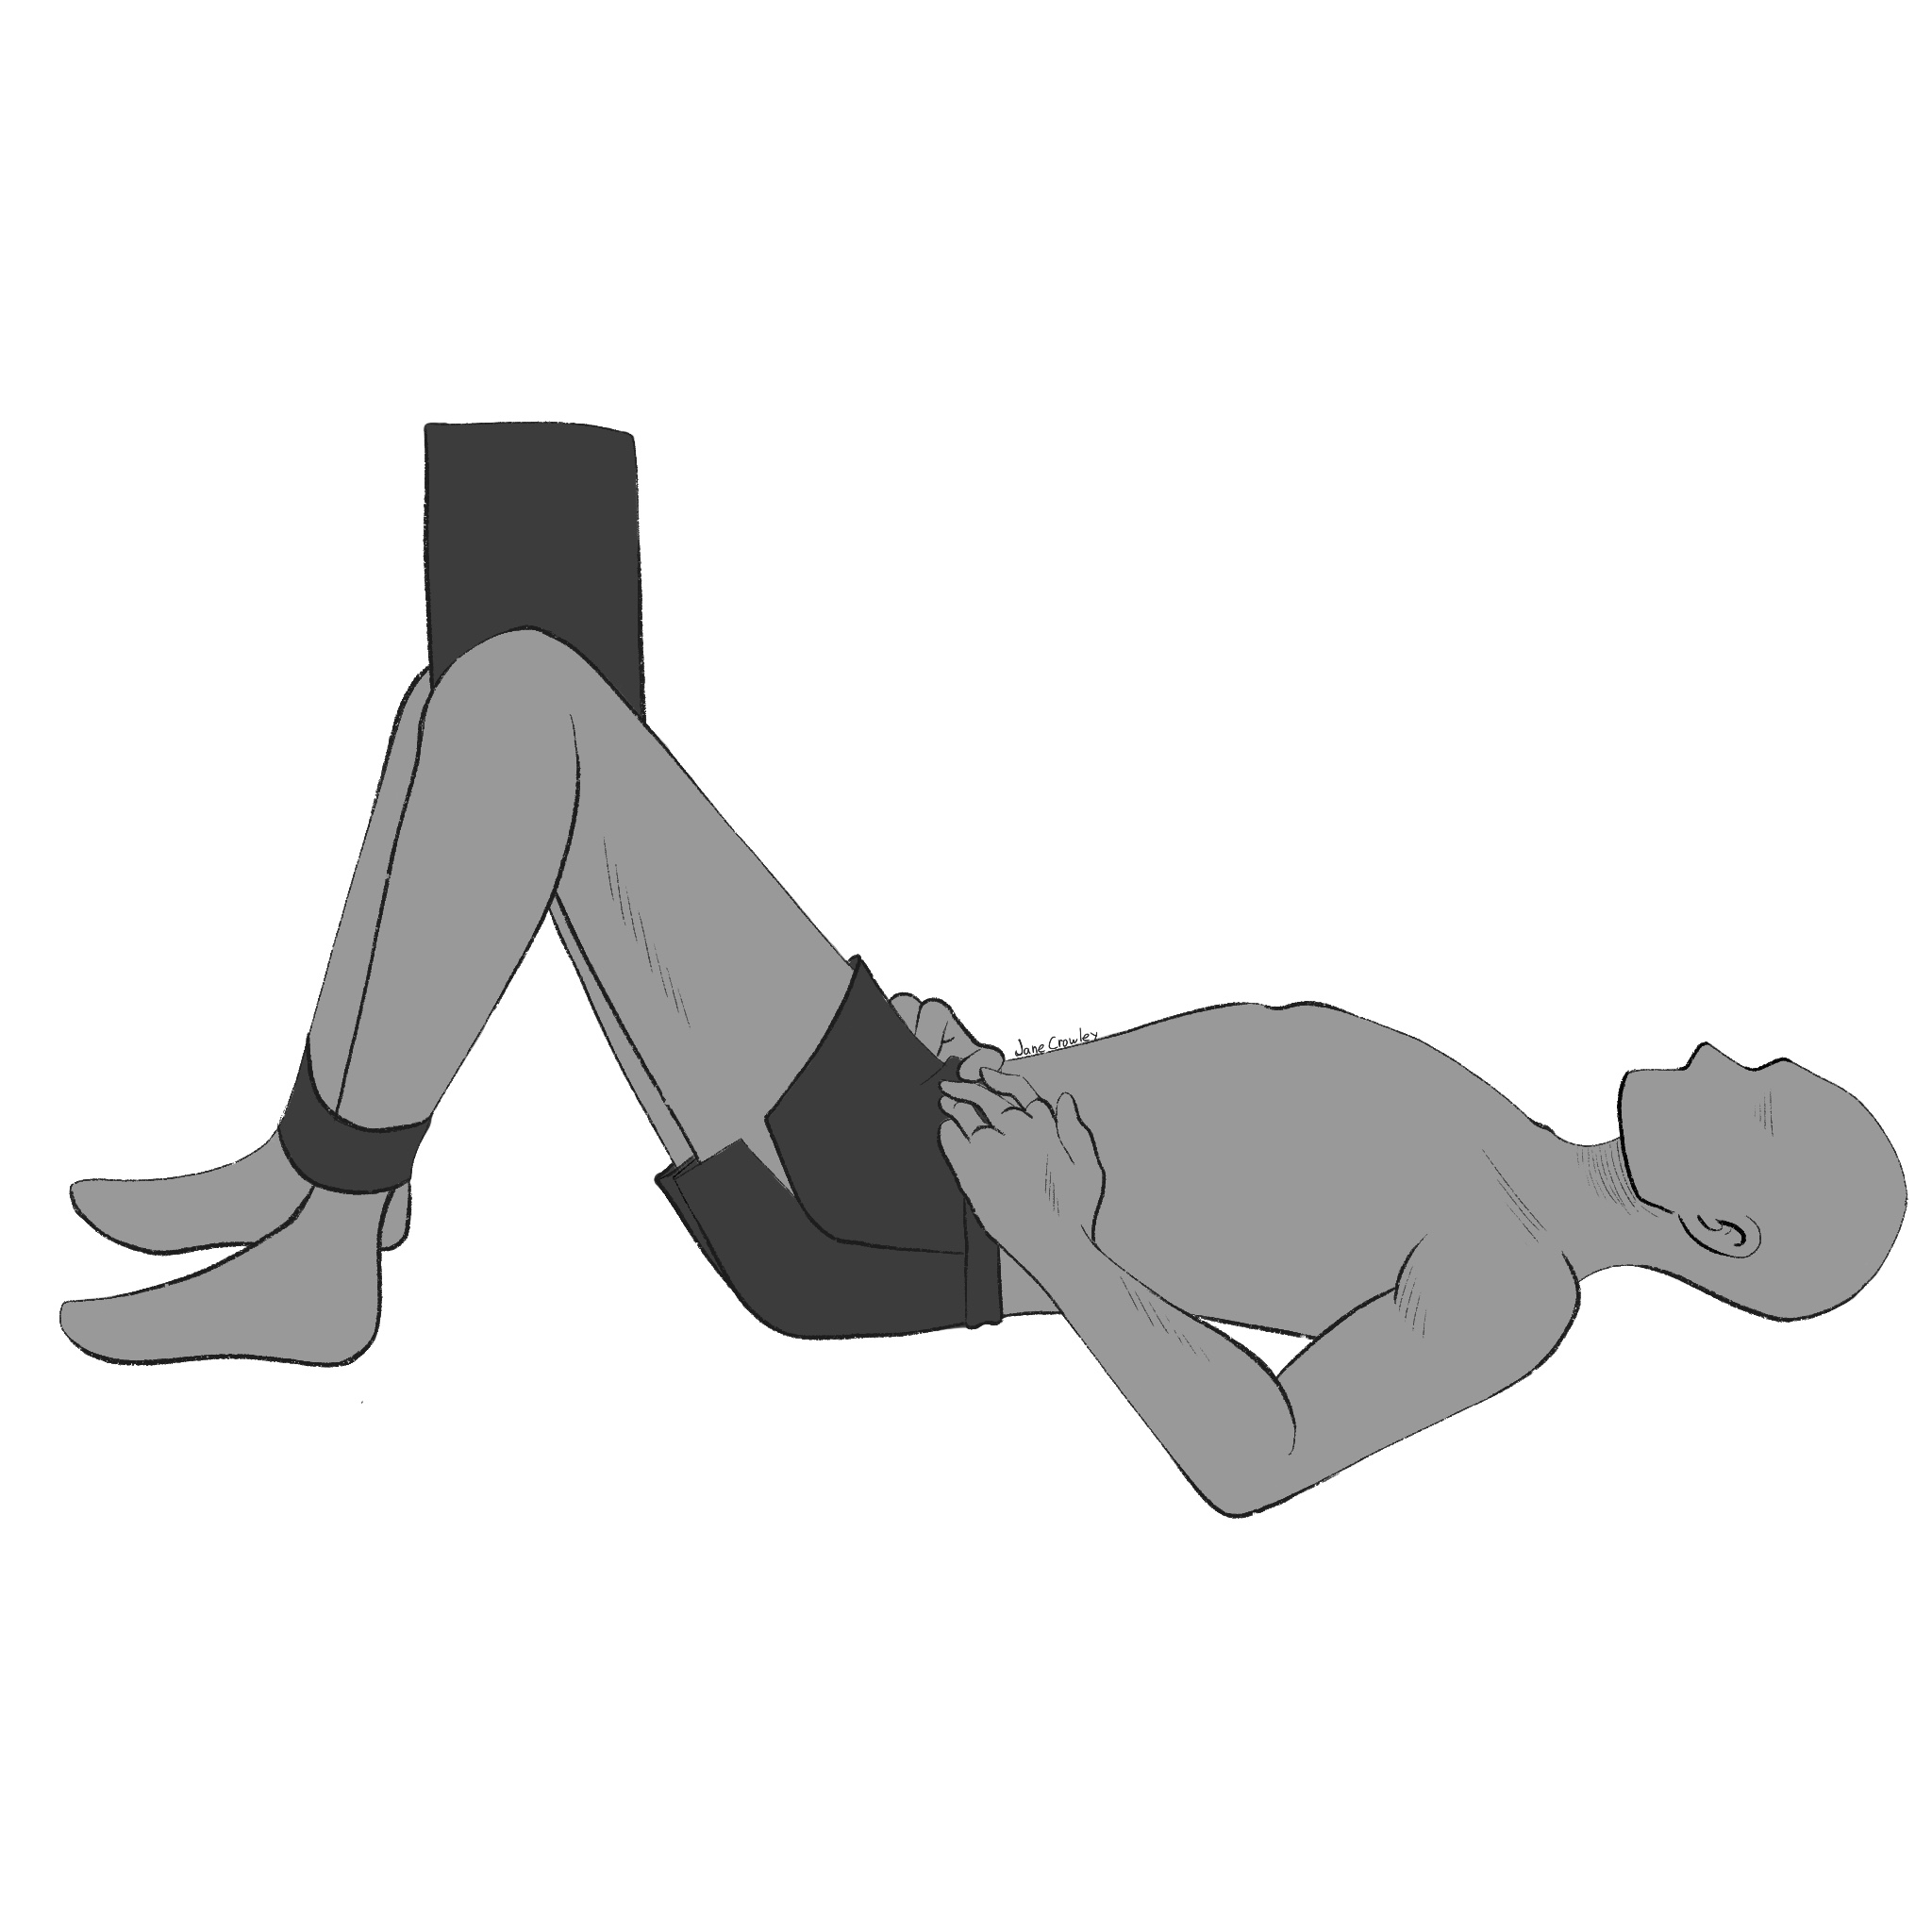
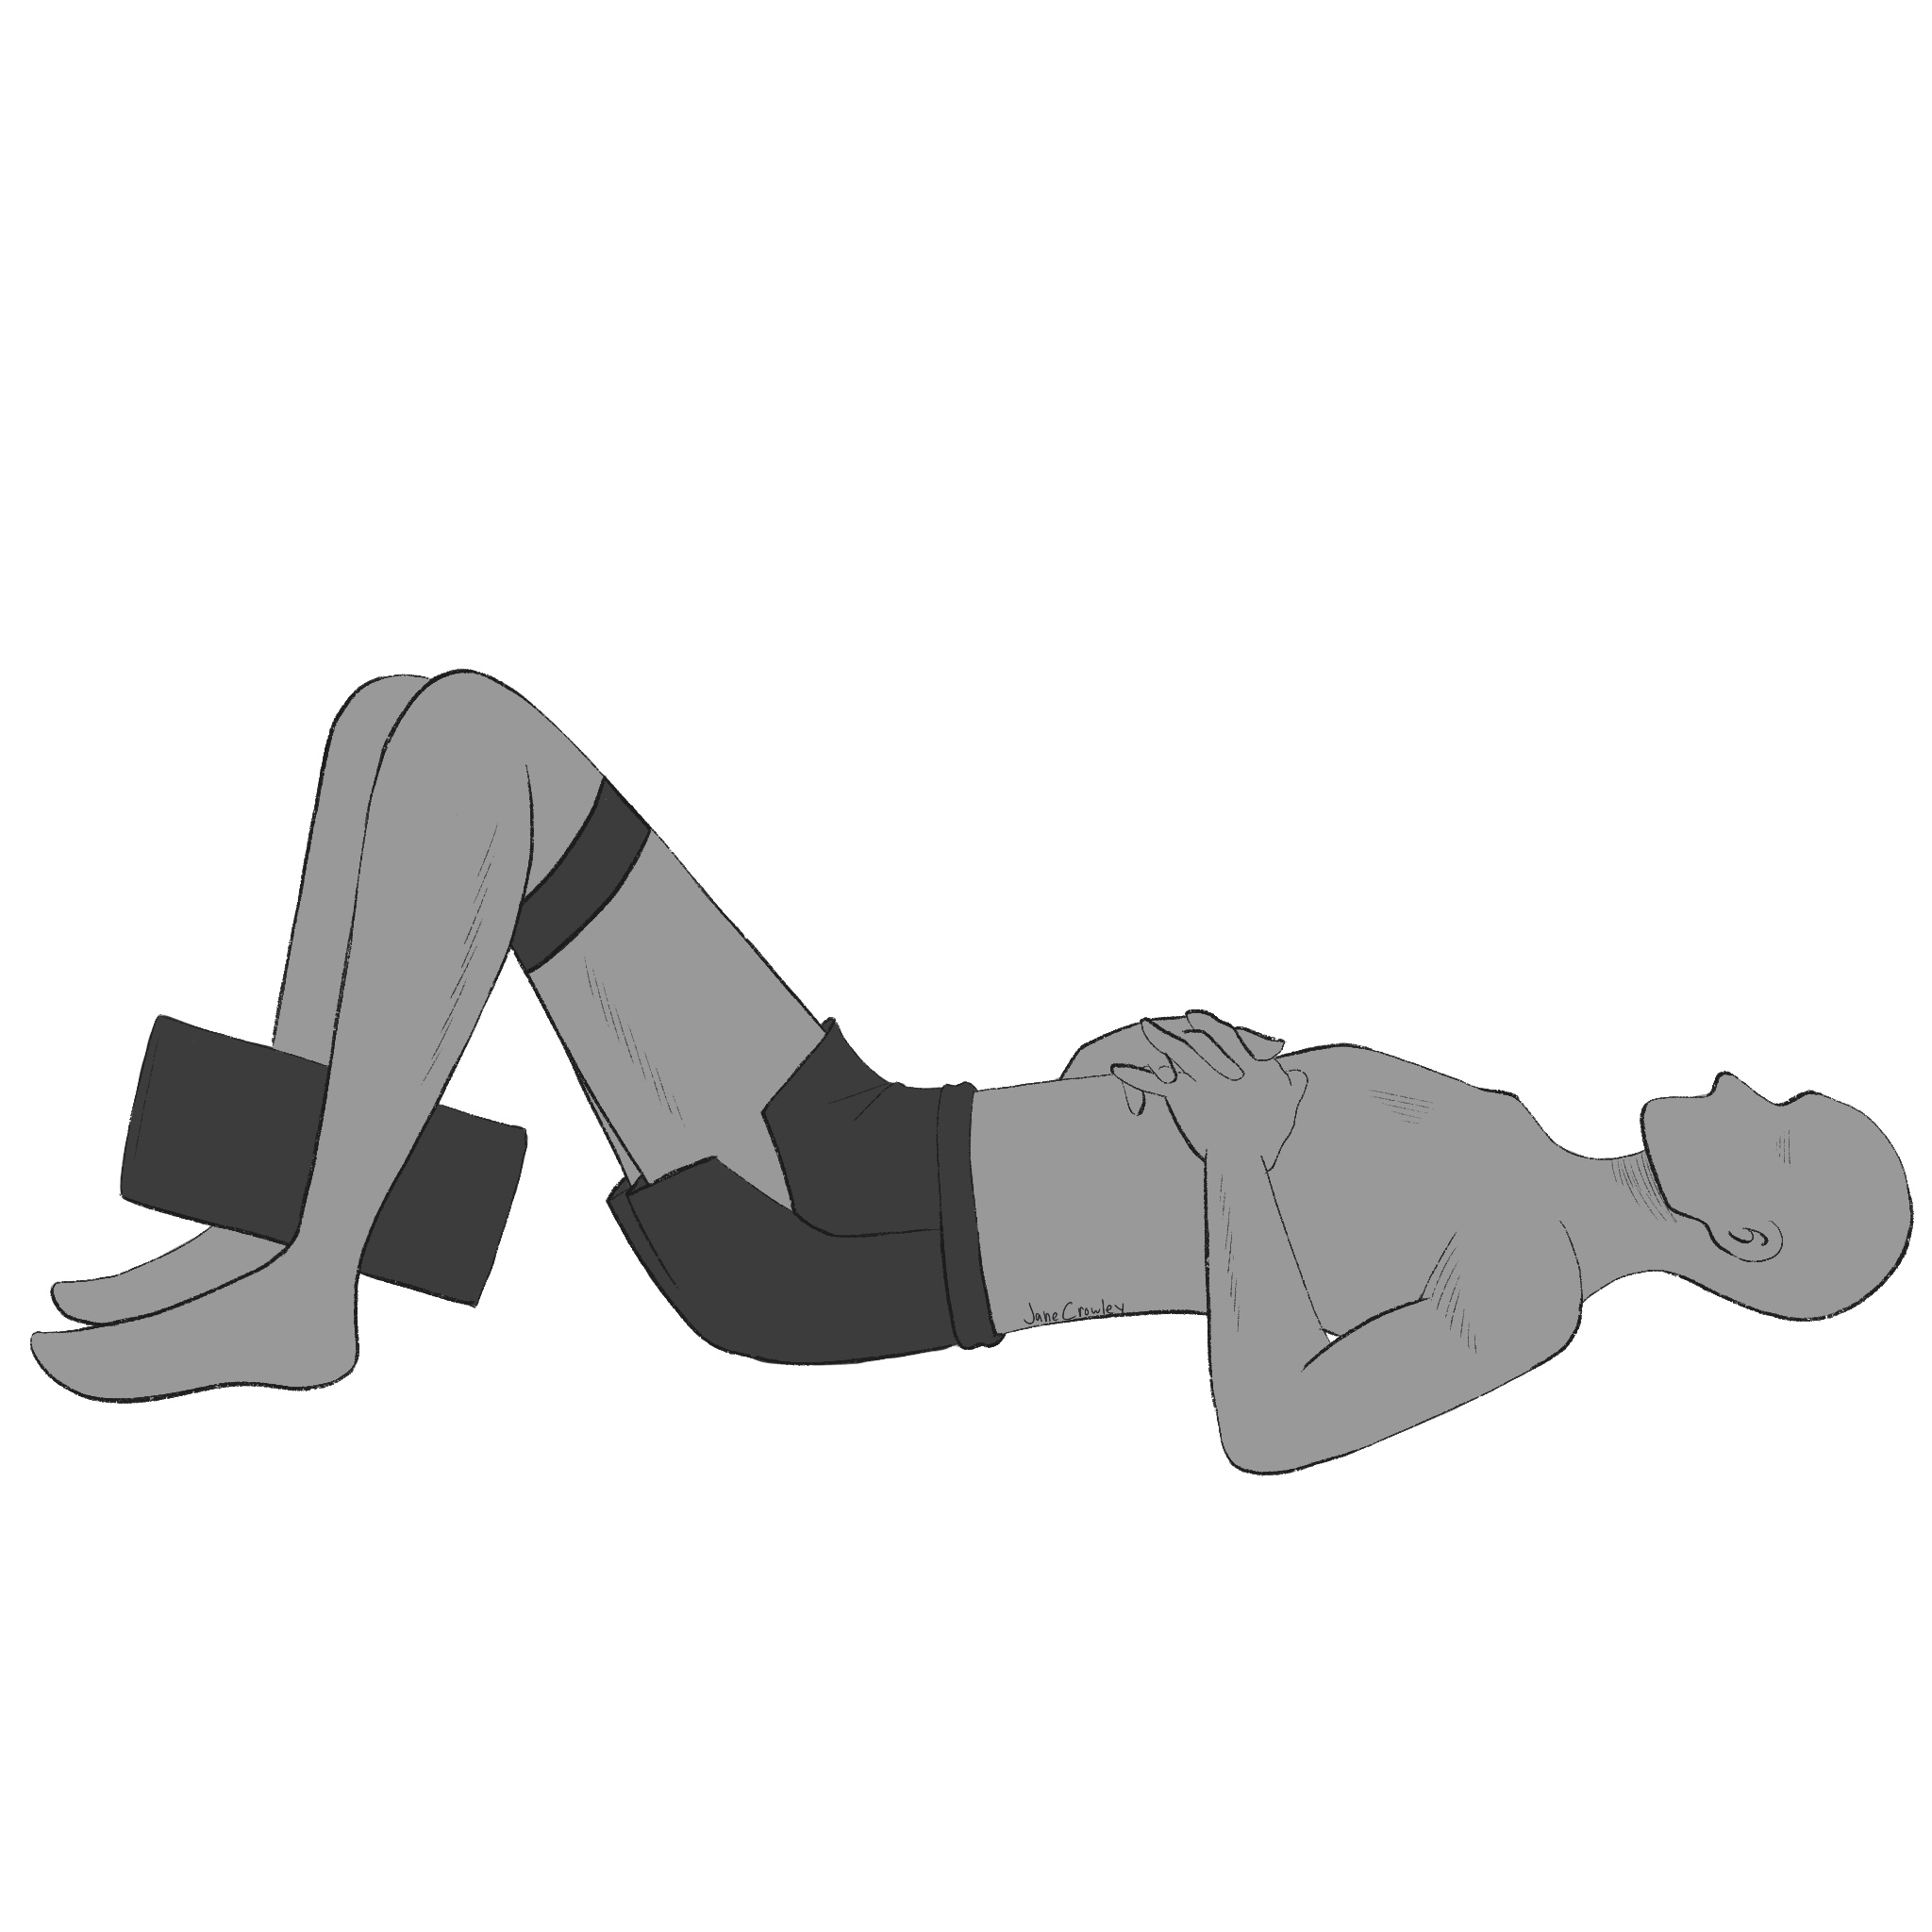
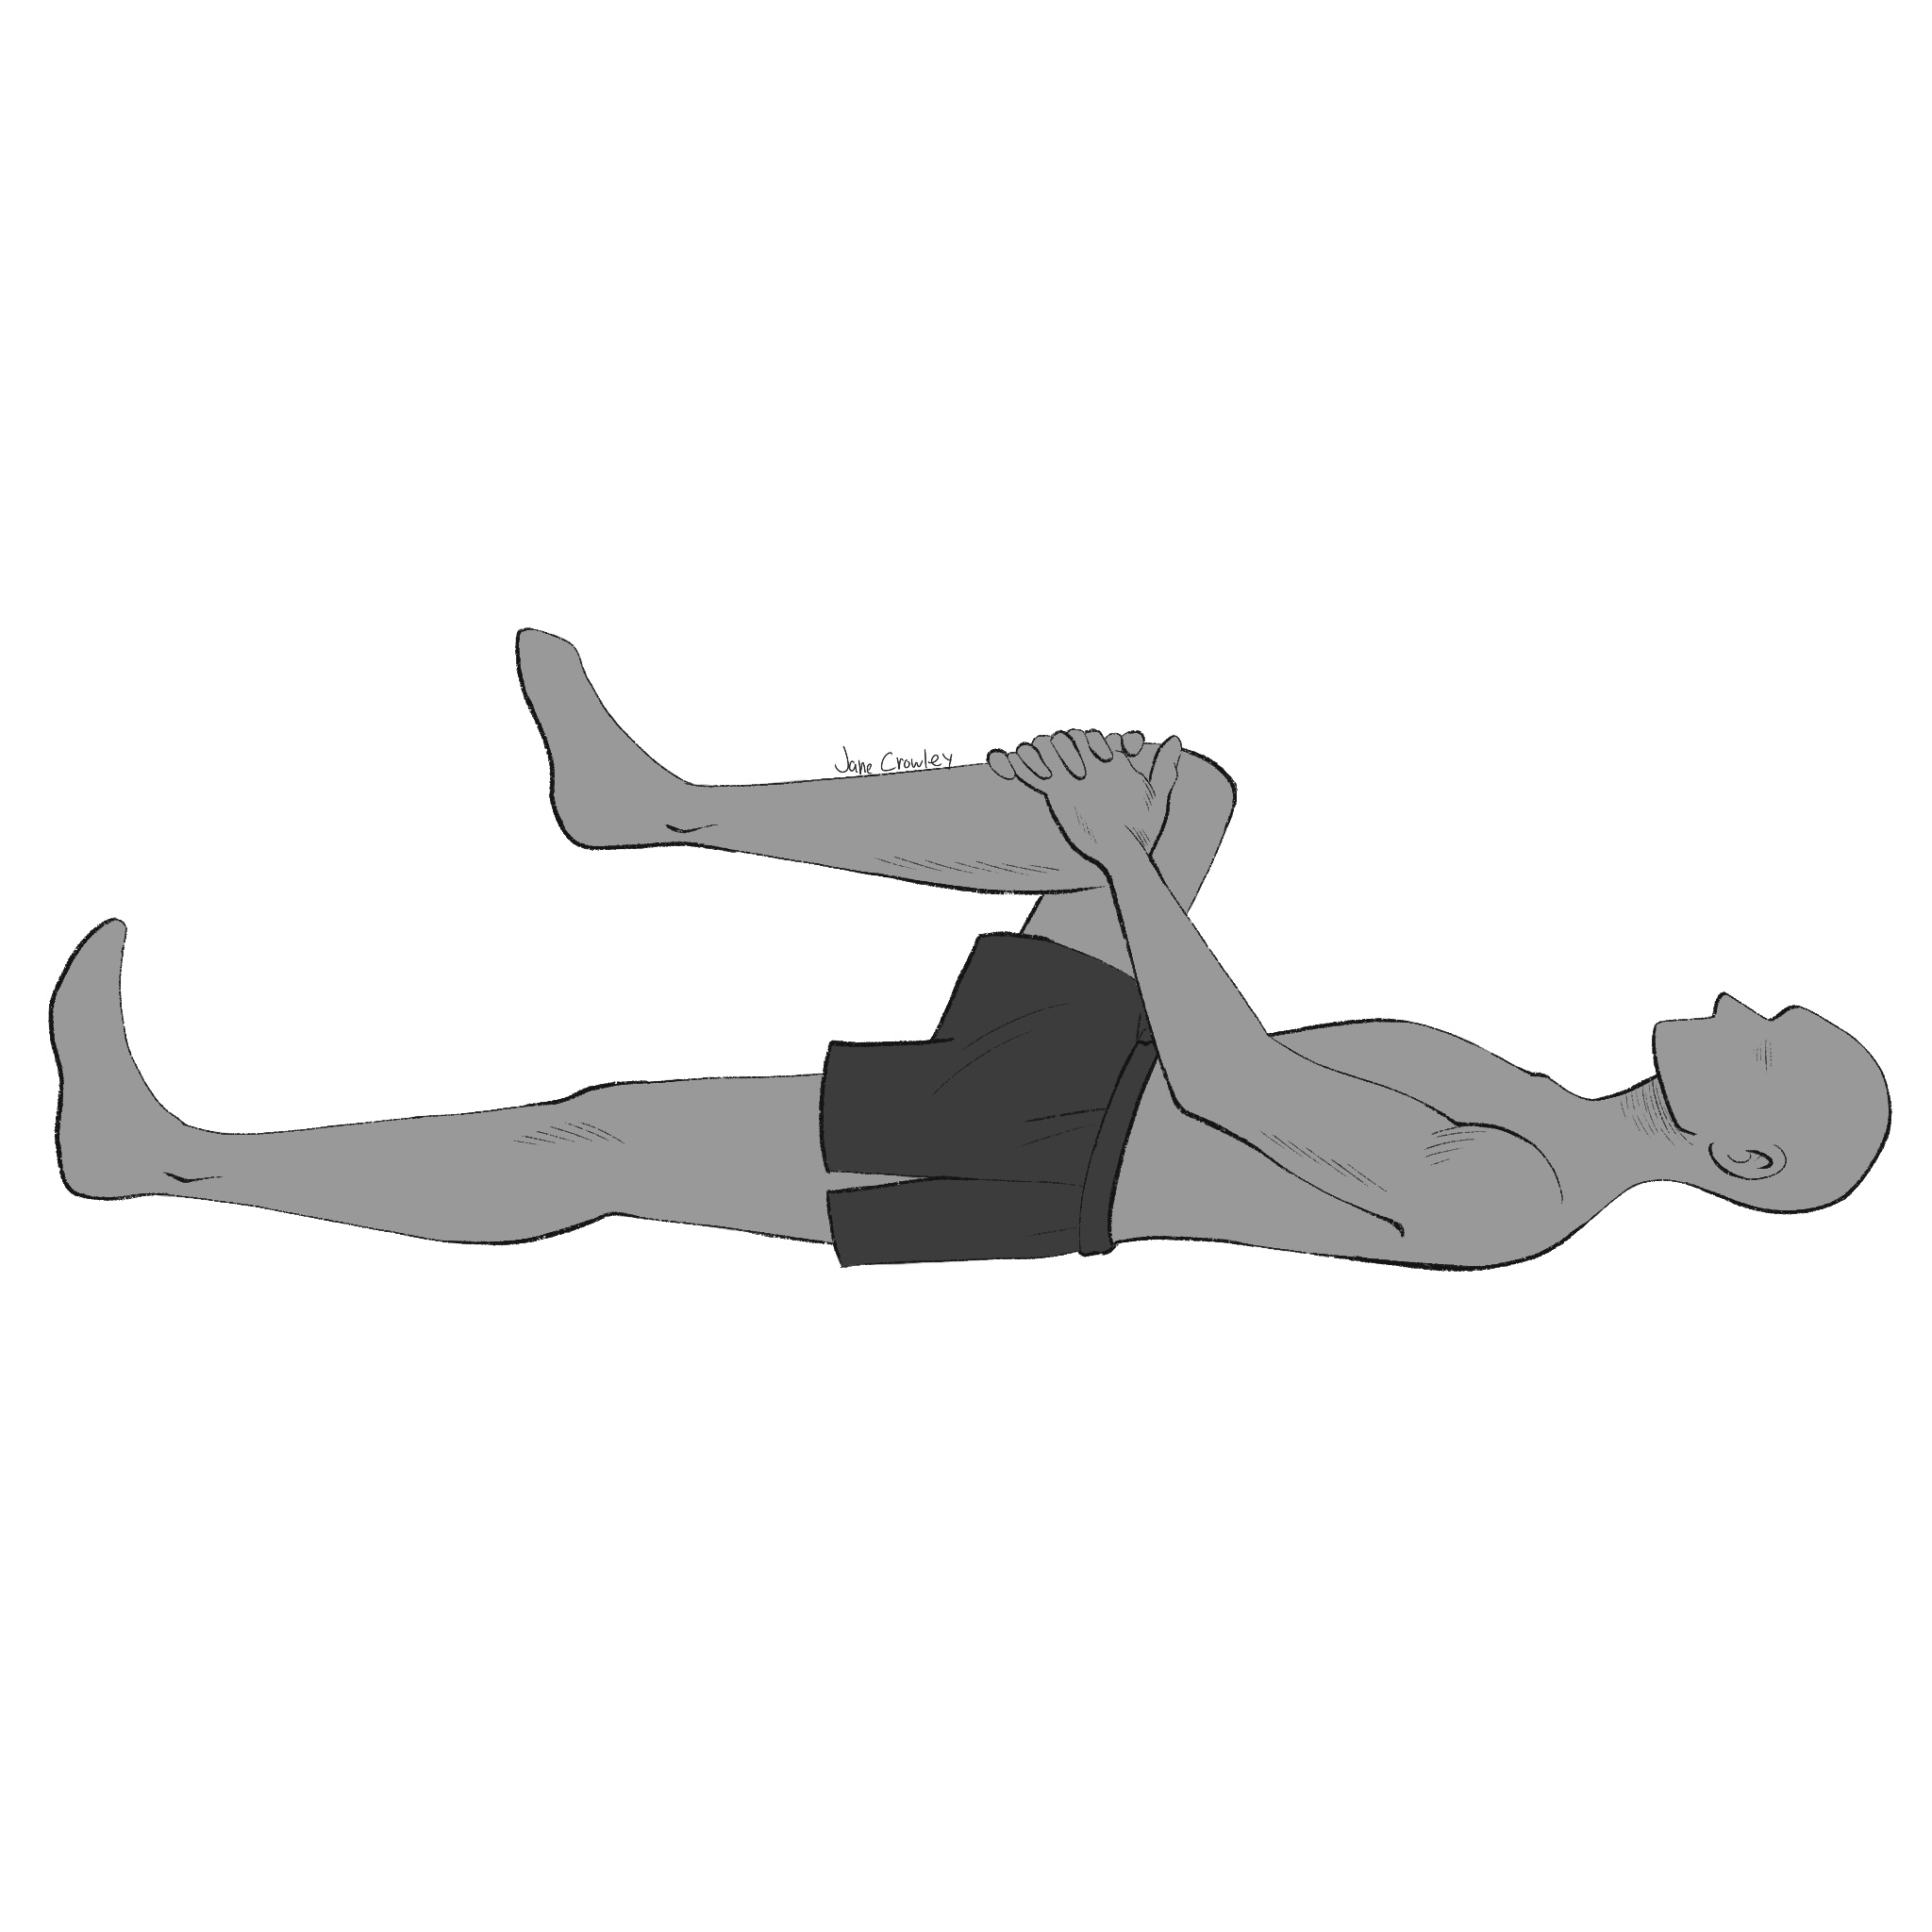
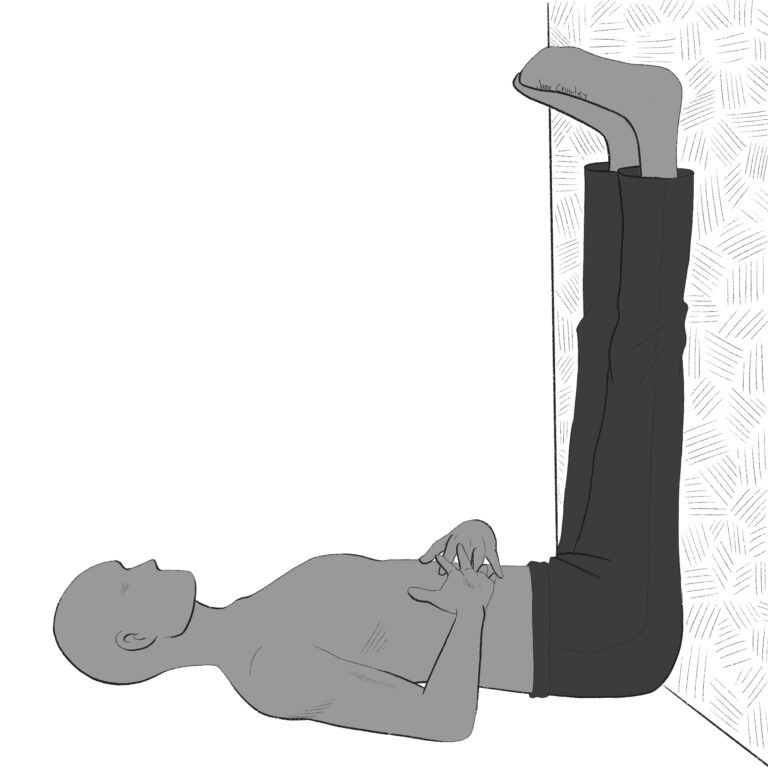
Pelvic Balance
Lay on back with knees bent and soles of feet on the floor. Set a loop in a yoga strap or belt (non elastic) and place around the ankles so that the ankles are approximately at hips width. Place a foam roller or yoga block between the knees. Hold the pelvis in a neutral or slightly tucked position with the low back flattened into the floor. Press the ankles outward against the strap while squeezing the knees inward against the prop. Maintain these dynamics while taking 5 long slow breaths (fig.1).
Switch the position of the strap and the foam roller/yoga block and again push out against the strap while squeezing on the firm prop while taking 5 long slow breaths (fig.2).
Lay on back and bend the knee on the side of the anteriorly rotated hemi-pelvis (as designated by osteopath) toward the chest. Holding the bent knee with both hands (or with the hands holding the thigh behind the knee) press the knee toward the feet matching the resistance of the arms (creating an isometric contraction). Maintain this dynamic for 5 long slow breaths. Rest a few breaths then repeat for another 5 breaths (fig. 3). DO THIS 3rd STAGE ON ONLY ONE SIDE — in order to bring the pelvis into balance.
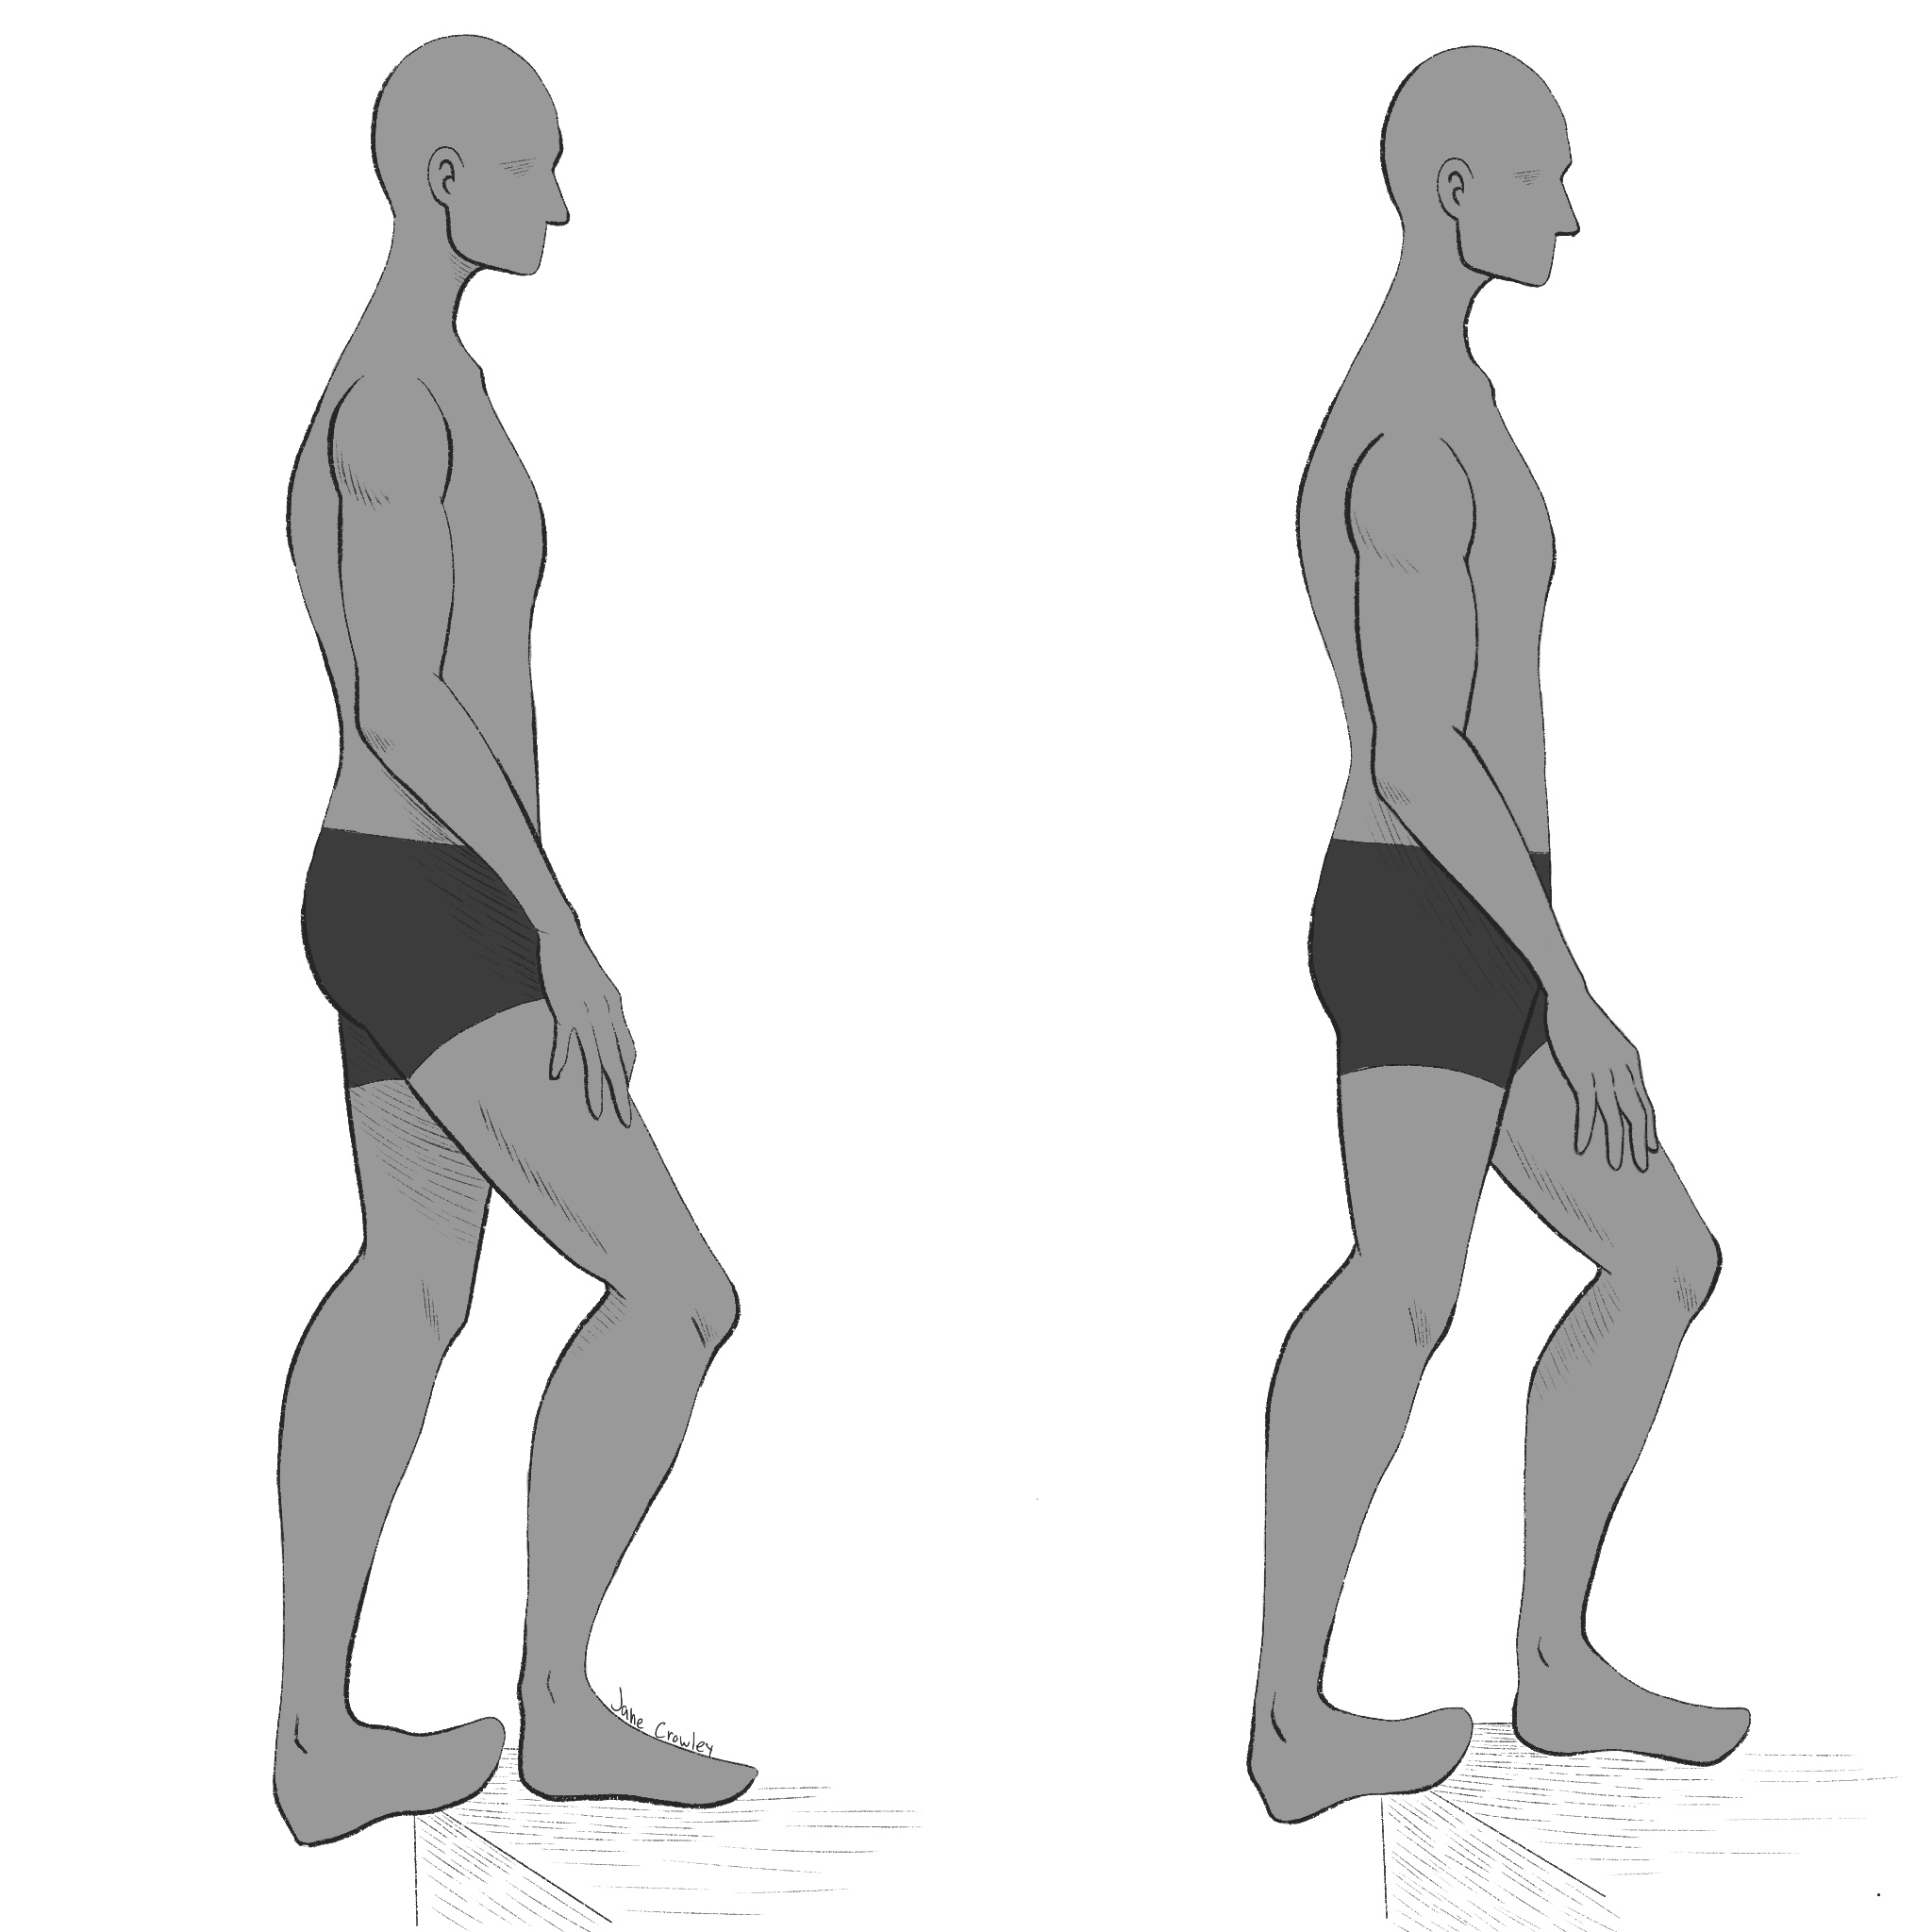
Kneeling Quad and Hip Flexor Stretch
Take a kneeling position with one knee resting on a pad or mat and the other knee up with the sole of the foot grounded.If able take one or both hands back to hold the foot of the kneeling leg in the hands.Alternatively, one can set up this stretch near a wall with the hind foot resting against the wall the then resting the hands on the forward knee.
Keeping the shoulders above the pelvis, gently tuck the pelvis/tailbone under and forward toward the lead knee until reaching the desired tension/stretch in the hip flexor (front of hip region) and thigh of the kneeling leg.Hold posture for 5-10 long slow breaths.
Repeat on the other side.
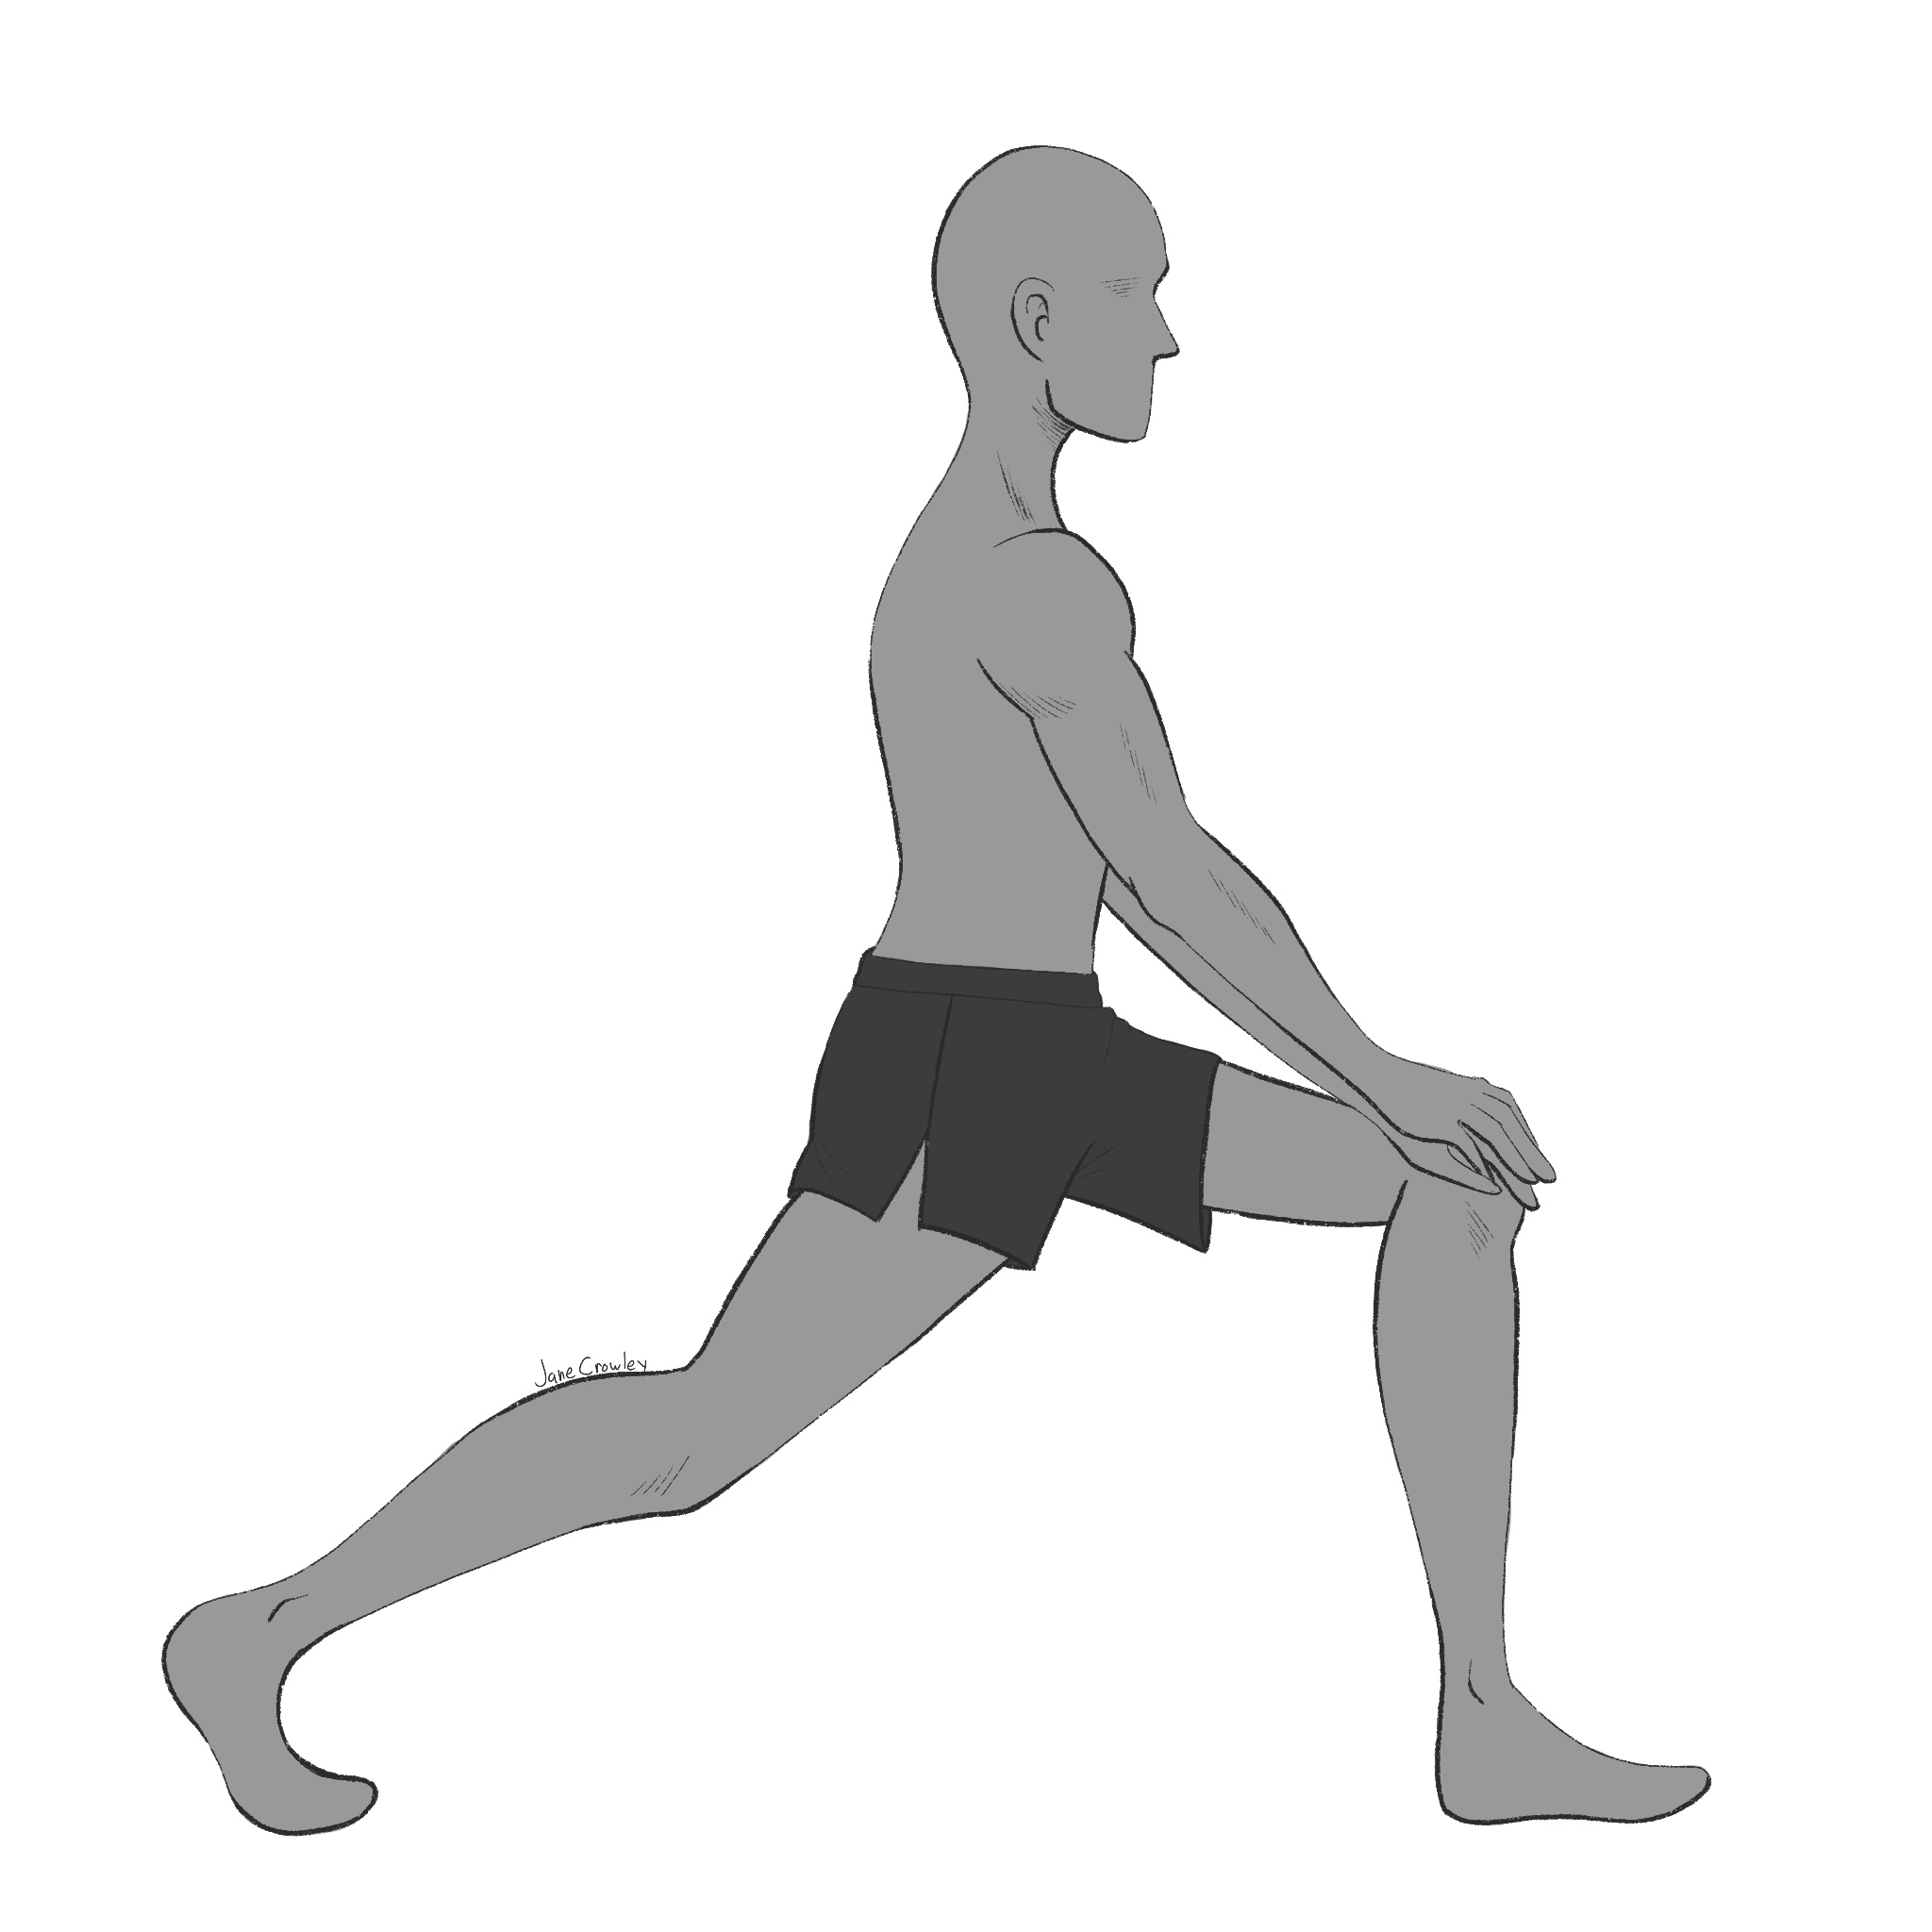
Lunging Hip Flexor Stretch
Stand in a lunge posture with the front knee directly above its ankle and the rear leg reaching back through the heel with knee approximating full extension (straightening as far as is comfortable).
Keeping the shoulders above the pelvis, gently tuck the pelvis/tailbone under and forward toward the lead knee until reaching the desired tension/stretch in the hip flexor (front of the hip region). Hold posture for 5-10 long slow breaths.
Repeat on the other side.
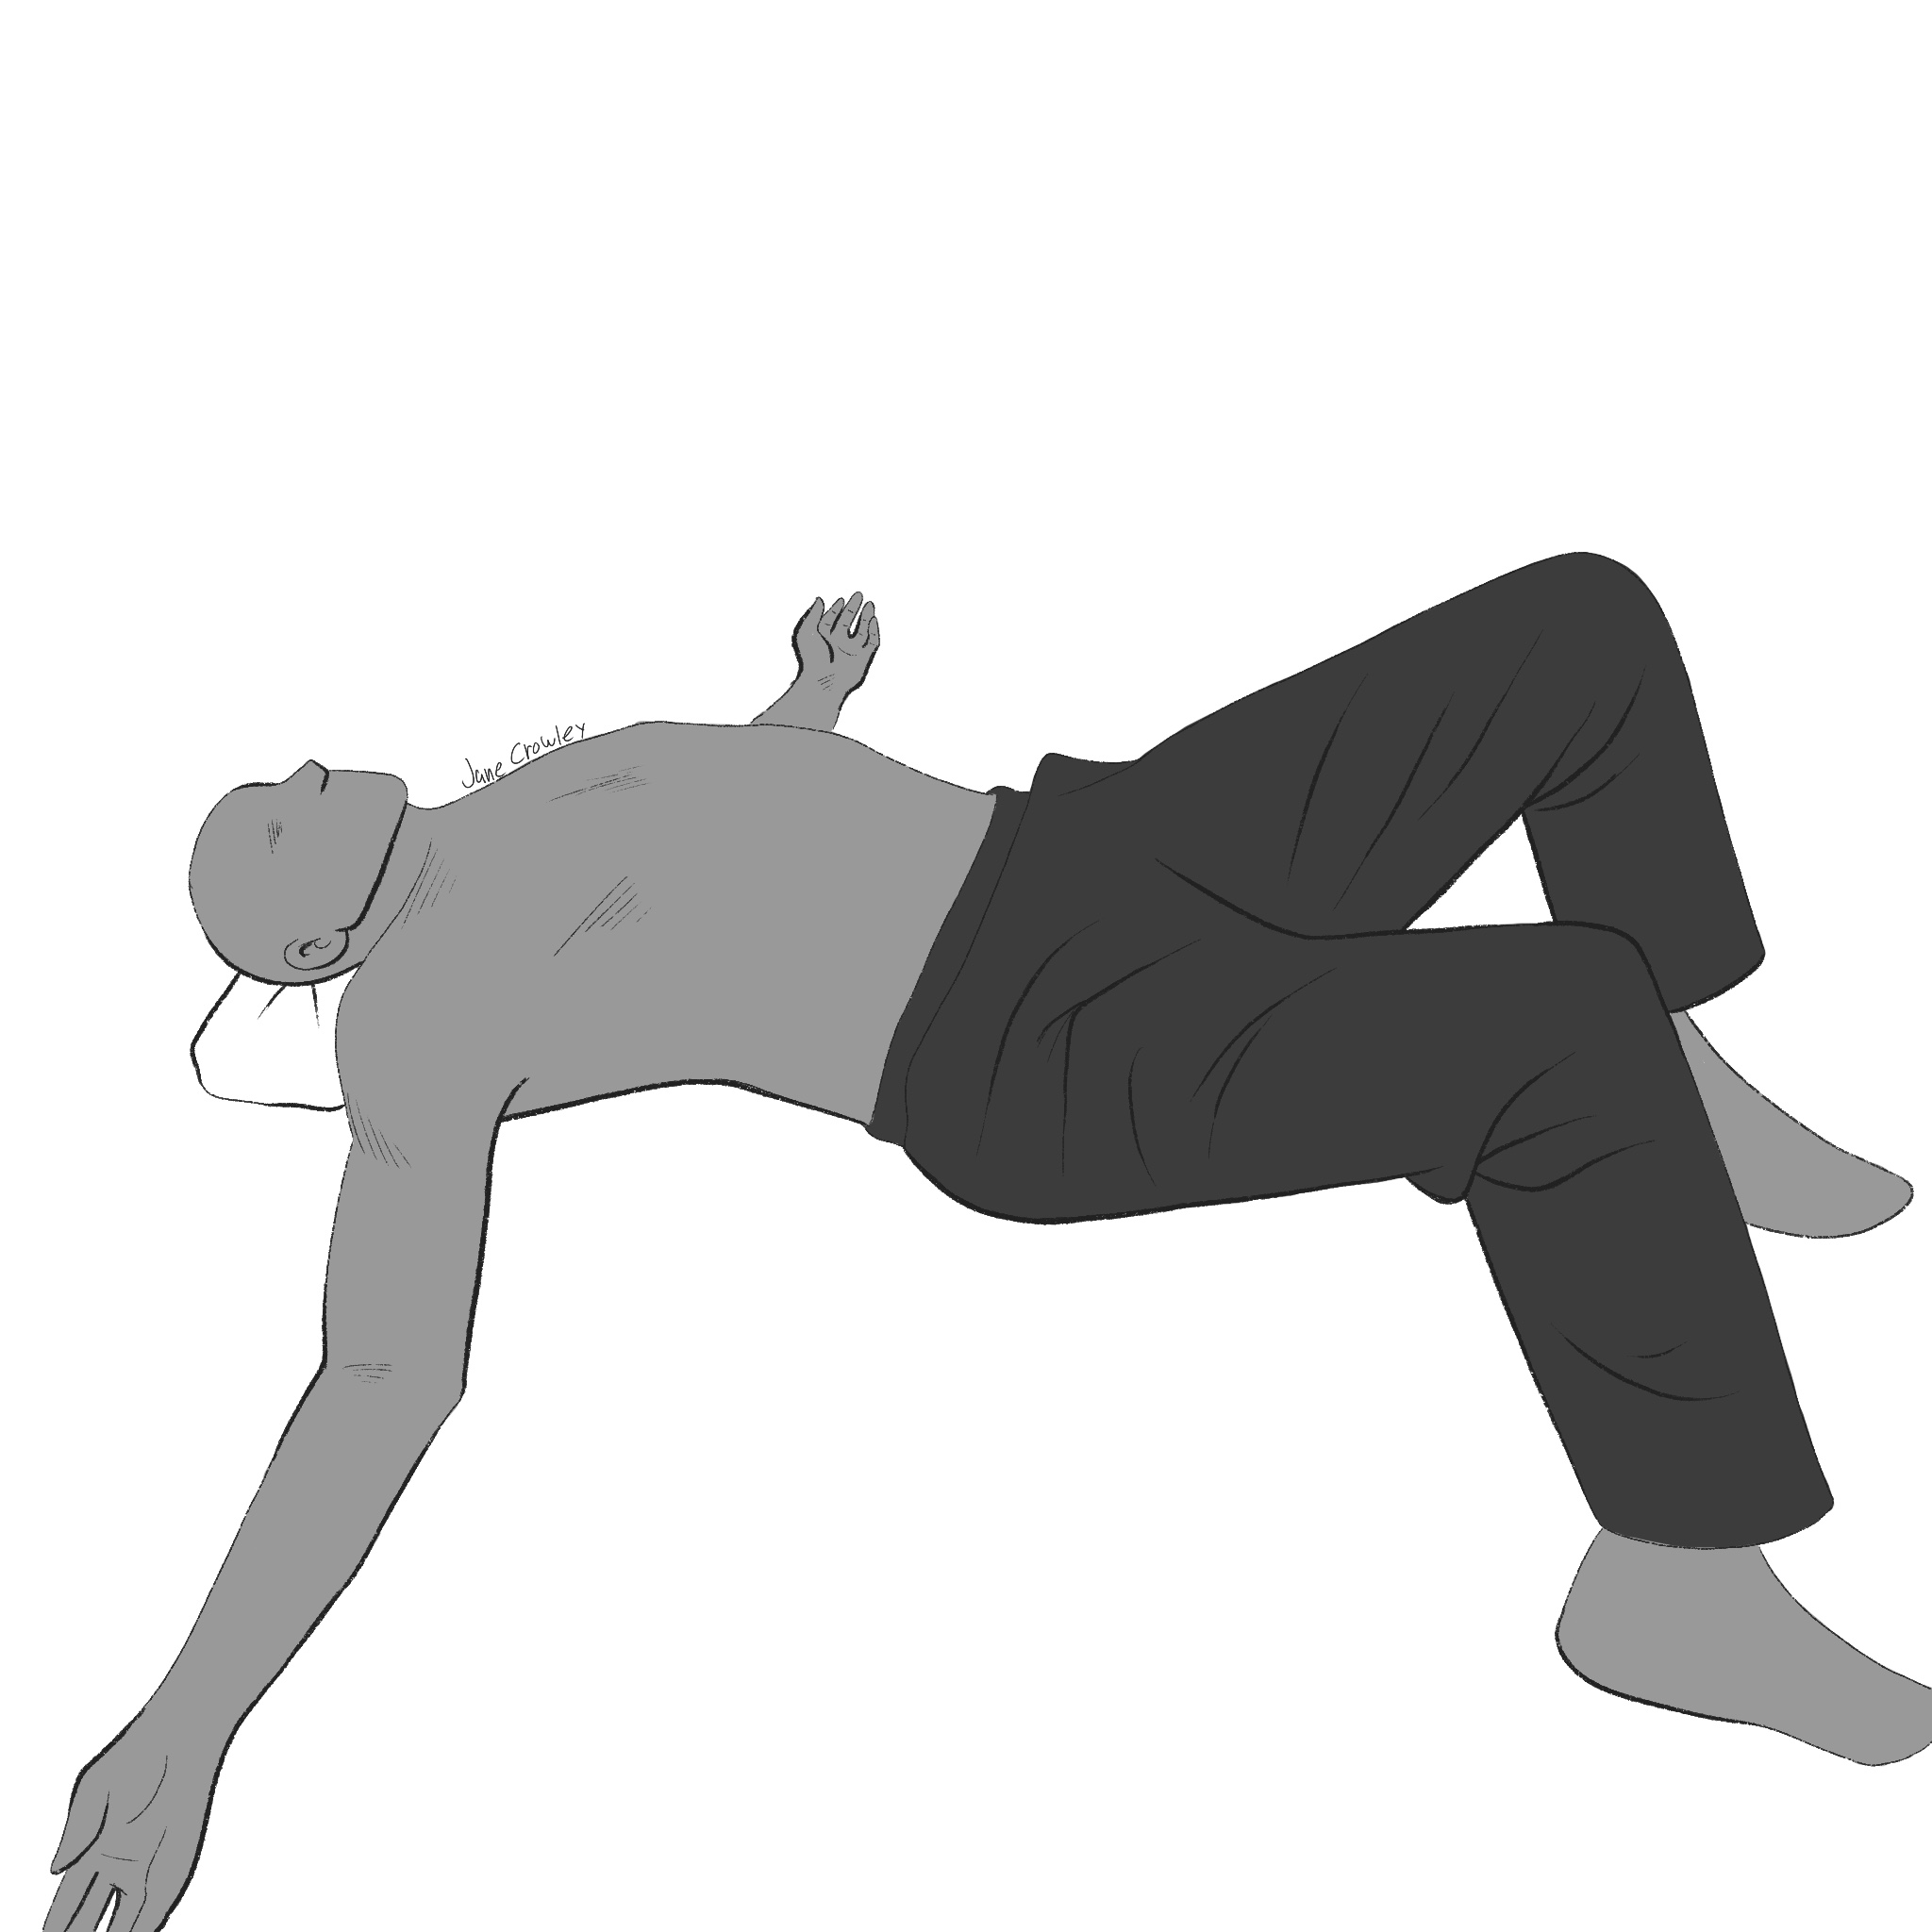
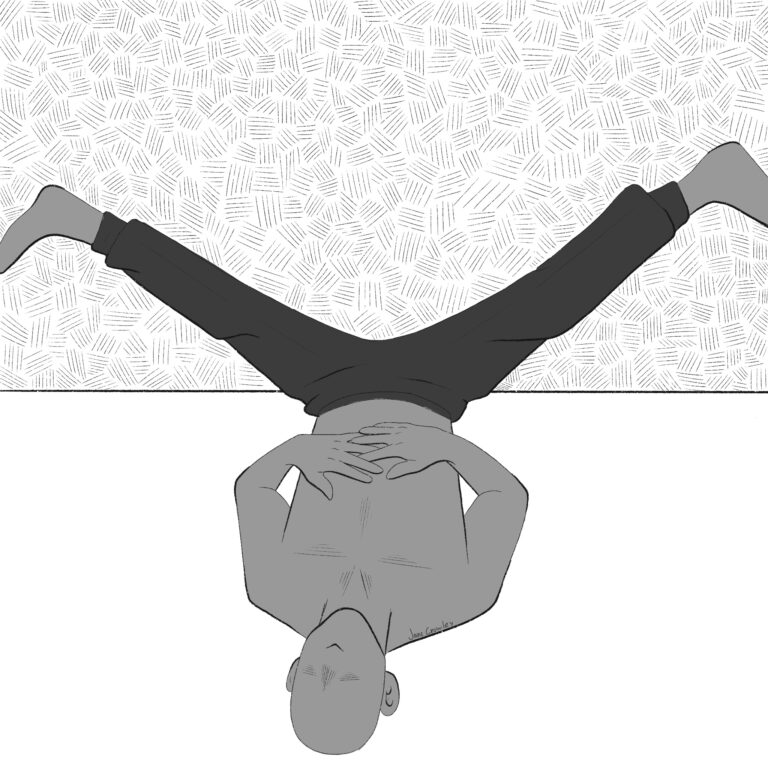
Supine Legs Up Wall/Straight Knees
Lie on the floor with your buttocks as close to the wall as you can comfortably with your knees in full extension, straight up the wall.(You may find it helpful to enter this position by first lying on your side, scooting your buttocks toward the wall, then extending the legs up the wall as you roll onto your back).
Allow your entire torso, neck and head to relax into the floor.Keeping your knees straight allow the weight of your legs to sink down toward the hips, relaxing the hips, pelvis and lumbar region.
Take long slow breaths and relax here for several minutes to 10 minutes.You might proceed to the other Supine Legs Up Wall postures from here.
Supine Legs Up Wall/Squat
Enter this posture from Supine Legs Up Wall – Straight Knees (fig. 1).
Bend the knees and slide the feet down the wall and place the feet at hips’ width.
Allow this posture to stretch the hip and pelvic region.
Relax here for at least 10 long slow breaths.
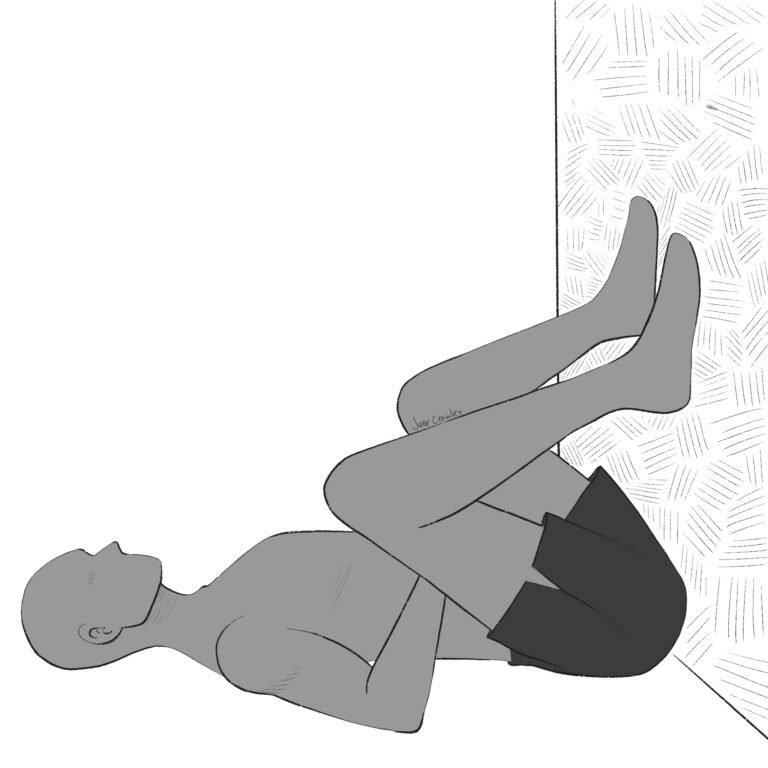
Supine Legs Up Wall/Butterfly
Enter this posture from Supine Legs Up Wall (fig. 1 or 2).
Bring the feet together and externally rotate both hips separating the knees and bring the soles of the feet together.
Allow the knees to approximate the wall (perhaps with gentle pressure from the hands).
Relax here for at least 10 long slow breaths.
Supine Legs Up Wall/Spread
Enter this posture from any of the Supine Legs Up Wall postures (figs. 1-3).
Lie on the floor with your buttocks as close to the wall as you can comfortably with your knees in full extension, straight up the wall.
Slide the legs apart slowly allowing gravity to pull the length of the entire legtoward toward the floor.Allow your entire torso, neck and head to relax into the floor.Keeping your knees straight allow the spreading of your legs to gradually open the hips and inner thigh region.
Remain for at least 10 long slow breaths.
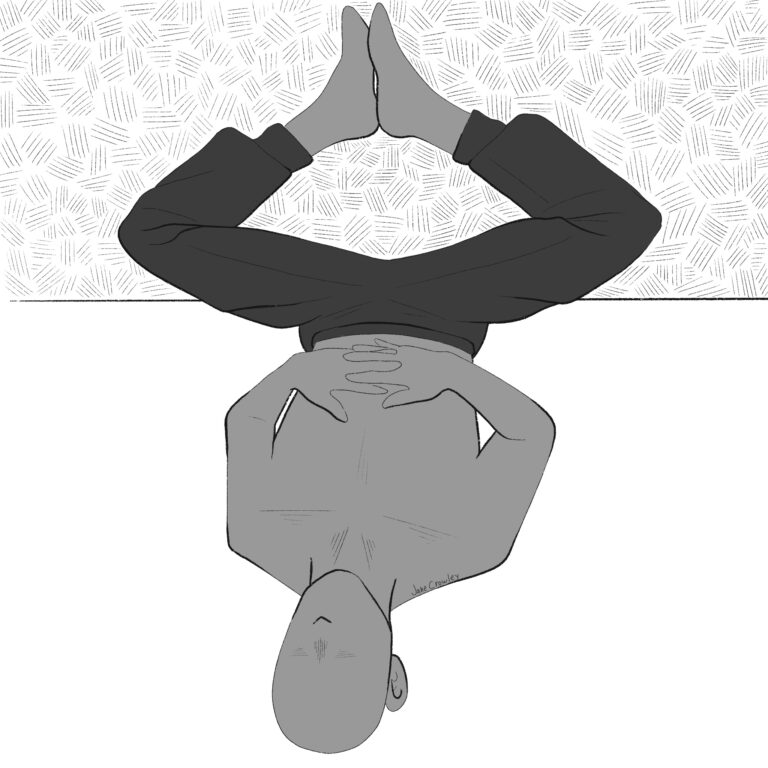
Seated Figure “4”
Seated, cross one ankle over the opposite thigh.Place your hands on the knee of the top leg and reach your nose toward your toes.
Maintain this posture for 5-10 long slow breaths.
Switch legs and perform same posture to the other side.
You can also enter a similar posture as a part of the Supine Legs Up Wall sequence or by lying on the floor with knees bent (as in Bridge starting position). Then set up the Figure “4” from this supine position.